


Apache Beamプログラミングガイド
**Beamプログラミングガイド**は、Beam SDKを使用してデータ処理パイプラインを作成したいBeamユーザーを対象としています。Beam SDKクラスを使用してパイプラインを構築およびテストするためのガイダンスを提供します。このプログラミングガイドは、網羅的なリファレンスではなく、Beamパイプラインをプログラムで構築するための言語に依存しない、高レベルのガイドとして意図されています。プログラミングガイドが充実するにつれて、テキストには複数の言語によるコードサンプルが含まれ、パイプラインでBeamの概念を実装する方法を示します。
プログラミングガイドを読む前に、Beamの基本概念の概要を知りたい場合は、Beamモデルの基本ページをご覧ください。
Python SDKは、Python 3.8、3.9、3.10、3.11、および3.12をサポートしています。
Go SDKは、Go v1.20以降をサポートしています。
Typescript SDKはNode v16以降をサポートしますが、まだ実験段階です。
YAMLはBeam 2.52からサポートされていますが、現在も開発中であり、最新のSDKの使用が推奨されます。
1. 概要
Beamを使用するには、まず、Beam SDKのいずれかのクラスを使用してドライバプログラムを作成する必要があります。ドライバプログラムは、すべての入力、変換、出力を含むパイプラインを*定義*し、パイプラインの実行オプション(通常はコマンドラインオプションを使用して渡されます)も設定します。これらには、パイプラインがどのバックエンドで実行されるかを決定するパイプラインランナーが含まれます。
Beam SDKは、大規模な分散データ処理のメカニズムを簡素化する多くの抽象化を提供します。同じBeam抽象化は、バッチデータソースとストリーミングデータソースの両方で機能します。Beamパイプラインを作成する際、これらの抽象化の観点からデータ処理タスクについて考えることができます。これらには以下が含まれます。
Pipeline:Pipelineは、開始から終了まで、データ処理タスク全体をカプセル化します。これには、入力データの読み取り、データの変換、出力データの書き込みが含まれます。すべてのBeamドライバプログラムはPipelineを作成する必要があります。Pipelineを作成する際には、Pipelineがどこでどのように実行されるかを指示する実行オプションも指定する必要があります。PCollection:PCollectionは、Beamパイプラインが操作する分散データセットを表します。データセットは、ファイルなどの固定ソースからのバウンドであるか、サブスクリプションなどのメカニズムを介して継続的に更新されるソースからのアンバウンドである可能性があります。パイプラインは通常、外部データソースからデータを読み取ることで初期PCollectionを作成しますが、ドライバプログラム内のメモリ内データからPCollectionを作成することもできます。そこから、PCollectionはパイプラインの各ステップの入力と出力になります。PTransform:PTransformは、パイプライン内のデータ処理操作、またはステップを表します。すべてのPTransformは、1つ以上のPCollectionオブジェクトを入力として受け取り、そのPCollectionの要素に対して提供する処理関数を実行し、0個以上の出力PCollectionオブジェクトを生成します。
Scope: Go SDKには、Pipelineを構築するために使用される明示的なスコープ変数があります。Pipelineは、Root()メソッドを使用してルートスコープを返すことができます。スコープ変数は、PTransform関数に渡されて、Scopeを所有するPipelineに配置されます。
- I/O変換: Beamには、さまざまな外部ストレージシステムとのデータの読み書きを行うライブラリ
PTransformである多数の「IO」が付属しています。
一般的なBeamドライバプログラムは、次のように動作します。
- 作成:
Pipelineオブジェクトを作成し、パイプラインランナーを含むパイプライン実行オプションを設定します。 - 初期の
PCollectionをパイプラインデータ用に作成します。これには、IOを使用して外部ストレージシステムからデータを読み取る、またはCreate変換を使用してメモリ内データからPCollectionを構築する方法があります。 - 適用:各
PCollectionにPTransformを適用します。変換は、PCollection内の要素を変更、フィルタリング、グループ化、分析、またはその他の方法で処理できます。変換は、入力コレクションを変更せずに新しい出力PCollectionを作成します。一般的なパイプラインは、処理が完了するまで、順番に各新しい出力PCollectionに後続の変換を適用します。ただし、パイプラインは、次々と適用される変換の単一の直線である必要はありません。PCollectionを変数として、PTransformをこれらの変数に適用される関数として考えてください。パイプラインの形状は、任意に複雑な処理グラフになり得ます。 - IOを使用して、最終的な変換された
PCollectionを外部ソースに書き込みます。 - 実行:指定されたパイプラインランナーを使用してパイプラインを実行します。
Beamドライバプログラムを実行すると、指定したパイプラインランナーは、作成したPCollectionオブジェクトと適用した変換に基づいて、パイプラインの**ワークフロートグラフ**を構築します。そのグラフは、適切な分散処理バックエンドを使用して実行され、そのバックエンドで非同期「ジョブ」(または同等物)になります。
2. パイプラインの作成
Pipeline抽象化は、データ処理タスクのすべてのデータとステップをカプセル化します。Beamドライバプログラムは、通常、Pipeline Pipeline Pipelineオブジェクトを構築することから始まり、そのオブジェクトをPCollectionとしてパイプラインのデータセットとTransformとして操作の基礎として使用します。
Beamを使用するには、ドライバプログラムは最初にBeam SDKクラスPipelineのインスタンスを作成する必要があります(通常はmain()関数内)。Pipelineを作成する際には、いくつかの**構成オプション**も設定する必要があります。パイプラインの構成オプションはプログラムで設定できますが、オプションを事前に設定し(またはコマンドラインから読み取り)、オブジェクトを作成する際にPipelineオブジェクトに渡す方が簡単な場合があります。
// Start by defining the options for the pipeline.
PipelineOptions options = PipelineOptionsFactory.create();

// Then create the pipeline.
Pipeline p = Pipeline.create(options);
import apache_beam as beam
with beam.Pipeline() as pipeline:
pass # build your pipeline here// beam.Init() is an initialization hook that must be called
// near the beginning of main(), before creating a pipeline.
beam.Init()
// Create the Pipeline object and root scope.
pipeline, scope := beam.NewPipelineWithRoot()await beam.createRunner().run(function pipeline(root) {
// Use root to build a pipeline.
});pipeline:
...
options:
...Python SDKで基本的なパイプラインを作成する方法の詳細なチュートリアルについては、このcolabノートブックを読んで実践してください。
2.1. パイプラインオプションの設定
パイプラインオプションを使用して、パイプラインを実行するパイプラインランナーや、選択したランナーに必要なランナー固有の構成など、パイプラインのさまざまな側面を構成します。パイプラインオプションには、プロジェクトIDやファイルの保存場所などの情報が含まれる可能性があります。
選択したランナーでパイプラインを実行すると、PipelineOptionsのコピーがコードで使用できるようになります。たとえば、DoFnの@ProcessElementメソッドにPipelineOptionsパラメーターを追加すると、システムによって設定されます。
2.1.1. コマンドライン引数からのPipelineOptionsの設定
PipelineOptionsオブジェクトを作成してフィールドを直接設定することでパイプラインを構成できますが、Beam SDKには、コマンドライン引数を使用してPipelineOptionsのフィールドを設定するために使用できるコマンドラインパーサーが含まれています。
コマンドラインからオプションを読み取るには、次の例コードに示されているようにPipelineOptionsオブジェクトを構築します。
Goのフラグを使用してコマンドライン引数を解析し、パイプラインを構成します。フラグは、beam.Init()が呼び出される前に解析する必要があります。
任意のJavascriptオブジェクトをパイプラインオプションとして使用できます。手動で構築することもできますが、`yargs.argv`などのコマンドラインオプションから作成されたオブジェクトを渡すことも一般的です。
パイプラインオプションは、パイプライン定義自体と兄弟関係にあるオプションのYAMLマッピングプロパティです。コマンドラインで渡されたオプションとマージされます。
PipelineOptions options =
    PipelineOptionsFactory.fromArgs(args).withValidation().create();
from apache_beam.options.pipeline_options import PipelineOptions
beam_options = PipelineOptions()// If beamx or Go flags are used, flags must be parsed first,
// before beam.Init() is called.
flag.Parse()const pipeline_options = {
runner: "default",
project: "my_project",
};
const runner = beam.createRunner(pipeline_options);
const runnerFromCommandLineOptions = beam.createRunner(yargs.argv);pipeline:
...
options:
my_pipeline_option: my_value
...これは、次の形式に従うコマンドライン引数を解釈します。
--<option>=<value>
.withValidationメソッドを追加すると、必須のコマンドライン引数を確認し、引数値を検証します。
このようにPipelineOptionsを構築すると、コマンドライン引数として任意のオプションを指定できます。
このようにフラグ変数を定義すると、コマンドライン引数として任意のオプションを指定できます。
注記:WordCountの例パイプラインは、コマンドラインオプションを使用して実行時にパイプラインオプションを設定する方法を示しています。
2.1.2. カスタムオプションの作成
標準のPipelineOptionsに加えて、独自のカスタムオプションを追加できます。
独自のオプションを追加するには、各オプションのゲッターとセッターメソッドを持つインターフェースを定義します。
次の例は、inputとoutputのカスタムオプションを追加する方法を示しています。public interface MyOptions extends PipelineOptions {
String getInput();
void setInput(String input);
String getOutput();
void setOutput(String output);
}from apache_beam.options.pipeline_options import PipelineOptions
class MyOptions(PipelineOptions):
@classmethod
def _add_argparse_args(cls, parser):
parser.add_argument('--input')
parser.add_argument('--output')// Use standard Go flags to define pipeline options.
var (
input = flag.String("input", "", "")
output = flag.String("output", "", "")
)const options = yargs.argv; // Or an alternative command-line parsing library.
// Use options.input and options.output during pipeline construction.
ユーザーがコマンドライン引数として--helpを渡したときに表示される説明と、デフォルト値を指定することもできます。
説明とデフォルト値は、次のようにアノテーションを使用して設定します。
public interface MyOptions extends PipelineOptions {
    @Description("Input for the pipeline")
    @Default.String("gs://my-bucket/input")
    String getInput();
    void setInput(String input);

    @Description("Output for the pipeline")
    @Default.String("gs://my-bucket/output")
    String getOutput();
    void setOutput(String output);
}
from apache_beam.options.pipeline_options import PipelineOptions
class MyOptions(PipelineOptions):
@classmethod
def _add_argparse_args(cls, parser):
parser.add_argument(
'--input',
default='gs://dataflow-samples/shakespeare/kinglear.txt',
help='The file path for the input text to process.')
parser.add_argument(
'--output', required=True, help='The path prefix for output files.')var (
input = flag.String("input", "gs://my-bucket/input", "Input for the pipeline")
output = flag.String("output", "gs://my-bucket/output", "Output for the pipeline")
)Pythonの場合、argparseでカスタムオプションを解析するだけで済み、別のPipelineOptionsサブクラスを作成する必要はありません。
インターフェースをPipelineOptionsFactoryに登録し、PipelineOptionsオブジェクトを作成する際にインターフェースを渡すことをお勧めします。インターフェースをPipelineOptionsFactoryに登録すると、--helpはカスタムオプションインターフェースを見つけて、--helpコマンドの出力に追加できます。PipelineOptionsFactoryは、カスタムオプションが他のすべての登録済みオプションと互換性があることを検証します。
次の例コードは、カスタムオプションインターフェースをPipelineOptionsFactoryに登録する方法を示しています。
PipelineOptionsFactory.register(MyOptions.class);
MyOptions options = PipelineOptionsFactory.fromArgs(args)
                                                .withValidation()
.as(MyOptions.class);これで、パイプラインはコマンドライン引数として--input=valueと--output=valueを受け入れることができます。
3. PCollections
PCollection PCollection PCollection抽象化は、分散されうるマルチ要素データセットを表します。PCollectionを「パイプライン」データと考えることができます。Beam変換は、入力と出力としてPCollectionオブジェクトを使用します。そのため、パイプライン内のデータを使用する場合は、PCollectionの形にする必要があります。
Pipelineを作成した後、何らかの形式で少なくとも1つのPCollectionを作成する必要があります。作成するPCollectionは、パイプライン内の最初の操作の入力として機能します。
3.1. PCollectionの作成
PCollectionを作成するには、BeamのSource APIを使用して外部ソースからデータを読み込むか、ドライバプログラム内のインメモリコレクションクラスに格納されているデータのPCollectionを作成します。前者は、本番パイプラインがデータを取り込む典型的な方法です。BeamのSource APIには、大規模なクラウドベースのファイル、データベース、またはサブスクリプションサービスなど、外部ソースから読み取るためのアダプタが含まれています。後者は、主にテストとデバッグの目的で役立ちます。
3.1.1. 外部ソースからの読み取り
外部ソースから読み取るには、Beam提供のI/Oアダプタのいずれかを使用します。アダプタは使用方法が異なりますが、すべて外部データソースから読み取り、そのソース内のデータレコードを表す要素を持つPCollectionを返します。
各データソースアダプタにはRead変換があります。読み取るには、Pipelineオブジェクト自体にその変換を適用する必要があります。この変換をパイプラインのsourceまたはtransforms部分に配置します。 例えば、TextIO.Read io.TextFileSource textio.Read textio.ReadFromText、ReadFromTextは、外部テキストファイルから読み取り、その要素がString型で、各Stringがテキストファイルの1行を表すPCollectionを返します。 PCollectionを作成するためにTextIO.Read io.TextFileSource textio.Read textio.ReadFromText ReadFromTextをPipeline ルートに適用する方法は次のとおりです。
public static void main(String[] args) {
    // Create the pipeline.
    PipelineOptions options =
        PipelineOptionsFactory.fromArgs(args).create();
    Pipeline p = Pipeline.create(options);

    // Create the PCollection 'lines' by applying a 'Read' transform.
    PCollection<String> lines = p.apply(
      "ReadMyFile", TextIO.read().from("gs://some/inputData.txt"));
}
lines = pipeline | 'ReadMyFile' >> beam.io.ReadFromText(
'gs://some/inputData.txt')// Read the file at the URI 'gs://some/inputData.txt' and return
// the lines as a PCollection<string>.
// Notice the scope as the first variable when calling
// the method as is needed when calling all transforms.
lines := textio.Read(scope, "gs://some/inputData.txt")async function pipeline(root: beam.Root) {
// Note that textio.ReadFromText is an AsyncPTransform.
const pcoll: PCollection<string> = await root.applyAsync(
textio.ReadFromText("path/to/text_pattern")
);
}pipeline:
source:
type: ReadFromText
config:
path: ...Beam SDKでサポートされているさまざまなデータソースからの読み取り方法の詳細については、I/Oに関するセクションを参照してください。
3.1.2. メモリ内データからのPCollectionの作成
インメモリのJava CollectionからPCollectionを作成するには、Beam提供のCreate変換を使用します。データアダプタのReadと同様に、CreateをPipelineオブジェクト自体に直接適用します。
パラメータとして、CreateはJava CollectionとCoderオブジェクトを受け入れます。Coderは、Collection内の要素をどのようにエンコードするかを指定します。
インメモリのlistからPCollectionを作成するには、Beam提供のCreate変換を使用します。この変換をPipelineオブジェクト自体に直接適用します。
インメモリのsliceからPCollectionを作成するには、Beam提供のbeam.CreateList変換を使用します。この変換にパイプラインのscopeとsliceを渡します。
インメモリのarrayからPCollectionを作成するには、Beam提供のCreate変換を使用します。この変換をRootオブジェクトに直接適用します。
インメモリのarrayからPCollectionを作成するには、Beam提供のCreate変換を使用します。パイプライン自体に要素を指定します。
次のコード例は、インメモリのList list slice arrayからPCollectionを作成する方法を示しています。
public static void main(String[] args) {
    // Create a Java Collection, in this case a List of Strings.
    final List<String> LINES = Arrays.asList(
      "To be, or not to be: that is the question: ",
      "Whether 'tis nobler in the mind to suffer ",
      "The slings and arrows of outrageous fortune, ",
      "Or to take arms against a sea of troubles, ");

    // Create the pipeline.
    PipelineOptions options =
        PipelineOptionsFactory.fromArgs(args).create();
    Pipeline p = Pipeline.create(options);

    // Apply Create, passing the list and the coder, to create the PCollection.
    p.apply(Create.of(LINES)).setCoder(StringUtf8Coder.of());
}
import apache_beam as beam
with beam.Pipeline() as pipeline:
lines = (
pipeline
| beam.Create([
'To be, or not to be: that is the question: ',
"Whether 'tis nobler in the mind to suffer ",
'The slings and arrows of outrageous fortune, ',
'Or to take arms against a sea of troubles, ',
]))lines := []string{
"To be, or not to be: that is the question: ",
"Whether 'tis nobler in the mind to suffer ",
"The slings and arrows of outrageous fortune, ",
"Or to take arms against a sea of troubles, ",
}
// Create the Pipeline object and root scope.
// It's conventional to use p as the Pipeline variable and
// s as the scope variable.
p, s := beam.NewPipelineWithRoot()
// Pass the slice to beam.CreateList, to create the pcollection.
// The scope variable s is used to add the CreateList transform
// to the pipeline.
linesPCol := beam.CreateList(s, lines)function pipeline(root: beam.Root) {
const pcoll = root.apply(
beam.create([
"To be, or not to be: that is the question: ",
"Whether 'tis nobler in the mind to suffer ",
"The slings and arrows of outrageous fortune, ",
"Or to take arms against a sea of troubles, ",
])
);
}pipeline:
transforms:
- type: Create
config:
elements:
- A
- B
- ...3.2. PCollectionの特性
PCollectionは、作成された特定のPipelineオブジェクトによって所有されます。複数のパイプラインがPCollectionを共有することはできません。ある意味、PCollectionはCollectionクラスのように機能します。ただし、PCollectionはいくつかの重要な点で異なる場合があります。
3.2.1. 要素の種類
PCollectionの要素は任意の型にすることができますが、すべて同じ型である必要があります。ただし、分散処理をサポートするために、Beamは個々の要素をバイト文字列としてエンコードできる必要があります(そのため、要素を分散ワーカーに渡すことができます)。Beam SDKは、一般的に使用される型に対する組み込みエンコーディングと、必要に応じてカスタムエンコーディングを指定するためのサポートを含むデータエンコーディングメカニズムを提供します。
3.2.2. 要素スキーマ
多くの場合、PCollectionの要素型には、イントロスペクトできる構造があります。例としては、JSON、Protocol Buffer、Avro、およびデータベースレコードがあります。スキーマは、型を一連の名前付きフィールドとして表現する方法を提供し、より表現力豊かな集計を可能にします。
3.2.3. 不変性
PCollectionは不変です。一度作成されると、個々の要素を追加、削除、または変更することはできません。Beam変換は、PCollectionの各要素を処理し、新しいパイプラインデータ(新しいPCollectionとして)を生成する場合がありますが、元の入力コレクションを消費または変更することはありません。
注:Beam SDKは要素の不要なコピーを避けるため、
PCollectionの内容は物理的には不変ではなく、論理的には不変です。入力要素への変更は、同じバンドル内で実行されている他のDoFnに表示される可能性があり、正確性の問題を引き起こす可能性があります。原則として、DoFnに提供された値を変更することは安全ではありません。
3.2.4. ランダムアクセス
PCollectionは、個々の要素へのランダムアクセスをサポートしません。代わりに、Beam変換はPCollection内のすべての要素を個別に考慮します。
3.2.5. サイズと境界性
PCollectionは、要素の大きく不変の「バッグ」です。PCollectionに含めることができる要素数の上限はありません。任意のPCollectionは、単一のマシン上のメモリに収まる場合もあれば、永続的なデータストアによってバックアップされた非常に大規模な分散データセットを表す場合もあります。
PCollectionは、サイズがバウンドされているかアンバウンドされているかのいずれかです。バウンドされたPCollectionは、既知の固定サイズのデータセットを表し、アンバウンドされたPCollectionは、無制限のサイズのデータセットを表します。PCollectionがバウンドされているかアンバウンドされているかは、それが表すデータセットのソースによって異なります。ファイルやデータベースなどのバッチデータソースから読み取ると、バウンドされたPCollectionが作成されます。Pub/SubやKafkaなどのストリーミングまたは継続的に更新されるデータソースから読み取ると、(明示的に指定しない限り)アンバウンドされたPCollectionが作成されます。
PCollectionのバウンド(またはアンバウンド)の性質は、Beamがデータを処理する方法に影響します。バウンドされたPCollectionは、データセット全体を一度読み取り、有限長のジョブで処理を実行する可能性のあるバッチジョブを使用して処理できます。アンバウンドされたPCollectionは、コレクション全体を一度に処理することはできないため、継続的に実行されるストリーミングジョブを使用して処理する必要があります。
Beamはウィンドウ化を使用して、継続的に更新されるアンバウンドされたPCollectionを有限サイズの論理ウィンドウに分割します。これらの論理ウィンドウは、タイムスタンプなど、データ要素に関連付けられた特性によって決定されます。集約変換(GroupByKeyやCombineなど)は、ウィンドウ単位で機能します。データセットが生成されると、これらの有限ウィンドウの連続として各PCollectionを処理します。
3.2.6. 要素タイムスタンプ
PCollectionの各要素には、関連付けられた固有のタイムスタンプがあります。各要素のタイムスタンプは、最初にPCollectionを作成するソースによって割り当てられます。アンバウンドされたPCollectionを作成するソースは、多くの場合、新しい要素ごとに、要素が読み取られたり追加されたりする時間に相当するタイムスタンプを割り当てます。
注:固定データセットのバウンドされた
PCollectionを作成するソースもタイムスタンプを自動的に割り当てますが、最も一般的な動作は、すべての要素に同じタイムスタンプ(Long.MIN_VALUE)を割り当てることです。
タイムスタンプは、時間に固有の概念を持つ要素を含むPCollectionに役立ちます。ツイートやその他のソーシャルメディアメッセージなどのイベントのストリームを読み取っている場合、各要素はイベントが投稿された時間を要素タイムスタンプとして使用する場合があります。
ソースがタイムスタンプを割り当てない場合は、PCollectionの要素に手動でタイムスタンプを割り当てることができます。要素に固有のタイムスタンプがあるが、タイムスタンプが要素自体の構造のどこかに存在する場合(サーバーログエントリの「時間」フィールドなど)、これを行う必要があります。Beamには、入力としてPCollectionを受け取り、タイムスタンプが添付された同一のPCollectionを出力する変換があります。タイムスタンプの追加を参照して、その方法の詳細を確認してください。
4. 変換
変換はパイプライン内の操作であり、一般的な処理フレームワークを提供します。関数オブジェクト(口語的には「ユーザーコード」と呼ばれる)の形式で処理ロジックを提供し、ユーザーコードは入力PCollection(または複数のPCollection)の各要素に適用されます。選択したパイプラインランナーとバックエンドによっては、クラスタ全体にある多くの異なるワーカーが並列でユーザーコードのインスタンスを実行する場合があります。各ワーカーで実行されるユーザーコードは、最終的に変換によって生成される最終出力PCollectionに追加される出力要素を生成します。
集約は、Beamの変換について学習する際に理解する重要な概念です。集約の概要については、Beamモデルの基本集約セクションを参照してください。
Beam SDKには、パイプラインのPCollectionに適用できるさまざまな変換が含まれています。ParDoやCombineなど、汎用的なコア変換があります。SDKには、コレクション内の要素の計数や結合など、便利な処理パターンで1つ以上のコア変換を組み合わせた、事前に記述された複合変換も含まれています。パイプラインの正確なユースケースに適合するように、より複雑な独自の複合変換を定義することもできます。
Python SDKでさまざまな変換を適用する方法の詳細なチュートリアルについては、このcolabノートブックを読んで実行してください。
4.1. 変換の適用
変換を呼び出すには、入力PCollectionに適用する必要があります。Beam SDKの各変換には、汎用的なapplyメソッド(またはパイプ演算子|)があります。複数のBeam変換を呼び出すことは、メソッドチェーンに似ていますが、わずかに違いがあります。変換を入力PCollectionに適用し、変換自体を引数として渡し、操作は出力PCollectionを返します。array YAMLでは、変換は入力をリストすることによって適用されます。これは次の一般的な形式になります。
[Output PCollection] = [Input PCollection].apply([Transform])[Output PCollection] = [Input PCollection] | [Transform][Output PCollection] := beam.ParDo(scope, [Transform], [Input PCollection])[Output PCollection] = [Input PCollection].apply([Transform])
[Output PCollection] = await [Input PCollection].applyAsync([AsyncTransform])pipeline:
transforms:
...
- name: ProducingTransform
type: ProducingTransformType
...
- name: MyTransform
type: MyTransformType
input: ProducingTransform
...トランスフォームが複数(エラー以外)の出力を持つ場合、出力名は明示的に指定することで各出力を識別できます。
pipeline:
  transforms:
    ...
    - name: ProducingTransform
      type: ProducingTransformType
      ...

    - name: MyTransform
      type: MyTransformType
      input: ProducingTransform.output_name
      ...

    - name: MyTransform
      type: MyTransformType
      input: ProducingTransform.another_output_name
...線形パイプラインの場合、トランスフォームの順序に基づいて入力を暗黙的に決定し、型をchainに指定することで、さらに簡素化できます。例:
pipeline:
  type: chain
  transforms:
    - name: ProducingTransform
      type: ReadTransform
      config: ...

    - name: MyTransform
      type: MyTransformType
      config: ...

    - name: ConsumingTransform
      type: WriteTransform
config: ...BeamはPCollectionに対して汎用的なapplyメソッドを使用しているため、トランスフォームを逐次的にチェーンしたり、他のトランスフォームを含むトランスフォーム(Beam SDKでは複合トランスフォームと呼ばれる)を適用したりできます。
入力データを逐次的に変換するには、新しいPCollectionごとに新しい変数を作成することをお勧めします。Scopeを使用して、他のトランスフォームを含む関数(Beam SDKでは複合トランスフォームと呼ばれる)を作成できます。
パイプラインのトランスフォームの適用方法は、パイプラインの構造を決定します。パイプラインを理解する最良の方法は、有向非巡回グラフとして考えることです。ここで、PTransformノードは、PCollectionノードを入力として受け入れ、PCollectionノードを出力として生成するサブルーチンです。例えば、トランスフォームをチェーンして、入力データを連続的に変更するパイプラインを作成できます。 例えば、PCollectionに対してトランスフォームを連続的に呼び出して、入力データを変更できます。
[Final Output PCollection] = [Initial Input PCollection].apply([First Transform])
.apply([Second Transform])
.apply([Third Transform])[Final Output PCollection] = ([Initial Input PCollection] | [First Transform]
| [Second Transform]
| [Third Transform])[Second PCollection] := beam.ParDo(scope, [First Transform], [Initial Input PCollection])
[Third PCollection] := beam.ParDo(scope, [Second Transform], [Second PCollection])
[Final Output PCollection] := beam.ParDo(scope, [Third Transform], [Third PCollection])[Final Output PCollection] = [Initial Input PCollection].apply([First Transform])
.apply([Second Transform])
.apply([Third Transform])このパイプラインのグラフは以下のようになります。

図1:3つの連続したトランスフォームを持つ線形パイプライン。
ただし、トランスフォームは入力コレクションを消費したり変更したりしません—PCollectionは定義上不変であることを忘れないでください。つまり、同じ入力PCollectionに複数のトランスフォームを適用して、次のような分岐パイプラインを作成できます。
[PCollection of database table rows] = [Database Table Reader].apply([Read Transform])
[PCollection of 'A' names] = [PCollection of database table rows].apply([Transform A])
[PCollection of 'B' names] = [PCollection of database table rows].apply([Transform B])[PCollection of database table rows] = [Database Table Reader] | [Read Transform]
[PCollection of 'A' names] = [PCollection of database table rows] | [Transform A]
[PCollection of 'B' names] = [PCollection of database table rows] | [Transform B][PCollection of database table rows] = beam.ParDo(scope, [Read Transform], [Database Table Reader])
[PCollection of 'A' names] = beam.ParDo(scope, [Transform A], [PCollection of database table rows])
[PCollection of 'B' names] = beam.ParDo(scope, [Transform B], [PCollection of database table rows])[PCollection of database table rows] = [Database Table Reader].apply([Read Transform])
[PCollection of 'A' names] = [PCollection of database table rows].apply([Transform A])
[PCollection of 'B' names] = [PCollection of database table rows].apply([Transform B])この分岐パイプラインのグラフは以下のようになります。

図2:分岐パイプライン。2つのトランスフォームがデータベーステーブル行の単一のPCollectionに適用されます。
複数のトランスフォームを単一のより大きなトランスフォームにネストする独自の複合トランスフォームを構築することもできます。複合トランスフォームは、多くの場所で繰り返し使用される単純なステップの再利用可能なシーケンスを構築する場合に特に役立ちます。
パイプ構文を使用すると、複数の入力(FlattenやCoGroupByKeyなど)を受け入れるトランスフォームの場合、tupleやdictのPCollectionにPTransformを適用することもできます。
PTransformは、ルートオブジェクト、PCollection、PValueの配列、およびPValue値を持つオブジェクトなど、あらゆるPValueに適用できます。これらの複合型にトランスフォームを適用するには、beam.Pでラップします(例:beam.P({left: pcollA, right: pcollB}).apply(transformExpectingTwoPCollections))。
PTransformには、それらの適用*が非同期呼び出しを含むかどうかによって、同期型と非同期型の2種類があります。AsyncTransformはapplyAsyncで適用する必要があり、さらにパイプラインを構築する前に待機する必要があるPromiseを返します。
4.2. コアBeam変換
Beamは、それぞれ異なる処理パラダイムを表す次のコアトランスフォームを提供します。
ParDoGroupByKeyCoGroupByKeyCombineFlattenPartition
TypeScript SDKは、これらのトランスフォームの最も基本的なものをPCollection自体に対するメソッドとして提供しています。
4.2.1. ParDo
ParDoは、汎用的な並列処理のためのBeamトランスフォームです。ParDo処理パラダイムは、Map/Shuffle/Reduceスタイルのアルゴリズムの「Map」フェーズに似ています。ParDoトランスフォームは、入力PCollection内の各要素を考慮し、その要素に対して何らかの処理関数(ユーザーコード)を実行し、0個、1個、または複数の要素を出力PCollectionに出力します。
ParDoは、さまざまな一般的なデータ処理操作に役立ちます。これらには以下が含まれます。
- データセットのフィルタリング。
ParDoを使用して、PCollection内の各要素を検討し、その要素を新しいコレクションに出力するか、破棄することができます。 - データセット内の各要素のフォーマットまたは型変換。 入力
PCollectionに、必要な型またはフォーマットとは異なる型の要素が含まれている場合、ParDoを使用して各要素を変換し、結果を新しいPCollectionに出力できます。 - データセット内の各要素の一部を抽出する。 例えば、複数のフィールドを持つレコードの
PCollectionがある場合、ParDoを使用して、検討するフィールドだけを新しいPCollectionに解析できます。 - データセット内の各要素に対して計算を実行する。
ParDoを使用して、PCollectionのすべての要素、または特定の要素に対して単純な計算または複雑な計算を実行し、結果を新しいPCollectionとして出力できます。
このような役割において、ParDoはパイプラインにおける一般的な中間ステップです。生の入力レコードのセットから特定のフィールドを抽出したり、生の入力を異なる形式に変換したりするために使用できます。また、処理済みのデータをデータベーステーブル行や印刷可能な文字列などの出力に適した形式に変換するためにもParDoを使用できます。
ParDoトランスフォームを適用する際には、DoFnオブジェクトの形式でユーザーコードを提供する必要があります。DoFnは、分散処理関数を定義するBeam SDKクラスです。
Beam YAMLでは、ParDo操作はMapToFields、Filter、Explodeトランスフォーム型によって表現されます。これらの型は、DoFnの概念を導入するのではなく、選択した言語のUDFを使用できます。詳細については、fnのマッピングに関するページを参照してください。
DoFnのサブクラスを作成する際には、サブクラスがBeamトランスフォームのユーザーコード記述に関する要件に準拠していることに注意してください。
すべてのDoFnは、汎用的なregister.DoFnXxY[...]関数を使用して登録する必要があります。これにより、Go SDKは任意の入力/出力からエンコーディングを推測し、リモートランナーでのDoFnの実行を登録し、リフレクションを使用してDoFnの実行時実行を最適化できます。
// ComputeWordLengthFn is a DoFn that computes the word length of string elements.
type ComputeWordLengthFn struct{}

// ProcessElement computes the length of word and emits the result.
// When creating structs as a DoFn, the ProcessElement method performs the
// work of this step in the pipeline.
func (fn *ComputeWordLengthFn) ProcessElement(ctx context.Context, word string) int {
   ...
}

func init() {
  // 2 inputs and 1 output => DoFn2x1
  // Input/output types are included in order in the brackets
	register.DoFn2x1[context.Context, string, int](&ComputeWordLengthFn{})
}
4.2.1.1. ParDoの適用
すべてのBeamトランスフォームと同様に、次の例コードに示すように、入力PCollectionでapplyメソッドを呼び出し、ParDoを引数として渡すことでParDoを適用します。
すべてのBeamトランスフォームと同様に、次の例コードに示すように、入力PCollectionでbeam.ParDoを呼び出し、DoFnを引数として渡すことでParDoを適用します。
beam.ParDoは、次の例コードに示すように、渡されたDoFn引数を入力PCollectionに適用します。
// The input PCollection of Strings.
PCollection<String> words = ...;

// The DoFn to perform on each element in the input PCollection.
static class ComputeWordLengthFn extends DoFn<String, Integer> { ... }

// Apply a ParDo to the PCollection "words" to compute lengths for each word.
PCollection<Integer> wordLengths = words.apply(
    ParDo
    .of(new ComputeWordLengthFn()));        // The DoFn to perform on each element, which
                                            // we define above.
# The input PCollection of Strings.
words = ...

# The DoFn to perform on each element in the input PCollection.

class ComputeWordLengthFn(beam.DoFn):
  def process(self, element):
    return [len(element)]


# Apply a ParDo to the PCollection "words" to compute lengths for each word.
word_lengths = words | beam.ParDo(ComputeWordLengthFn())
// ComputeWordLengthFn is the DoFn to perform on each element in the input PCollection.
type ComputeWordLengthFn struct{}
// ProcessElement is the method to execute for each element.
func (fn *ComputeWordLengthFn) ProcessElement(word string, emit func(int)) {
emit(len(word))
}
// DoFns must be registered with beam.
func init() {
beam.RegisterType(reflect.TypeOf((*ComputeWordLengthFn)(nil)))
// 2 inputs and 0 outputs => DoFn2x0
// 1 input => Emitter1
// Input/output types are included in order in the brackets
register.DoFn2x0[string, func(int)](&ComputeWordLengthFn{})
register.Emitter1[int]()
}
// words is an input PCollection of strings
var words beam.PCollection = ...
wordLengths := beam.ParDo(s, &ComputeWordLengthFn{}, words)# The input PCollection of Strings.
const words : PCollection<string> = ...
# The DoFn to perform on each element in the input PCollection.
function computeWordLengthFn(): beam.DoFn<string, number> {
return {
process: function* (element) {
yield element.length;
},
};
}
const result = words.apply(beam.parDo(computeWordLengthFn()));この例では、入力PCollectionにはString string値が含まれています。各文字列の長さを計算する関数(ComputeWordLengthFn)を指定するParDoトランスフォームを適用し、結果を各単語の長さを格納するInteger int値の新しいPCollectionに出力します。
4.2.1.2. DoFnの作成
ParDoに渡すDoFnオブジェクトには、入力コレクションの要素に適用される処理ロジックが含まれています。Beamを使用する場合、通常、記述する最も重要なコードはこれらのDoFnです。これらは、パイプラインの正確なデータ処理タスクを定義するものです。
注記:
DoFnを作成する際には、Beamトランスフォームのユーザーコード記述に関する要件に注意し、コードがそれらに従っていることを確認してください。DoFn.Setupで大きなファイルを読み取るなどの時間のかかる操作は避けてください。
DoFnは、入力PCollectionから一度に1つの要素を処理します。DoFnのサブクラスを作成する際には、入力要素と出力要素の型と一致する型パラメーターを提供する必要があります。DoFnが入力String要素を処理し、出力コレクションに対してInteger要素を生成する場合(前の例、ComputeWordLengthFnのように)、クラス宣言は次のようになります。
DoFnは、入力PCollectionから一度に1つの要素を処理します。DoFn構造体を作成する際には、ProcessElementメソッドで入力要素と出力要素の型と一致する型パラメーターを提供する必要があります。DoFnが入力string要素を処理し、出力コレクションに対してint要素を生成する場合(前の例、ComputeWordLengthFnのように)、dofnは次のようになります。
static class ComputeWordLengthFn extends DoFn<String, Integer> { ... }// ComputeWordLengthFn is a DoFn that computes the word length of string elements.
type ComputeWordLengthFn struct{}
// ProcessElement computes the length of word and emits the result.
// When creating structs as a DoFn, the ProcessElement method performs the
// work of this step in the pipeline.
func (fn *ComputeWordLengthFn) ProcessElement(word string, emit func(int)) {
...
}
func init() {
// 2 inputs and 0 outputs => DoFn2x0
// 1 input => Emitter1
// Input/output types are included in order in the brackets
register.Function2x0(&ComputeWordLengthFn{})
register.Emitter1[int]()
}DoFnサブクラス内では、実際の処理ロジックを提供する@ProcessElementで注釈されたメソッドを記述します。入力コレクションから要素を手動で抽出する必要はありません。Beam SDKが処理します。@ProcessElementメソッドは、@Elementでタグ付けされたパラメーターを受け入れる必要があります。これは入力要素で設定されます。要素を出力するには、メソッドは要素の出力を行うメソッドを提供するOutputReceiver型の引数も取ることができます。パラメーター型は、DoFnの入力型と出力型と一致する必要があります。そうでない場合、フレームワークはエラーを発生させます。注:@ElementとOutputReceiverはBeam 2.5.0で導入されました。Beamの以前のリリースを使用している場合は、代わりにProcessContextパラメーターを使用する必要があります。
DoFnサブクラス内では、実際の処理ロジックを提供するprocessメソッドを記述します。入力コレクションから要素を手動で抽出する必要はありません。Beam SDKが処理します。processメソッドは、入力要素である引数elementを受け入れ、出力値を含むイテラブルを返します。これは、yieldステートメントで個々の要素を出力し、yield fromを使用してリストやジェネレーターなどのイテラブルからのすべての要素を出力することで実現できます。yieldステートメントとreturnステートメントを同じprocessメソッドで混在させない限り、イテラブルでreturnステートメントを使用することもできます。これは誤った動作につながるためです。
DoFn型の場合、実際の処理ロジックを提供するProcessElementメソッドを記述します。入力コレクションから要素を手動で抽出する必要はありません。Beam SDKが処理します。ProcessElementメソッドは、入力要素であるパラメーターelementを受け入れる必要があります。要素を出力するには、メソッドは要素の出力を行うことができる関数パラメーターも受け入れることができます。パラメーター型は、DoFnの入力型と出力型と一致する必要があります。そうでない場合、フレームワークはエラーを発生させます。
static class ComputeWordLengthFn extends DoFn<String, Integer> {
  @ProcessElement
  public void processElement(@Element String word, OutputReceiver<Integer> out) {
    // Use OutputReceiver.output to emit the output element.
    out.output(word.length());
  }
}
class ComputeWordLengthFn(beam.DoFn):
def process(self, element):
return [len(element)]// ComputeWordLengthFn is the DoFn to perform on each element in the input PCollection.
type ComputeWordLengthFn struct{}
// ProcessElement is the method to execute for each element.
func (fn *ComputeWordLengthFn) ProcessElement(word string, emit func(int)) {
emit(len(word))
}
// DoFns must be registered with beam.
func init() {
beam.RegisterType(reflect.TypeOf((*ComputeWordLengthFn)(nil)))
// 2 inputs and 0 outputs => DoFn2x0
// 1 input => Emitter1
// Input/output types are included in order in the brackets
register.DoFn2x0[string, func(int)](&ComputeWordLengthFn{})
register.Emitter1[int]()
}function computeWordLengthFn(): beam.DoFn<string, number> {
return {
process: function* (element) {
yield element.length;
},
};
}単純なDoFnは関数として記述することもできます。
func ComputeWordLengthFn(word string, emit func(int)) { ... }

func init() {
  // 2 inputs and 0 outputs => DoFn2x0
  // 1 input => Emitter1
  // Input/output types are included in order in the brackets
  register.DoFn2x0[string, func(int)](&ComputeWordLengthFn{})
  register.Emitter1[int]()
}
注記: 構造体
DoFn型を使用する場合でも、関数型DoFnを使用する場合でも、initブロックでbeamに登録する必要があります。そうしないと、分散ランナーで実行されない可能性があります。
注記: 入力
PCollectionの要素がキー/値のペアである場合、それぞれelement.getKey()またはelement.getValue()を使用してキーまたは値にアクセスできます。
注記: 入力
PCollectionの要素がキー/値のペアである場合、process要素メソッドには、それぞれキーと値のそれぞれに対して2つのパラメーターが必要です。同様に、キー/値のペアは、単一のemitter関数への別々のパラメーターとしても出力されます。
特定のDoFnインスタンスは、一般的に、要素の任意のバッチを処理するために1回以上呼び出されます。ただし、Beamは呼び出しの正確な数を保証しません。障害と再試行を考慮するために、特定のワーカーノードで複数回呼び出される場合があります。そのため、処理メソッドへの複数の呼び出しで情報をキャッシュできますが、その場合、実装が呼び出しの数に依存しないことを確認してください。
処理メソッドでは、Beamと処理バックエンドがパイプライン内の値を安全にシリアル化およびキャッシュできるように、いくつかの不変性の要件も満たす必要があります。メソッドは次の要件を満たしている必要があります。
@ElementアノテーションまたはProcessContext.sideInput()(入力コレクションからの入力要素)によって返される要素を、いかなる方法でも変更しないでください。OutputReceiver.output()を使用して値を出力したら、その値をいかなる方法でも変更しないでください。
processメソッドに渡されるelement引数、またはサイド入力はいかなる方法でも変更しないでください。yieldまたはreturnを使用して値を出力したら、その値をいかなる方法でも変更しないでください。
ProcessElementメソッドに渡されるパラメータ、またはサイド入力はいかなる方法でも変更しないでください。- エミッター関数を使用して値を出力したら、その値をいかなる方法でも変更しないでください。
4.2.1.3. 軽量DoFnおよびその他の抽象化
関数が比較的単純な場合は、匿名内部クラスインスタンスラムダ関数匿名関数PCollection.mapまたはPCollection.flatMapに渡される関数として、軽量なDoFnをインラインで提供することで、ParDoの使用を簡素化できます。
前の例、ComputeLengthWordsFnを使用したParDoを、DoFnを匿名内部クラスインスタンスラムダ関数匿名関数関数として指定した例を示します。
// The input PCollection.
PCollection<String> words = ...;

// Apply a ParDo with an anonymous DoFn to the PCollection words.
// Save the result as the PCollection wordLengths.
PCollection<Integer> wordLengths = words.apply(
  "ComputeWordLengths",                     // the transform name
  ParDo.of(new DoFn<String, Integer>() {    // a DoFn as an anonymous inner class instance
      @ProcessElement
      public void processElement(@Element String word, OutputReceiver<Integer> out) {
        out.output(word.length());
      }
    }));
# The input PCollection of strings.
words = ...
# Apply a lambda function to the PCollection words.
# Save the result as the PCollection word_lengths.
word_lengths = words | beam.FlatMap(lambda word: [len(word)])The Go SDK cannot support anonymous functions outside of the deprecated Go Direct runner.
// words is the input PCollection of strings
var words beam.PCollection = ...
lengths := beam.ParDo(s, func (word string, emit func(int)) {
emit(len(word))
}, words)// The input PCollection of strings.
words = ...
const result = words.flatMap((word) => [word.length]);ParDoが入力要素を出力要素に一対一でマッピングする処理を行う場合、つまり、各入力要素に対して、*正確に1つの*出力要素を生成する関数を適用する場合、その要素を直接返すことができます。より高レベルのMapElementsMap変換を使用できます。MapElementsは、簡潔にするために匿名のJava 8ラムダ関数を受け入れることができます。
次に、MapElementsMap直接的な返却を使用した前の例を示します。
// The input PCollection.
PCollection<String> words = ...;

// Apply a MapElements with an anonymous lambda function to the PCollection words.
// Save the result as the PCollection wordLengths.
PCollection<Integer> wordLengths = words.apply(
  MapElements.into(TypeDescriptors.integers())
             .via((String word) -> word.length()));
# The input PCollection of string.
words = ...
# Apply a Map with a lambda function to the PCollection words.
# Save the result as the PCollection word_lengths.
word_lengths = words | beam.Map(len)The Go SDK cannot support anonymous functions outside of the deprecated Go Direct runner.
func wordLengths(word string) int { return len(word) }
func init() { register.Function1x1(wordLengths) }
func applyWordLenAnon(s beam.Scope, words beam.PCollection) beam.PCollection {
return beam.ParDo(s, wordLengths, words)
}// The input PCollection of string.
words = ...
const result = words.map((word) => word.length);注記: Java 8ラムダ関数は、
Filter、FlatMapElements、Partitionなど、他のいくつかのBeam変換で使用できます。
注記: 匿名関数のDoFnは、分散ランナーでは機能しません。名前付き関数を使用し、
init()ブロックでregister.FunctionXxYを使用して登録することをお勧めします。
4.2.1.4. DoFnのライフサイクル
以下は、ParDo変換の実行中のDoFnのライフサイクルを示すシーケンス図です。コメントには、オブジェクトに適用される制約や、フェイルオーバーやインスタンスの再利用などの特定のケースに関する有用な情報がパイプライン開発者向けに提供されています。インスタンス化のユースケースも示されています。3つの重要な点は次のとおりです。
- ティアダウンはベストエフォートで行われるため、保証されていません。
- 実行時に作成されるDoFnインスタンスの数は、ランナーによって異なります。
- Python SDKの場合、DoFnのユーザーコードなどのパイプラインの内容は、バイトコードにシリアル化されます。したがって、
DoFnは、ロックなど、シリアル化できないオブジェクトを参照しないでください。同じプロセス内の複数のDoFnインスタンス間でオブジェクトの単一インスタンスを管理するには、shared.pyモジュールのユーティリティを使用します。

4.2.2. GroupByKey
GroupByKeyは、キー/値ペアのコレクションを処理するためのBeam変換です。これは、Map/Shuffle/Reduceスタイルのアルゴリズムのシャッフルフェーズと同様の並列リダクション操作です。GroupByKeyへの入力は、キー/値ペアのコレクションであり、これはマルチマップを表します。コレクションには、同じキーを持つが値が異なる複数のペアが含まれています。このようなコレクションが与えられると、GroupByKeyを使用して、各固有キーに関連付けられたすべての値を収集します。
GroupByKeyは、共通点を持つデータを集計するのに適した方法です。たとえば、顧客注文のレコードを格納するコレクションがある場合、同じ郵便番号からのすべての注文をグループ化したい場合があります(キー/値ペアの「キー」は郵便番号フィールドであり、「値」はレコードの残りの部分です)。
データセットがテキストファイルからの単語とその単語が出現する行番号で構成される単純な例を使用して、GroupByKeyの仕組みを調べましょう。テキスト内の特定の単語が出現する場所をすべて表示できるように、同じ単語(キー)を共有するすべての行番号(値)をグループ化します。
入力は、各単語がキーであり、値が単語が出現するファイル内の行番号であるキー/値ペアのPCollectionです。入力コレクション内のキー/値ペアのリストを以下に示します。
cat, 1
dog, 5
and, 1
jump, 3
tree, 2
cat, 5
dog, 2
and, 2
cat, 9
and, 6
...
GroupByKeyは、同じキーを持つすべての値を収集し、固有のキーと、入力コレクションでそのキーに関連付けられていたすべての値のコレクションからなる新しいペアを出力します。上記の入力コレクションにGroupByKeyを適用すると、出力コレクションは次のようになります。
cat, [1,5,9]
dog, [5,2]
and, [1,2,6]
jump, [3]
tree, [2]
...
したがって、GroupByKeyは、マルチマップ(複数のキーから個々の値へ)からユニマップ(固有のキーから値のコレクションへ)への変換を表します。
GroupByKeyの使用は簡単です。
すべてのSDKにGroupByKey変換がありますが、GroupByを使用する方が一般的に自然です。GroupBy変換は、PCollectionの要素をグループ化するプロパティの名前、または各要素を入力として受け取り、グループ化するキーにマッピングする関数によってパラメータ化できます。
// The input PCollection.
 PCollection<KV<String, String>> mapped = ...;

// Apply GroupByKey to the PCollection mapped.
// Save the result as the PCollection reduced.
PCollection<KV<String, Iterable<String>>> reduced =
 mapped.apply(GroupByKey.<String, String>create());
# The input PCollection of (`string`, `int`) tuples.
words_and_counts = ...
grouped_words = words_and_counts | beam.GroupByKey()// CreateAndSplit creates and returns a PCollection with <K,V>
// from an input slice of stringPair (struct with K, V string fields).
pairs := CreateAndSplit(s, input)
keyed := beam.GroupByKey(s, pairs)// A PCollection of elements like
// {word: "cat", score: 1}, {word: "dog", score: 5}, {word: "cat", score: 5}, ...
const scores : PCollection<{word: string, score: number}> = ...
// This will produce a PCollection with elements like
// {key: "cat", value: [{ word: "cat", score: 1 },
// { word: "cat", score: 5 }, ...]}
// {key: "dog", value: [{ word: "dog", score: 5 }, ...]}
const grouped_by_word = scores.apply(beam.groupBy("word"));
// This will produce a PCollection with elements like
// {key: 3, value: [{ word: "cat", score: 1 },
// { word: "dog", score: 5 },
// { word: "cat", score: 5 }, ...]}
const by_word_length = scores.apply(beam.groupBy((x) => x.word.length));type: Combine
config:
group_by: animal
combine:
weight: group4.2.2.1 GroupByKeyと無制限のPCollection
無制限のPCollectionを使用する場合は、GroupByKeyまたはCoGroupByKeyを実行するために、グローバルではないウィンドウ処理または集計トリガーを使用する必要があります。これは、バウンドされたGroupByKeyまたはCoGroupByKeyは、特定のキーを持つすべてのデータの収集を待機する必要があるためですが、無制限のコレクションでは、データは無制限であるためです。ウィンドウ処理と/またはトリガーにより、無制限のデータストリーム内の論理的な有限データバンドルでグループ化を実行できます。
各コレクションにグローバルではないウィンドウ処理戦略、トリガー戦略、またはその両方を設定せずに、GroupByKeyまたはCoGroupByKeyを無制限のPCollectionのグループに適用すると、パイプライン構築時にBeamはIllegalStateExceptionエラーを生成します。
ウィンドウ処理戦略が適用されているPCollectionをグループ化するのにGroupByKeyまたはCoGroupByKeyを使用する場合、グループ化するすべてのPCollectionは同じウィンドウ処理戦略とウィンドウサイズを使用する必要があります。たとえば、マージするすべてのコレクションは(仮に)、同一の5分間の固定ウィンドウ、または30秒ごとに開始する4分間のスライドウィンドウを使用する必要があります。
パイプラインが互換性のないウィンドウを持つPCollectionをマージするのにGroupByKeyまたはCoGroupByKeyを使用しようとすると、Beamはパイプライン構築時にIllegalStateExceptionエラーを生成します。
4.2.3. CoGroupByKey
CoGroupByKeyは、同じキータイプを持つ2つ以上のキー/値PCollectionのリレーショナル結合を実行します。パイプラインの設計は、結合を使用するパイプラインの例を示しています。
関連するものの情報を提供する複数のデータセットがある場合は、CoGroupByKeyの使用を検討してください。たとえば、ユーザーデータを含む2つの異なるファイルがあるとします。1つのファイルには名前とメールアドレスがあり、もう1つのファイルには名前と電話番号があります。ユーザー名を共通キーとして、他のデータを関連値として使用して、これら2つのデータセットを結合できます。結合後、各名前に関連付けられたすべての情報(メールアドレスと電話番号)を含む1つのデータセットが得られます。
SqlTransformを使用して結合を実行することも検討できます。
無制限のPCollectionを使用する場合は、CoGroupByKeyを実行するために、グローバルではないウィンドウ処理または集計トリガーを使用する必要があります。詳細については、GroupByKeyと無制限のPCollectionを参照してください。
Java用のBeam SDKでは、CoGroupByKeyは、キー付きPCollectionのタプル(PCollection<KV<K, V>>)を入力として受け入れます。型安全のために、SDKは各PCollectionをKeyedPCollectionTupleの一部として渡す必要があります。CoGroupByKeyに渡すKeyedPCollectionTupleには、各入力PCollectionについてTupleTagを宣言する必要があります。出力として、CoGroupByKeyはPCollection<KV<K, CoGbkResult>>を返し、これはすべての入力PCollectionからの値を共通のキーでグループ化します。各キー(すべてK型)には異なるCoGbkResultがあり、これはTupleTag<T>からIterable<T>へのマップです。CoGbkResultオブジェクト内の特定のコレクションにアクセスするには、最初のコレクションで提供したTupleTagを使用します。
Python用のBeam SDKでは、CoGroupByKeyは、キー付きPCollectionの辞書を入力として受け入れます。出力として、CoGroupByKeyは、入力PCollectionの各キーに対して1つのキー/値タプルを含む単一の出力をPCollectionを作成します。各キーの値は、各タグを対応するPCollectionのキーの下の値のイテラブルにマッピングする辞書です。
Go用のBeam SDKでは、CoGroupByKeyは、任意の数のPCollectionを入力として受け入れます。出力として、CoGroupByKeyは、各キーを各入力PCollectionの値イテレータ関数でグループ化する単一の出力をPCollectionを作成します。イテレータ関数は、CoGroupByKeyに提供されたのと同じ順序で入力PCollectionsにマッピングされます。
次の概念的な例では、2つの入力コレクションを使用してCoGroupByKeyの仕組みを示しています。
最初のデータセットには、emailsTag という名前の TupleTag<String> があり、名前とメールアドレスが含まれています。2 番目のデータセットには、phonesTag という名前の TupleTag<String> があり、名前と電話番号が含まれています。
最初のデータセットには、名前とメールアドレスが含まれています。2 番目のデータセットには、名前と電話番号が含まれています。
final List<KV<String, String>> emailsList =
    Arrays.asList(
        KV.of("amy", "amy@example.com"),
        KV.of("carl", "carl@example.com"),
        KV.of("julia", "julia@example.com"),
        KV.of("carl", "carl@email.com"));

final List<KV<String, String>> phonesList =
    Arrays.asList(
        KV.of("amy", "111-222-3333"),
        KV.of("james", "222-333-4444"),
        KV.of("amy", "333-444-5555"),
        KV.of("carl", "444-555-6666"));

PCollection<KV<String, String>> emails = p.apply("CreateEmails", Create.of(emailsList));
PCollection<KV<String, String>> phones = p.apply("CreatePhones", Create.of(phonesList));
emails_list = [
('amy', 'amy@example.com'),
('carl', 'carl@example.com'),
('julia', 'julia@example.com'),
('carl', 'carl@email.com'),
]
phones_list = [
('amy', '111-222-3333'),
('james', '222-333-4444'),
('amy', '333-444-5555'),
('carl', '444-555-6666'),
]
emails = p | 'CreateEmails' >> beam.Create(emails_list)
phones = p | 'CreatePhones' >> beam.Create(phones_list)type stringPair struct {
K, V string
}
func splitStringPair(e stringPair) (string, string) {
return e.K, e.V
}
func init() {
// Register DoFn.
register.Function1x2(splitStringPair)
}
// CreateAndSplit is a helper function that creates
func CreateAndSplit(s beam.Scope, input []stringPair) beam.PCollection {
initial := beam.CreateList(s, input)
return beam.ParDo(s, splitStringPair, initial)
}
var emailSlice = []stringPair{
{"amy", "amy@example.com"},
{"carl", "carl@example.com"},
{"julia", "julia@example.com"},
{"carl", "carl@email.com"},
}
var phoneSlice = []stringPair{
{"amy", "111-222-3333"},
{"james", "222-333-4444"},
{"amy", "333-444-5555"},
{"carl", "444-555-6666"},
}
emails := CreateAndSplit(s.Scope("CreateEmails"), emailSlice)
phones := CreateAndSplit(s.Scope("CreatePhones"), phoneSlice)const emails_list = [
{ name: "amy", email: "amy@example.com" },
{ name: "carl", email: "carl@example.com" },
{ name: "julia", email: "julia@example.com" },
{ name: "carl", email: "carl@email.com" },
];
const phones_list = [
{ name: "amy", phone: "111-222-3333" },
{ name: "james", phone: "222-333-4444" },
{ name: "amy", phone: "333-444-5555" },
{ name: "carl", phone: "444-555-6666" },
];
const emails = root.apply(
beam.withName("createEmails", beam.create(emails_list))
);
const phones = root.apply(
beam.withName("createPhones", beam.create(phones_list))
);- type: Create
name: CreateEmails
config:
elements:
- { name: "amy", email: "amy@example.com" }
- { name: "carl", email: "carl@example.com" }
- { name: "julia", email: "julia@example.com" }
- { name: "carl", email: "carl@email.com" }
- type: Create
name: CreatePhones
config:
elements:
- { name: "amy", phone: "111-222-3333" }
- { name: "james", phone: "222-333-4444" }
- { name: "amy", phone: "333-444-5555" }
- { name: "carl", phone: "444-555-6666" }CoGroupByKey の後、結果データには、入力コレクションのいずれかからの固有キーに関連付けられたすべてのデータが含まれます。
final TupleTag<String> emailsTag = new TupleTag<>();
final TupleTag<String> phonesTag = new TupleTag<>();

final List<KV<String, CoGbkResult>> expectedResults =
    Arrays.asList(
        KV.of(
            "amy",
            CoGbkResult.of(emailsTag, Arrays.asList("amy@example.com"))
                .and(phonesTag, Arrays.asList("111-222-3333", "333-444-5555"))),
        KV.of(
            "carl",
            CoGbkResult.of(emailsTag, Arrays.asList("carl@email.com", "carl@example.com"))
                .and(phonesTag, Arrays.asList("444-555-6666"))),
        KV.of(
            "james",
            CoGbkResult.of(emailsTag, Arrays.asList())
                .and(phonesTag, Arrays.asList("222-333-4444"))),
        KV.of(
            "julia",
            CoGbkResult.of(emailsTag, Arrays.asList("julia@example.com"))
                .and(phonesTag, Arrays.asList())));
results = [
(
'amy',
{
'emails': ['amy@example.com'],
'phones': ['111-222-3333', '333-444-5555']
}),
(
'carl',
{
'emails': ['carl@email.com', 'carl@example.com'],
'phones': ['444-555-6666']
}),
('james', {
'emails': [], 'phones': ['222-333-4444']
}),
('julia', {
'emails': ['julia@example.com'], 'phones': []
}),
]results := beam.CoGroupByKey(s, emails, phones)
contactLines := beam.ParDo(s, formatCoGBKResults, results)
// Synthetic example results of a cogbk.
results := []struct {
Key string
Emails, Phones []string
}{
{
Key: "amy",
Emails: []string{"amy@example.com"},
Phones: []string{"111-222-3333", "333-444-5555"},
}, {
Key: "carl",
Emails: []string{"carl@email.com", "carl@example.com"},
Phones: []string{"444-555-6666"},
}, {
Key: "james",
Emails: []string{},
Phones: []string{"222-333-4444"},
}, {
Key: "julia",
Emails: []string{"julia@example.com"},
Phones: []string{},
},
}const results = [
{
name: "amy",
values: {
emails: [{ name: "amy", email: "amy@example.com" }],
phones: [
{ name: "amy", phone: "111-222-3333" },
{ name: "amy", phone: "333-444-5555" },
],
},
},
{
name: "carl",
values: {
emails: [
{ name: "carl", email: "carl@example.com" },
{ name: "carl", email: "carl@email.com" },
],
phones: [{ name: "carl", phone: "444-555-6666" }],
},
},
{
name: "james",
values: {
emails: [],
phones: [{ name: "james", phone: "222-333-4444" }],
},
},
{
name: "julia",
values: {
emails: [{ name: "julia", email: "julia@example.com" }],
phones: [],
},
},
];次のコード例では、CoGroupByKey を使用して 2 つの PCollection を結合し、その後 ParDo を使用して結果を処理します。その後、コードはタグを使用して各コレクションからのデータを参照し、フォーマットします。
次のコード例では、CoGroupByKey を使用して 2 つの PCollection を結合し、その後 ParDo を使用して結果を処理します。DoFn のイテレータパラメータの順序は、CoGroupByKey の入力の順序に対応しています。
PCollection<KV<String, CoGbkResult>> results =
    KeyedPCollectionTuple.of(emailsTag, emails)
        .and(phonesTag, phones)
        .apply(CoGroupByKey.create());

PCollection<String> contactLines =
    results.apply(
        ParDo.of(
            new DoFn<KV<String, CoGbkResult>, String>() {
              @ProcessElement
              public void processElement(ProcessContext c) {
                KV<String, CoGbkResult> e = c.element();
                String name = e.getKey();
                Iterable<String> emailsIter = e.getValue().getAll(emailsTag);
                Iterable<String> phonesIter = e.getValue().getAll(phonesTag);
                String formattedResult =
                    Snippets.formatCoGbkResults(name, emailsIter, phonesIter);
                c.output(formattedResult);
              }
            }));
# The result PCollection contains one key-value element for each key in the
# input PCollections. The key of the pair will be the key from the input and
# the value will be a dictionary with two entries: 'emails' - an iterable of
# all values for the current key in the emails PCollection and 'phones': an
# iterable of all values for the current key in the phones PCollection.
results = ({'emails': emails, 'phones': phones} | beam.CoGroupByKey())
def join_info(name_info):
(name, info) = name_info
return '%s; %s; %s' %\
(name, sorted(info['emails']), sorted(info['phones']))
contact_lines = results | beam.Map(join_info)func formatCoGBKResults(key string, emailIter, phoneIter func(*string) bool) string {
var s string
var emails, phones []string
for emailIter(&s) {
emails = append(emails, s)
}
for phoneIter(&s) {
phones = append(phones, s)
}
// Values have no guaranteed order, sort for deterministic output.
sort.Strings(emails)
sort.Strings(phones)
return fmt.Sprintf("%s; %s; %s", key, formatStringIter(emails), formatStringIter(phones))
}
func init() {
register.Function3x1(formatCoGBKResults)
// 1 input of type string => Iter1[string]
register.Iter1[string]()
}
// Synthetic example results of a cogbk.
results := []struct {
Key string
Emails, Phones []string
}{
{
Key: "amy",
Emails: []string{"amy@example.com"},
Phones: []string{"111-222-3333", "333-444-5555"},
}, {
Key: "carl",
Emails: []string{"carl@email.com", "carl@example.com"},
Phones: []string{"444-555-6666"},
}, {
Key: "james",
Emails: []string{},
Phones: []string{"222-333-4444"},
}, {
Key: "julia",
Emails: []string{"julia@example.com"},
Phones: []string{},
},
}const formatted_results_pcoll = beam
.P({ emails, phones })
.apply(beam.coGroupBy("name"))
.map(function formatResults({ key, values }) {
const emails = values.emails.map((x) => x.email).sort();
const phones = values.phones.map((x) => x.phone).sort();
return `${key}; [${emails}]; [${phones}]`;
});- type: MapToFields
name: PrepareEmails
input: CreateEmails
config:
language: python
fields:
name: name
email: "[email]"
phone: "[]"
- type: MapToFields
name: PreparePhones
input: CreatePhones
config:
language: python
fields:
name: name
email: "[]"
phone: "[phone]"
- type: Combine
name: CoGropuBy
input: [PrepareEmails, PreparePhones]
config:
group_by: [name]
combine:
email: concat
phone: concat
- type: MapToFields
name: FormatResults
input: CoGropuBy
config:
language: python
fields:
formatted:
"'%s; %s; %s' % (name, sorted(email), sorted(phone))"フォーマットされたデータは次のようになります。
final List<String> formattedResults =
    Arrays.asList(
        "amy; ['amy@example.com']; ['111-222-3333', '333-444-5555']",
        "carl; ['carl@email.com', 'carl@example.com']; ['444-555-6666']",
        "james; []; ['222-333-4444']",
        "julia; ['julia@example.com']; []");
formatted_results = [
"amy; ['amy@example.com']; ['111-222-3333', '333-444-5555']",
"carl; ['carl@email.com', 'carl@example.com']; ['444-555-6666']",
"james; []; ['222-333-4444']",
"julia; ['julia@example.com']; []",
]formattedResults := []string{
"amy; ['amy@example.com']; ['111-222-3333', '333-444-5555']",
"carl; ['carl@email.com', 'carl@example.com']; ['444-555-6666']",
"james; []; ['222-333-4444']",
"julia; ['julia@example.com']; []",
}const formatted_results = [
"amy; [amy@example.com]; [111-222-3333,333-444-5555]",
"carl; [carl@email.com,carl@example.com]; [444-555-6666]",
"james; []; [222-333-4444]",
"julia; [julia@example.com]; []",
];"amy; ['amy@example.com']; ['111-222-3333', '333-444-5555']",
"carl; ['carl@email.com', 'carl@example.com']; ['444-555-6666']",
"james; []; ['222-333-4444']",
"julia; ['julia@example.com']; []",4.2.4. Combine
Combine Combine Combine Combine は、データ内の要素または値のコレクションを結合するための Beam トランスフォームです。Combine には、全体の PCollection で動作するものと、キー/値ペアの PCollection の各キーの値を結合するものがあります。
Combine トランスフォームを適用する際には、要素または値を結合するロジックを含む関数を指定する必要があります。結合関数は、特定のキーを持つすべての値に対して関数が正確に1回呼び出されるとは限らないため、可換かつ結合的である必要があります。入力データ(値のコレクションを含む)は複数のワーカーに分散される可能性があるため、値のコレクションのサブセットに対して部分的な結合を実行するために、結合関数が複数回呼び出される場合があります。Beam SDK は、合計、最小値、最大値などの一般的な数値結合演算のためのいくつかの組み込み結合関数も提供しています。
合計などの単純な結合演算は、通常、単純な関数として実装できます。より複雑な結合演算では、入力/出力タイプとは異なる累積タイプを持つ CombineFn のサブクラスを作成する必要があります。
CombineFn の結合性と可換性は、ランナーが自動的にいくつかの最適化を適用することを可能にします。
- コンバイナのリフト:これは最も重要な最適化です。入力要素はシャッフルされる前にキーとウィンドウごとに結合されるため、シャッフルされるデータの量は桁違いに削減される可能性があります。この最適化の別の用語は「マッパー側結合」です。
- 増分結合:データサイズを大幅に削減する
CombineFnを持つ場合、ストリーミングシャッフルから出現する要素を結合することが役立ちます。これにより、ストリーミング計算がアイドル状態になる可能性のある時間中に、結合を実行するコストが分散されます。増分結合は、中間アキュムレータのストレージも削減します。
4.2.4.1. 単純な関数を使用した単純な結合
Beam YAMLには、count、sum、min、max、mean、any、all、group、concatという組み込みのCombineFnがあります。他の言語からのCombineFnも、(集約に関する完全なドキュメント)[https://beam.dokyumento.jp/documentation/sdks/yaml-combine/]に記載されているように参照できます。 次のコード例は、単純な結合関数を示しています。結合は、`combining`メソッドでグループ化変換を変更することによって行われます。このメソッドは、結合する値(入力要素の名前付きプロパティ、または入力全体の関数)、結合演算(2項関数または`CombineFn`)、出力オブジェクト内の結合された値の名前の3つのパラメータを取ります。// Sum a collection of Integer values. The function SumInts implements the interface SerializableFunction.
public static class SumInts implements SerializableFunction<Iterable<Integer>, Integer> {
@Override
public Integer apply(Iterable<Integer> input) {
int sum = 0;
for (int item : input) {
sum += item;
}
return sum;
}
}pc = [1, 10, 100, 1000]
def bounded_sum(values, bound=500):
return min(sum(values), bound)
small_sum = pc | beam.CombineGlobally(bounded_sum) # [500]
large_sum = pc | beam.CombineGlobally(bounded_sum, bound=5000) # [1111]func sumInts(a, v int) int {
return a + v
}
func init() {
register.Function2x1(sumInts)
}
func globallySumInts(s beam.Scope, ints beam.PCollection) beam.PCollection {
return beam.Combine(s, sumInts, ints)
}
type boundedSum struct {
Bound int
}
func (fn *boundedSum) MergeAccumulators(a, v int) int {
sum := a + v
if fn.Bound > 0 && sum > fn.Bound {
return fn.Bound
}
return sum
}
func init() {
register.Combiner1[int](&boundedSum{})
}
func globallyBoundedSumInts(s beam.Scope, bound int, ints beam.PCollection) beam.PCollection {
return beam.Combine(s, &boundedSum{Bound: bound}, ints)
}const pcoll = root.apply(beam.create([1, 10, 100, 1000]));
const result = pcoll.apply(
beam
.groupGlobally()
.combining((c) => c, (x, y) => x + y, "sum")
.combining((c) => c, (x, y) => x * y, "product")
);
const expected = { sum: 1111, product: 1000000 }type: Combine
config:
language: python
group_by: animal
combine:
biggest:
fn:
type: 'apache_beam.transforms.combiners.TopCombineFn'
config:
n: 2
value: weightすべてのコンバイナは、汎用的な register.CombinerX[...] 関数を使用して登録する必要があります。これにより、Go SDK は任意の入力/出力からエンコーディングを推論し、リモートランナーでの実行のためにコンバイナを登録し、リフレクションを介してコンバイナのランタイム実行を最適化できます。
アキュムレータ、入力、および出力がすべて同じタイプの場合、Combiner1 を使用する必要があります。これは、register.Combiner1[T](&CustomCombiner{}) で呼び出すことができ、ここで T は入力/アキュムレータ/出力のタイプです。
アキュムレータ、入力、および出力が 2 つの異なるタイプの場合、Combiner2 を使用する必要があります。これは、register.Combiner2[T1, T2](&CustomCombiner{}) で呼び出すことができ、ここで T1 はアキュムレータのタイプ、T2 は他のタイプです。
アキュムレータ、入力、および出力が 3 つの異なるタイプの場合、Combiner3 を使用する必要があります。これは、register.Combiner3[T1, T2, T3](&CustomCombiner{}) で呼び出すことができ、ここで T1 はアキュムレータのタイプ、T2 は入力のタイプ、T3 は出力のタイプです。
4.2.4.2. CombineFn を使用した高度な結合
より複雑な結合関数の場合、CombineFn のサブクラスを定義できます。結合関数により洗練されたアキュムレータが必要な場合、追加の前処理または後処理を実行する必要がある場合、出力タイプが変更される可能性がある場合、またはキーを考慮する場合には、CombineFn を使用する必要があります。
一般的な結合演算は、5 つの演算で構成されます。CombineFn のサブクラスを作成する場合は、対応するメソッドをオーバーライドして 5 つの演算を提供する必要があります。MergeAccumulators のみが必須メソッドです。他のメソッドは、アキュムレータのタイプに基づいてデフォルトの解釈がされます。ライフサイクルメソッドは次のとおりです。
アキュムレータの作成 は、新しい「ローカル」アキュムレータを作成します。平均値を計算する例では、ローカルアキュムレータは値の累積合計(最終的な平均除算の分子値)と、これまで合計された値の数(分母値)を追跡します。これは、分散方式で任意の回数呼び出される可能性があります。
入力の追加 は、入力要素をアキュムレータに追加し、アキュムレータの値を返します。この例では、合計を更新し、カウントを増分します。これは並列して呼び出される可能性もあります。
アキュムレータのマージ は、複数の累積器を単一の累積器にマージします。これは、最終計算の前に複数の累積器のデータがどのように結合されるかを示しています。平均値の計算の場合、除算の各部分を表す累積器がマージされます。これは、その出力に対して任意の回数再び呼び出される可能性があります。
出力の抽出 は、最終計算を実行します。平均値を計算する場合、これは、合計された値の合計を合計された値の数で除算することを意味します。これは、最終的にマージされた累積器に対して1回呼び出されます。
圧縮 は、アキュムレータのよりコンパクトな表現を返します。これは、アキュムレータがネットワークを介して送信される前に呼び出され、値がバッファリングされる場合や、アキュムレータに追加されるときに遅延して未処理の状態が保持される場合に役立ちます。Compact は、同等であるが、変更されている可能性のあるアキュムレータを返す必要があります。ほとんどの場合、Compact は必要ありません。Compact の使用の現実的な例については、TopCombineFn の Python SDK 実装を参照してください。
次のコード例は、平均値を計算する CombineFn を定義する方法を示しています。
public class AverageFn extends CombineFn<Integer, AverageFn.Accum, Double> {
  public static class Accum {
    int sum = 0;
    int count = 0;
  }

  @Override
  public Accum createAccumulator() { return new Accum(); }

  @Override
  public Accum addInput(Accum accum, Integer input) {
      accum.sum += input;
      accum.count++;
      return accum;
  }

  @Override
  public Accum mergeAccumulators(Iterable<Accum> accums) {
    Accum merged = createAccumulator();
    for (Accum accum : accums) {
      merged.sum += accum.sum;
      merged.count += accum.count;
    }
    return merged;
  }

  @Override
  public Double extractOutput(Accum accum) {
    return ((double) accum.sum) / accum.count;
  }

  // No-op
  @Override
  public Accum compact(Accum accum) { return accum; }
}
pc = ...
class AverageFn(beam.CombineFn):
def create_accumulator(self):
return (0.0, 0)
def add_input(self, sum_count, input):
(sum, count) = sum_count
return sum + input, count + 1
def merge_accumulators(self, accumulators):
sums, counts = zip(*accumulators)
return sum(sums), sum(counts)
def extract_output(self, sum_count):
(sum, count) = sum_count
return sum / count if count else float('NaN')
def compact(self, accumulator):
# No-op
return accumulatortype averageFn struct{}
type averageAccum struct {
Count, Sum int
}
func (fn *averageFn) CreateAccumulator() averageAccum {
return averageAccum{0, 0}
}
func (fn *averageFn) AddInput(a averageAccum, v int) averageAccum {
return averageAccum{Count: a.Count + 1, Sum: a.Sum + v}
}
func (fn *averageFn) MergeAccumulators(a, v averageAccum) averageAccum {
return averageAccum{Count: a.Count + v.Count, Sum: a.Sum + v.Sum}
}
func (fn *averageFn) ExtractOutput(a averageAccum) float64 {
if a.Count == 0 {
return math.NaN()
}
return float64(a.Sum) / float64(a.Count)
}
func (fn *averageFn) Compact(a averageAccum) averageAccum {
// No-op
return a
}
func init() {
register.Combiner3[averageAccum, int, float64](&averageFn{})
}const meanCombineFn: beam.CombineFn<number, [number, number], number> =
{
createAccumulator: () => [0, 0],
addInput: ([sum, count]: [number, number], i: number) => [
sum + i,
count + 1,
],
mergeAccumulators: (accumulators: [number, number][]) =>
accumulators.reduce(([sum0, count0], [sum1, count1]) => [
sum0 + sum1,
count0 + count1,
]),
extractOutput: ([sum, count]: [number, number]) => sum / count,
};4.2.4.3. PCollection の単一の値への結合
グローバル結合を使用して、特定の PCollection のすべての要素を、1 つの要素としてパイプラインに表現される単一の値に変換します。次のコード例は、Beam 提供の合計結合関数を適用して、整数の PCollection に対して単一の合計値を生成する方法を示しています。
// Sum.SumIntegerFn() combines the elements in the input PCollection. The resulting PCollection, called sum,
// contains one value: the sum of all the elements in the input PCollection.
PCollection<Integer> pc = ...;
PCollection<Integer> sum = pc.apply(
   Combine.globally(new Sum.SumIntegerFn()));
# sum combines the elements in the input PCollection.
# The resulting PCollection, called result, contains one value: the sum of all
# the elements in the input PCollection.
pc = ...
average = pc | beam.CombineGlobally(AverageFn())average := beam.Combine(s, &averageFn{}, ints)const pcoll = root.apply(beam.create([4, 5, 6]));
const result = pcoll.apply(
beam.groupGlobally().combining((c) => c, meanCombineFn, "mean")
);type: Combine
config:
group_by: []
combine:
weight: sum4.2.4.4. 結合とグローバルウィンドウ化
入力 PCollection がデフォルトのグローバルウィンドウ化を使用している場合、デフォルトの動作は、1 つのアイテムを含む PCollection を返すことです。そのアイテムの値は、Combine を適用したときに指定した結合関数のアキュムレータから取得されます。たとえば、Beam 提供の合計結合関数はゼロ値(空の入力の合計)を返し、最小値結合関数は最大値または無限大の値を返します。
入力データが空の場合に、Combine が空の PCollection を返すようにするには、次のコード例のように、Combine トランスフォームを適用するときに .withoutDefaults を指定します。
PCollection<Integer> pc = ...;
PCollection<Integer> sum = pc.apply(
  Combine.globally(new Sum.SumIntegerFn()).withoutDefaults());
pc = ...
sum = pc | beam.CombineGlobally(sum).without_defaults()func returnSideOrDefault(d float64, iter func(*float64) bool) float64 {
var c float64
if iter(&c) {
// Side input has a value, so return it.
return c
}
// Otherwise, return the default
return d
}
func init() { register.Function2x1(returnSideOrDefault) }
func globallyAverageWithDefault(s beam.Scope, ints beam.PCollection) beam.PCollection {
// Setting combine defaults has requires no helper function in the Go SDK.
average := beam.Combine(s, &averageFn{}, ints)
// To add a default value:
defaultValue := beam.Create(s, float64(0))
return beam.ParDo(s, returnSideOrDefault, defaultValue, beam.SideInput{Input: average})
}const pcoll = root.apply(
beam.create([
{ player: "alice", accuracy: 1.0 },
{ player: "bob", accuracy: 0.99 },
{ player: "eve", accuracy: 0.5 },
{ player: "eve", accuracy: 0.25 },
])
);
const result = pcoll.apply(
beam
.groupGlobally()
.combining("accuracy", combiners.mean, "mean")
.combining("accuracy", combiners.max, "max")
);
const expected = [{ max: 1.0, mean: 0.685 }];4.2.4.5. 結合と非グローバルウィンドウ化
PCollection が非グローバルウィンドウ化関数を使用している場合、Beam はデフォルトの動作を提供しません。Combine を適用するときに、次のオプションのいずれかを指定する必要があります。
.withoutDefaultsを指定します。入力PCollectionで空のウィンドウは、出力コレクションでも同様に空になります。.asSingletonViewを指定します。出力はすぐにPCollectionViewに変換されます。これは、サイド入力として後で使用する際に、空のウィンドウごとにデフォルト値を提供します。通常、このオプションは、パイプラインのCombineの結果が、後でパイプラインのサイド入力として使用される場合にのみ必要です。
PCollection が非グローバルウィンドウ化関数を使用している場合、Beam Go SDK はグローバルウィンドウ化の場合と同じように動作します。入力 PCollection で空のウィンドウは、出力コレクションでも同様に空になります。
4.2.4.6. キー付き PCollection 内の値の結合
キー付き PCollection を作成した後(たとえば、GroupByKey トランスフォームを使用)、一般的なパターンは、各キーに関連付けられた値のコレクションを単一の結合された値に結合することです。GroupByKey の前の例から、groupedWords というキーでグループ化された PCollection は次のようになります。
  cat, [1,5,9]
  dog, [5,2]
  and, [1,2,6]
  jump, [3]
  tree, [2]
  ...
上記の PCollection では、各要素は文字列キー(たとえば、「cat」)と、その値に対する整数のイテラブル(最初の要素では [1, 5, 9] を含む)を持っています。パイプラインの次の処理ステップが値を個別に考慮するのではなく結合する場合、整数のイテラブルを結合して、各キーとペアになる単一の結合値を作成できます。GroupByKey の後に値のコレクションをマージするというこのパターンは、Beam の Combine PerKey トランスフォームと同等です。Combine PerKey に提供する結合関数は、結合的削減関数または CombineFn のサブクラスである必要があります。
// PCollection is grouped by key and the Double values associated with each key are combined into a Double.
PCollection<KV<String, Double>> salesRecords = ...;
PCollection<KV<String, Double>> totalSalesPerPerson =
  salesRecords.apply(Combine.<String, Double, Double>perKey(
    new Sum.SumDoubleFn()));

// The combined value is of a different type than the original collection of values per key. PCollection has
// keys of type String and values of type Integer, and the combined value is a Double.
PCollection<KV<String, Integer>> playerAccuracy = ...;
PCollection<KV<String, Double>> avgAccuracyPerPlayer =
  playerAccuracy.apply(Combine.<String, Integer, Double>perKey(
    new MeanInts())));
# PCollection is grouped by key and the numeric values associated with each key
# are averaged into a float.
player_accuracies = ...
avg_accuracy_per_player = (
player_accuracies
| beam.CombinePerKey(beam.combiners.MeanCombineFn()))// PCollection is grouped by key and the numeric values associated with each key
// are averaged into a float64.
playerAccuracies := ... // PCollection<string,int>
avgAccuracyPerPlayer := stats.MeanPerKey(s, playerAccuracies)
// avgAccuracyPerPlayer is a PCollection<string,float64>
const pcoll = root.apply(
  beam.create([
    { player: "alice", accuracy: 1.0 },
    { player: "bob", accuracy: 0.99 },
    { player: "eve", accuracy: 0.5 },
    { player: "eve", accuracy: 0.25 },
  ])
);
const result = pcoll.apply(
  beam
    .groupBy("player")
    .combining("accuracy", combiners.mean, "mean")
    .combining("accuracy", combiners.max, "max")
);
const expected = [
  { player: "alice", mean: 1.0, max: 1.0 },
  { player: "bob", mean: 0.99, max: 0.99 },
  { player: "eve", mean: 0.375, max: 0.5 },
];type: Combine
config:
group_by: [animal]
combine:
total_weight:
fn: sum
value: weight
average_weight:
fn: mean
value: weight4.2.5. Flatten
Flatten Flatten Flatten Flatten は、同じデータ型を格納する PCollection オブジェクトのための Beam トランスフォームです。Flatten は、複数の PCollection オブジェクトを単一の論理 PCollection にマージします。
次の例は、Flatten トランスフォームを適用して複数の PCollection オブジェクトをマージする方法を示しています。
// Flatten takes a PCollectionList of PCollection objects of a given type.
// Returns a single PCollection that contains all of the elements in the PCollection objects in that list.
PCollection<String> pc1 = ...;
PCollection<String> pc2 = ...;
PCollection<String> pc3 = ...;
PCollectionList<String> collections = PCollectionList.of(pc1).and(pc2).and(pc3);

PCollection<String> merged = collections.apply(Flatten.<String>pCollections());
FlattenWith トランスフォームを使用して、PCollection を連結に適した方法で出力 PCollection にマージすることもできます。
PCollection<String> merged = pc1
    .apply(...)
    // Merges the elements of pc2 in at this point...
    .apply(FlattenWith.of(pc2))
    .apply(...)
    // and the elements of pc3 at this point.
    .apply(FlattenWith.of(pc3))
    .apply(...);
# Flatten takes a tuple of PCollection objects.
# Returns a single PCollection that contains all of the elements in the PCollection objects in that tuple.
merged = (
(pcoll1, pcoll2, pcoll3)
# A list of tuples can be "piped" directly into a Flatten transform.
| beam.Flatten())FlattenWith 変換を使うと、PCollection を出力 PCollection にマージできます。これはチェイニングとの互換性が高い方法です。
merged = (
    pcoll1
    | SomeTransform()
    | beam.FlattenWith(pcoll2, pcoll3)
    | SomeOtherTransform())
FlattenWith は、ルート PCollection を生成する変換(Create や Read など)と、既に構築済みの PCollection の両方を受け取ることができます。これらを適用し、その出力を結果の出力 PCollection にフラット化します。
merged = (
    pcoll
    | SomeTransform()
    | beam.FlattenWith(beam.Create(['x', 'y', 'z']))
    | SomeOtherTransform())
// Flatten accepts any number of PCollections of the same element type.
// Returns a single PCollection that contains all of the elements in input PCollections.
merged := beam.Flatten(s, pcol1, pcol2, pcol3)// Flatten taken an array of PCollection objects, wrapped in beam.P(...)
// Returns a single PCollection that contains a union of all of the elements in all input PCollections.
const fib = root.apply(
beam.withName("createFib", beam.create([1, 1, 2, 3, 5, 8]))
);
const pow = root.apply(
beam.withName("createPow", beam.create([1, 2, 4, 8, 16, 32]))
);
const result = beam.P([fib, pow]).apply(beam.flatten());- type: Flatten
input: [SomeProducingTransform, AnotherProducingTransform]Beam YAML では、通常、明示的なフラット化は必要ありません。任意の変換に対して複数の入力をリストできるため、暗黙的にフラット化されます。
4.2.5.1. マージされたコレクションのデータエンコーディング
デフォルトでは、出力 PCollection のコーダーは、入力 PCollectionList の最初の PCollection のコーダーと同じです。ただし、入力 PCollection オブジェクトはそれぞれ異なるコーダーを使用できます。ただし、それらがすべて選択した言語で同じデータ型を含む限りです。
4.2.5.2. ウィンドウ化されたコレクションのマージ
ウィンドウ処理が適用されている PCollection オブジェクトをマージするために Flatten を使用する場合、マージするすべての PCollection オブジェクトは互換性のあるウィンドウ処理戦略とウィンドウサイズを使用する必要があります。たとえば、マージするすべてのコレクションは、(仮に)同一の5分間の固定ウィンドウ、または30秒ごとに開始する4分間のスライドウィンドウを使用する必要があります。
パイプラインが互換性のないウィンドウを持つ PCollection オブジェクトをマージするために Flatten を使用しようとすると、パイプラインの構築時に Beam は IllegalStateException エラーを生成します。
4.2.6. Partition
Partition Partition Partition Partition は、同じデータ型を格納する PCollection オブジェクトのための Beam 変換です。Partition は、単一の PCollection を固定数のより小さなコレクションに分割します。
Typescript SDK では、多くの場合、Split 変換の方が自然に使用できます。
Partition は、ユーザーが提供するパーティショニング関数に従って、PCollection の要素を分割します。パーティショニング関数には、入力 PCollection の要素を各結果のパーティション PCollection に分割する方法を決定するロジックが含まれています。パーティションの数は、グラフ構築時に決定する必要があります。たとえば、実行時にコマンドラインオプションとしてパーティションの数を渡すことができます(その後、パイプライングラフを構築するために使用されます)。ただし、パイプライングラフが構築された後(たとえば、データに基づいて計算された後)に、パイプラインの途中でパーティションの数を決定することはできません。
次の例では、PCollection をパーセンタイルグループに分割します。
// Provide an int value with the desired number of result partitions, and a PartitionFn that represents the
// partitioning function. In this example, we define the PartitionFn in-line. Returns a PCollectionList
// containing each of the resulting partitions as individual PCollection objects.
PCollection<Student> students = ...;
// Split students up into 10 partitions, by percentile:
PCollectionList<Student> studentsByPercentile =
    students.apply(Partition.of(10, new PartitionFn<Student>() {
        public int partitionFor(Student student, int numPartitions) {
            return student.getPercentile()  // 0..99
                 * numPartitions / 100;
        }}));

// You can extract each partition from the PCollectionList using the get method, as follows:
PCollection<Student> fortiethPercentile = studentsByPercentile.get(4);
# Provide an int value with the desired number of result partitions, and a partitioning function (partition_fn in this example).
# Returns a tuple of PCollection objects containing each of the resulting partitions as individual PCollection objects.
students = ...
def partition_fn(student, num_partitions):
return int(get_percentile(student) * num_partitions / 100)
by_decile = students | beam.Partition(partition_fn, 10)
# You can extract each partition from the tuple of PCollection objects as follows:
fortieth_percentile = by_decile[4]func decileFn(student Student) int {
return int(float64(student.Percentile) / float64(10))
}
func init() {
register.Function1x1(decileFn)
}
// Partition returns a slice of PCollections
studentsByPercentile := beam.Partition(s, 10, decileFn, students)
// Each partition can be extracted by indexing into the slice.
fortiethPercentile := studentsByPercentile[4]const deciles: PCollection<Student>[] = students.apply(
beam.partition(
(student, numPartitions) =>
Math.floor((getPercentile(student) / 100) * numPartitions),
10
)
);
const topDecile: PCollection<Student> = deciles[9];type: Partition
config:
by: str(percentile // 10)
language: python
outputs: ["0", "1", "2", "3", "4", "5", "6", "7", "8", "9", "10"]Beam YAML では、PCollection は整数値ではなく文字列でパーティション分割されることに注意してください。
4.3. Beam変換のユーザーコード作成の要件
Beam 変換のユーザーコードを構築する際には、分散実行の性質を考慮する必要があります。たとえば、多くの異なるマシンで並行してユーザー関数の多くのコピーが実行されている可能性があり、それらのコピーは独立して機能し、他のコピーと通信したり状態を共有したりしません。選択したパイプラインランナーと処理バックエンドによっては、ユーザーコード関数の各コピーが再試行または複数回実行される可能性があります。そのため、ユーザーコードに状態依存性を含める際には注意する必要があります。
一般的に、ユーザーコードは少なくとも次の要件を満たす必要があります。
- 関数オブジェクトは**シリアライズ可能**である必要があります。
- 関数オブジェクトは**スレッド互換**である必要があり、Beam SDK はスレッドセーフではないことに注意してください。
さらに、関数オブジェクトを**べき等**にすることをお勧めします。べき等でない関数は Beam でサポートされていますが、外部の副作用がないことを確認するために追加の検討が必要です。
注記: これらの要件は、
DoFn(ParDo変換で使用される関数オブジェクト)、CombineFn(Combine変換で使用される関数オブジェクト)、およびWindowFn(Window変換で使用される関数オブジェクト)のサブクラスに適用されます。
注記: これらの要件は、
DoFn(ParDo変換で使用される関数オブジェクト)、CombineFn(Combine変換で使用される関数オブジェクト)、およびWindowFn(Window変換で使用される関数オブジェクト)に適用されます。
4.3.1. シリアライズ可能性
変換に提供する関数オブジェクトはすべて**完全にシリアライズ可能**である必要があります。これは、関数のコピーをシリアライズして処理クラスタのリモートワーカーに送信する必要があるためです。DoFn、CombineFn、WindowFnなどのユーザーコードの基底クラスは既にSerializableを実装していますが、サブクラスはシリアライズ不可能なメンバーを追加してはなりません。 関数は、register.FunctionXxY(単純な関数の場合)またはregister.DoFnXxY(構造化されたDoFnの場合)で登録されており、クロージャでない限り、シリアライズ可能です。構造化されたDoFnでは、エクスポートされたすべてのフィールドがシリアライズされます。エクスポートされていないフィールドはシリアライズできず、サイレントに無視されます。 Typescript SDK は、ts-serialize-closures を使用して関数(およびその他のオブジェクト)をシリアライズします。これは、クロージャでない関数に対してはすぐに動作し、問題の関数(および参照するクロージャ)が ts-closure-transformフック (例:tscの代わりにttscを使用)でコンパイルされている限り、クロージャに対しても動作します。あるいは、requireForSerialization("importableModuleDefiningFunc", {func}) を呼び出して 関数を直接名前で登録 することもでき、これはエラーが発生しにくくなります。Javascript の場合が多いように、func がクロージャを含むオブジェクトを返す場合、func だけを登録するだけでは不十分であり、使用される場合はその戻り値を登録する必要があります。
考慮すべきその他のシリアライズ可能性要因を以下に示します。
- 一時的なエクスポートされていない フィールドは、自動的にシリアライズされないため、ワーカーインスタンスに送信されません。
- シリアライズの前に大量のデータを含むフィールドの読み込みを避けてください。
- 関数オブジェクトの個々のインスタンスは、データを共有できません。
- 適用後に関数オブジェクトを変更しても、効果はありません。
注記: 匿名内部クラスインスタンスを使用して関数オブジェクトをインラインで宣言する場合に注意してください。非静的コンテキストでは、内部クラスインスタンスには暗黙的に包含クラスとクラスの状態へのポインターが含まれます。その包含クラスもシリアライズされるため、関数オブジェクト自体に適用されるものと同じ考慮事項が、この外部クラスにも適用されます。
注記: 関数がクロージャであるかどうかを検出する方法はありません。クロージャはランタイムエラーとパイプラインの失敗を引き起こします。可能な限り匿名関数の使用を避けてください。
4.3.2. スレッド互換性
関数オブジェクトはスレッド互換である必要があります。関数オブジェクトの各インスタンスは、独自の個別スレッドを作成しない限り、ワーカーインスタンスで一度に1つのスレッドによってアクセスされます。ただし、**Beam SDK はスレッドセーフではない**ことに注意してください。ユーザーコードで独自の個別スレッドを作成する場合は、独自の同期を提供する必要があります。関数オブジェクトの静的メンバーはワーカーインスタンスに渡されず、関数オブジェクトの複数のインスタンスが異なるスレッドからアクセスされる可能性があることに注意してください。
4.3.3. イデムポテンシー
関数オブジェクトをべき等にすることをお勧めします。つまり、意図しない副作用を引き起こすことなく、必要に応じて繰り返し再試行できることです。べき等でない関数はサポートされていますが、Beam モデルはユーザーコードが呼び出される回数または再試行される回数について保証を提供しません。したがって、関数オブジェクトをべき等にすることで、パイプラインの出力が決定論的になり、変換の動作がより予測可能でデバッグが容易になります。
4.4. サイド入力
メイン入力PCollectionに加えて、サイド入力という形で追加の入力をParDo変換に提供できます。サイド入力とは、入力PCollectionの要素を処理するたびにDoFnがアクセスできる追加の入力です。サイド入力を指定すると、ParDo変換のDoFn内で処理中に読み取ることができる他のデータのビューが作成されます。
サイド入力は、ParDoが入力PCollectionの各要素を処理するときに追加のデータを追加する必要があるが、追加のデータは実行時に(ハードコードではなく)決定する必要がある場合に役立ちます。このような値は、入力データによって決定されるか、パイプラインの異なるブランチに依存する可能性があります。
すべてのサイド入力イテラブルは、汎用的なregister.IterX[...]関数を使用して登録する必要があります。これにより、イテラブルの実行時実行が最適化されます。
4.4.1. ParDoへのサイド入力の渡
  // Pass side inputs to your ParDo transform by invoking .withSideInputs.
  // Inside your DoFn, access the side input by using the method DoFn.ProcessContext.sideInput.

  // The input PCollection to ParDo.
  PCollection<String> words = ...;

  // A PCollection of word lengths that we'll combine into a single value.
  PCollection<Integer> wordLengths = ...; // Singleton PCollection

  // Create a singleton PCollectionView from wordLengths using Combine.globally and View.asSingleton.
  final PCollectionView<Integer> maxWordLengthCutOffView =
     wordLengths.apply(Combine.globally(new Max.MaxIntFn()).asSingletonView());


  // Apply a ParDo that takes maxWordLengthCutOffView as a side input.
  PCollection<String> wordsBelowCutOff =
  words.apply(ParDo
      .of(new DoFn<String, String>() {
          @ProcessElement
          public void processElement(@Element String word, OutputReceiver<String> out, ProcessContext c) {
            // In our DoFn, access the side input.
            int lengthCutOff = c.sideInput(maxWordLengthCutOffView);
            if (word.length() <= lengthCutOff) {
              out.output(word);
            }
          }
      }).withSideInputs(maxWordLengthCutOffView)
  );
# Side inputs are available as extra arguments in the DoFn's process method or Map / FlatMap's callable.
# Optional, positional, and keyword arguments are all supported. Deferred arguments are unwrapped into their
# actual values. For example, using pvalue.AsIteor(pcoll) at pipeline construction time results in an iterable
# of the actual elements of pcoll being passed into each process invocation. In this example, side inputs are
# passed to a FlatMap transform as extra arguments and consumed by filter_using_length.
words = ...
# Callable takes additional arguments.
def filter_using_length(word, lower_bound, upper_bound=float('inf')):
if lower_bound <= len(word) <= upper_bound:
yield word
# Construct a deferred side input.
avg_word_len = (
words
| beam.Map(len)
| beam.CombineGlobally(beam.combiners.MeanCombineFn()))
# Call with explicit side inputs.
small_words = words | 'small' >> beam.FlatMap(filter_using_length, 0, 3)
# A single deferred side input.
larger_than_average = (
words | 'large' >> beam.FlatMap(
filter_using_length, lower_bound=pvalue.AsSingleton(avg_word_len))
)
# Mix and match.
small_but_nontrivial = words | beam.FlatMap(
filter_using_length,
lower_bound=2,
upper_bound=pvalue.AsSingleton(avg_word_len))
# We can also pass side inputs to a ParDo transform, which will get passed to its process method.
# The first two arguments for the process method would be self and element.
class FilterUsingLength(beam.DoFn):
def process(self, element, lower_bound, upper_bound=float('inf')):
if lower_bound <= len(element) <= upper_bound:
yield element
small_words = words | beam.ParDo(FilterUsingLength(), 0, 3)
...// Side inputs are provided using `beam.SideInput` in the DoFn's ProcessElement method.
// Side inputs can be arbitrary PCollections, which can then be iterated over per element
// in a DoFn.
// Side input parameters appear after main input elements, and before any output emitters.
words = ...
// avgWordLength is a PCollection containing a single element, a singleton.
avgWordLength := stats.Mean(s, wordLengths)
// Side inputs are added as with the beam.SideInput option to beam.ParDo.
wordsAboveCutOff := beam.ParDo(s, filterWordsAbove, words, beam.SideInput{Input: avgWordLength})
wordsBelowCutOff := beam.ParDo(s, filterWordsBelow, words, beam.SideInput{Input: avgWordLength})
// filterWordsAbove is a DoFn that takes in a word,
// and a singleton side input iterator as of a length cut off
// and only emits words that are beneath that cut off.
//
// If the iterator has no elements, an error is returned, aborting processing.
func filterWordsAbove(word string, lengthCutOffIter func(*float64) bool, emitAboveCutoff func(string)) error {
var cutOff float64
ok := lengthCutOffIter(&cutOff)
if !ok {
return fmt.Errorf("no length cutoff provided")
}
if float64(len(word)) > cutOff {
emitAboveCutoff(word)
}
return nil
}
// filterWordsBelow is a DoFn that takes in a word,
// and a singleton side input of a length cut off
// and only emits words that are beneath that cut off.
//
// If the side input isn't a singleton, a runtime panic will occur.
func filterWordsBelow(word string, lengthCutOff float64, emitBelowCutoff func(string)) {
if float64(len(word)) <= lengthCutOff {
emitBelowCutoff(word)
}
}
func init() {
register.Function3x1(filterWordsAbove)
register.Function3x0(filterWordsBelow)
// 1 input of type string => Emitter1[string]
register.Emitter1[string]()
// 1 input of type float64 => Iter1[float64]
register.Iter1[float64]()
}
// The Go SDK doesn't support custom ViewFns.
// See https://github.com/apache/beam/issues/18602 for details
// on how to contribute them!
// Side inputs are provided by passing an extra context object to
// `map`, `flatMap`, or `parDo` transforms.  This object will get passed as an
// extra argument to the provided function (or `process` method of the `DoFn`).
// `SideInputParam` properties (generally created with `pardo.xxxSideInput(...)`)
// have a `lookup` method that can be invoked from within the process method.

// Let words be a PCollection of strings.
const words : PCollection<string> = ...

// meanLengthPColl will contain a single number whose value is the
// average length of the words
const meanLengthPColl: PCollection<number> = words
  .apply(
    beam
      .groupGlobally<string>()
      .combining((word) => word.length, combiners.mean, "mean")
  )
  .map(({ mean }) => mean);

// Now we use this as a side input to yield only words that are
// smaller than average.
const smallWords = words.flatMap(
  // This is the function, taking context as a second argument.
  function* keepSmall(word, context) {
    if (word.length < context.meanLength.lookup()) {
      yield word;
    }
  },
  // This is the context that will be passed as a second argument.
  { meanLength: pardo.singletonSideInput(meanLengthPColl) }
);
4.4.2. サイド入力とウィンドウイング
ウィンドウ化されたPCollectionは無限である可能性があり、したがって単一の値(または単一のコレクションクラス)に圧縮できません。ウィンドウ化されたPCollectionのPCollectionViewを作成する場合、PCollectionViewはウィンドウごとに単一のエンティティを表します(ウィンドウごとに1つのシングルトン、ウィンドウごとに1つのリストなど)。
Beamは、メイン入力要素のウィンドウを使用して、サイド入力要素の適切なウィンドウを検索します。Beamは、メイン入力要素のウィンドウをサイド入力のウィンドウセットに投影し、結果のウィンドウからサイド入力を使用します。メイン入力とサイド入力が同一のウィンドウを持つ場合、投影は正確に対応するウィンドウを提供します。ただし、入力が異なるウィンドウを持つ場合、Beamは投影を使用して最も適切なサイド入力ウィンドウを選択します。
たとえば、メイン入力が1分間の固定時間ウィンドウを使用してウィンドウ化され、サイド入力が1時間間の固定時間ウィンドウを使用してウィンドウ化されている場合、Beamはメイン入力ウィンドウをサイド入力ウィンドウセットに対して投影し、適切な1時間の長さのサイド入力ウィンドウからサイド入力値を選択します。
メイン入力要素が複数のウィンドウに存在する場合、processElementは、ウィンドウごとに1回ずつ、複数回呼び出されます。processElementへの各呼び出しは、メイン入力要素の「現在の」ウィンドウを投影するため、毎回異なるサイド入力ビューを提供する可能性があります。
サイド入力に複数のトリガー発火がある場合、Beamは最新のトリガー発火からの値を使用します。これは、単一のグローバルウィンドウを持つサイド入力を使用し、トリガーを指定する場合に特に役立ちます。
4.5. 追加出力
ParDo は常にメインの出力 PCollection(apply 関数の戻り値)を生成しますが、任意の数の追加出力 PCollection を生成することもできます。複数の出力を生成する場合、ParDo は(メイン出力を含む)すべての出力 PCollection をまとめて返します。
beam.ParDo は常に PCollection を出力しますが、DoFn は任意の数の追加出力 PCollection を生成することも、まったく生成しないこともできます。複数の出力を生成する場合は、出力の数に一致する ParDo 関数を使用して DoFn を呼び出す必要があります。出力 PCollection が2つの場合は beam.ParDo2、3つの場合は beam.ParDo3 というように、beam.ParDo7 まであります。それ以上必要な場合は、[]beam.PCollection を返す beam.ParDoN を使用できます。
ParDo は常にメインの出力 PCollection(apply 関数の戻り値)を生成します。複数の出力を生成する場合は、ParDo 操作で異なるプロパティを持つオブジェクトを出力し、この操作の後に Split を使用して複数の PCollection に分割します。
Beam YAMLでは、追加のフィールドを含む可能性のある単一のPCollectionにすべて出力を送り出し、その後Partitionを使用してこの単一のPCollectionを複数の異なるPCollection出力に分割することで、複数の出力を取得します。
4.5.1. 複数の出力のためのタグ
Split PTransform は、{tagA?: A, tagB?: B, ...} 形式の要素の PCollection を受け取り、{tagA: PCollection<A>, tagB: PCollection<B>, ...} というオブジェクトを返します。期待されるタグのセットは操作に渡されます。複数のタグまたは不明なタグの処理方法は、デフォルト以外の SplitOptions インスタンスを渡すことで指定できます。
Go SDK は出力タグを使用せず、複数の出力 PCollection には位置順序を使用します。
// To emit elements to multiple output PCollections, create a TupleTag object to identify each collection
// that your ParDo produces. For example, if your ParDo produces three output PCollections (the main output
// and two additional outputs), you must create three TupleTags. The following example code shows how to
// create TupleTags for a ParDo with three output PCollections.

  // Input PCollection to our ParDo.
  PCollection<String> words = ...;

  // The ParDo will filter words whose length is below a cutoff and add them to
  // the main output PCollection<String>.
  // If a word is above the cutoff, the ParDo will add the word length to an
  // output PCollection<Integer>.
  // If a word starts with the string "MARKER", the ParDo will add that word to an
  // output PCollection<String>.
  final int wordLengthCutOff = 10;

  // Create three TupleTags, one for each output PCollection.
  // Output that contains words below the length cutoff.
  final TupleTag<String> wordsBelowCutOffTag =
      new TupleTag<String>(){};
  // Output that contains word lengths.
  final TupleTag<Integer> wordLengthsAboveCutOffTag =
      new TupleTag<Integer>(){};
  // Output that contains "MARKER" words.
  final TupleTag<String> markedWordsTag =
      new TupleTag<String>(){};

// Passing Output Tags to ParDo:
// After you specify the TupleTags for each of your ParDo outputs, pass the tags to your ParDo by invoking
// .withOutputTags. You pass the tag for the main output first, and then the tags for any additional outputs
// in a TupleTagList. Building on our previous example, we pass the three TupleTags for our three output
// PCollections to our ParDo. Note that all of the outputs (including the main output PCollection) are
// bundled into the returned PCollectionTuple.

  PCollectionTuple results =
      words.apply(ParDo
          .of(new DoFn<String, String>() {
            // DoFn continues here.
            ...
          })
          // Specify the tag for the main output.
          .withOutputTags(wordsBelowCutOffTag,
          // Specify the tags for the two additional outputs as a TupleTagList.
                          TupleTagList.of(wordLengthsAboveCutOffTag)
                                      .and(markedWordsTag)));
# To emit elements to multiple output PCollections, invoke with_outputs() on the ParDo, and specify the
# expected tags for the outputs. with_outputs() returns a DoOutputsTuple object. Tags specified in
# with_outputs are attributes on the returned DoOutputsTuple object. The tags give access to the
# corresponding output PCollections.
results = (
words
| beam.ParDo(ProcessWords(), cutoff_length=2, marker='x').with_outputs(
'above_cutoff_lengths',
'marked strings',
main='below_cutoff_strings'))
below = results.below_cutoff_strings
above = results.above_cutoff_lengths
marked = results['marked strings'] # indexing works as well
# The result is also iterable, ordered in the same order that the tags were passed to with_outputs(),
# the main tag (if specified) first.
below, above, marked = (words
| beam.ParDo(
ProcessWords(), cutoff_length=2, marker='x')
.with_outputs('above_cutoff_lengths',
'marked strings',
main='below_cutoff_strings'))// beam.ParDo3 returns PCollections in the same order as
// the emit function parameters in processWords.
below, above, marked := beam.ParDo3(s, processWords, words)
// processWordsMixed uses both a standard return and an emitter function.
// The standard return produces the first PCollection from beam.ParDo2,
// and the emitter produces the second PCollection.
length, mixedMarked := beam.ParDo2(s, processWordsMixed, words)# Create three PCollections from a single input PCollection.
const { below, above, marked } = to_split.apply(
beam.split(["below", "above", "marked"])
);4.5.2. DoFnでの複数の出力への出力
対応するPCollectionに対して0個以上の要素を生成するために必要に応じてエミッタ関数を呼び出します。同じ値を複数のエミッタで出力できます。通常どおり、どのエミッタからも値を出力した後は、値を変更しないでください。
すべてエミッタは、汎用的なregister.EmitterX[...]関数を使用して登録する必要があります。これにより、エミッタの実行時のパフォーマンスが最適化されます。
DoFn は標準的な戻り値を介して単一の要素を返すこともできます。標準的な戻り値は、常に beam.ParDo から返される最初の PCollection です。その他エミッタは、定義されたパラメータの順序に従って、それぞれ独自の PCollection に出力を送ります。
MapToFields は常に一対一です。一対多のマッピングを実行するには、まずフィールドを反復可能な型にマッピングし、その後、この変換の後に、展開されたフィールドの値ごとに複数の値を出力するExplode変換を実行します。
// Inside your ParDo's DoFn, you can emit an element to a specific output PCollection by providing a
// MultiOutputReceiver to your process method, and passing in the appropriate TupleTag to obtain an OutputReceiver.
// After your ParDo, extract the resulting output PCollections from the returned PCollectionTuple.
// Based on the previous example, this shows the DoFn emitting to the main output and two additional outputs.

  .of(new DoFn<String, String>() {
     public void processElement(@Element String word, MultiOutputReceiver out) {
       if (word.length() <= wordLengthCutOff) {
         // Emit short word to the main output.
         // In this example, it is the output with tag wordsBelowCutOffTag.
         out.get(wordsBelowCutOffTag).output(word);
       } else {
         // Emit long word length to the output with tag wordLengthsAboveCutOffTag.
         out.get(wordLengthsAboveCutOffTag).output(word.length());
       }
       if (word.startsWith("MARKER")) {
         // Emit word to the output with tag markedWordsTag.
         out.get(markedWordsTag).output(word);
       }
     }}));
# Inside your ParDo's DoFn, you can emit an element to a specific output by wrapping the value and the output tag (str).
# using the pvalue.OutputValue wrapper class.
# Based on the previous example, this shows the DoFn emitting to the main output and two additional outputs.
class ProcessWords(beam.DoFn):
def process(self, element, cutoff_length, marker):
if len(element) <= cutoff_length:
# Emit this short word to the main output.
yield element
else:
# Emit this word's long length to the 'above_cutoff_lengths' output.
yield pvalue.TaggedOutput('above_cutoff_lengths', len(element))
if element.startswith(marker):
# Emit this word to a different output with the 'marked strings' tag.
yield pvalue.TaggedOutput('marked strings', element)
# Producing multiple outputs is also available in Map and FlatMap.
# Here is an example that uses FlatMap and shows that the tags do not need to be specified ahead of time.
def even_odd(x):
yield pvalue.TaggedOutput('odd' if x % 2 else 'even', x)
if x % 10 == 0:
yield x
results = numbers | beam.FlatMap(even_odd).with_outputs()
evens = results.even
odds = results.odd
tens = results[None] # the undeclared main output// processWords is a DoFn that has 3 output PCollections. The emitter functions
// are matched in positional order to the PCollections returned by beam.ParDo3.
func processWords(word string, emitBelowCutoff, emitAboveCutoff, emitMarked func(string)) {
const cutOff = 5
if len(word) < cutOff {
emitBelowCutoff(word)
} else {
emitAboveCutoff(word)
}
if isMarkedWord(word) {
emitMarked(word)
}
}
// processWordsMixed demonstrates mixing an emitter, with a standard return.
// If a standard return is used, it will always be the first returned PCollection,
// followed in positional order by the emitter functions.
func processWordsMixed(word string, emitMarked func(string)) int {
if isMarkedWord(word) {
emitMarked(word)
}
return len(word)
}
func init() {
register.Function4x0(processWords)
register.Function2x1(processWordsMixed)
// 1 input of type string => Emitter1[string]
register.Emitter1[string]()
}const to_split = words.flatMap(function* (word) {
if (word.length < 5) {
yield { below: word };
} else {
yield { above: word };
}
if (isMarkedWord(word)) {
yield { marked: word };
}
});- type: MapToFields
input: SomeProducingTransform
config:
language: python
fields:
word: "line.split()"
- type: Explode
input: MapToFields
config:
fields: word4.5.3. DoFnでの追加パラメータへのアクセス
要素とOutputReceiverに加えて、BeamはDoFnの@ProcessElementメソッドに他のパラメータも設定します。これらのパラメータの任意の組み合わせを、任意の順序で処理メソッドに追加できます。
要素に加えて、BeamはDoFnのprocessメソッドに他のパラメータも設定します。これらのパラメータの任意の組み合わせを、任意の順序で処理メソッドに追加できます。
要素に加えて、BeamはDoFnのprocessメソッドに他のパラメータも設定します。これらは、サイド入力と同様に、コンテキスト引数にアクセッサを配置することで利用できます。
要素に加えて、BeamはDoFnのProcessElementメソッドに他のパラメータも設定します。これらのパラメータの任意の組み合わせを、標準的な順序で処理メソッドに追加できます。
context.Context: 統合ログとユーザー定義メトリクスをサポートするために、context.Contextパラメータを要求できます。Goの慣例に従って、存在する場合は、DoFnメソッドの最初のパラメータにする必要があります。
func MyDoFn(ctx context.Context, word string) string { ... }Timestamp: 入力要素のタイムスタンプにアクセスするには、Instant型の@Timestampで注釈されたパラメータを追加します。例:
Timestamp: 入力要素のタイムスタンプにアクセスするには、キーワードパラメータをDoFn.TimestampParamにデフォルト設定します。例:
Timestamp: 入力要素のタイムスタンプにアクセスするには、要素の前にbeam.EventTimeパラメータを追加します。例:
Timestamp: 入力要素が属するウィンドウにアクセスするには、コンテキスト引数にpardo.windowParam()を追加します。
.of(new DoFn<String, String>() {
     public void processElement(@Element String word, @Timestamp Instant timestamp) {
  }})
import apache_beam as beam
class ProcessRecord(beam.DoFn):
def process(self, element, timestamp=beam.DoFn.TimestampParam):
# access timestamp of element.
passfunc MyDoFn(ts beam.EventTime, word string) string { ... }function processFn(element, context) {
return context.timestamp.lookup();
}
pcoll.map(processFn, { timestamp: pardo.timestampParam() });Window: 入力要素が属するウィンドウにアクセスするには、入力PCollectionで使用されているウィンドウの型のパラメータを追加します。パラメータがウィンドウ型(BoundedWindowのサブクラス)で、入力PCollectionと一致しない場合、エラーが発生します。要素が複数のウィンドウに属する場合(たとえば、SlidingWindowsを使用する場合)、@ProcessElementメソッドは要素ごとに複数回、ウィンドウごとに1回呼び出されます。たとえば、固定ウィンドウを使用している場合、ウィンドウはIntervalWindow型になります。
Window: 入力要素が属するウィンドウにアクセスするには、キーワードパラメータをDoFn.WindowParamにデフォルト設定します。要素が複数のウィンドウに属する場合(たとえば、SlidingWindowsを使用する場合)、processメソッドは要素ごとに複数回、ウィンドウごとに1回呼び出されます。
Window: 入力要素が属するウィンドウにアクセスするには、要素の前にbeam.Windowパラメータを追加します。要素が複数のウィンドウに属する場合(たとえば、SlidingWindowsを使用する場合)、ProcessElementメソッドは要素ごとに複数回、ウィンドウごとに1回呼び出されます。beam.Windowはインターフェースであるため、ウィンドウの具体的な実装に型アサーションできます。たとえば、固定ウィンドウを使用している場合、ウィンドウはwindow.IntervalWindow型になります。
Window: 入力要素が属するウィンドウにアクセスするには、コンテキスト引数にpardo.windowParam()を追加します。要素が複数のウィンドウに属する場合(たとえば、SlidingWindowsを使用する場合)、関数は要素ごとに複数回、ウィンドウごとに1回呼び出されます。
.of(new DoFn<String, String>() {
     public void processElement(@Element String word, IntervalWindow window) {
  }})
import apache_beam as beam
class ProcessRecord(beam.DoFn):
def process(self, element, window=beam.DoFn.WindowParam):
# access window e.g. window.end.micros
passfunc MyDoFn(w beam.Window, word string) string {
iw := w.(window.IntervalWindow)
...
}pcoll.map(processWithWindow, { timestamp: pardo.windowParam() });PaneInfo: トリガーを使用する場合、Beamは現在の発火に関する情報を含むPaneInfoオブジェクトを提供します。PaneInfoを使用すると、これが早期発火か遅延発火か、このキーに対してこのウィンドウがすでに何回発火したかを判断できます。
PaneInfo: トリガーを使用する場合、Beamは現在の発火に関する情報を含むDoFn.PaneInfoParamオブジェクトを提供します。DoFn.PaneInfoParamを使用すると、これが早期発火か遅延発火か、このキーに対してこのウィンドウがすでに何回発火したかを判断できます。Python SDKでのこの機能の実装は完全に完了していません。詳細はIssue 17821を参照してください。
PaneInfo: トリガーを使用する場合、Beamは現在の発火に関する情報を含むbeam.PaneInfoオブジェクトを提供します。beam.PaneInfoを使用すると、これが早期発火か遅延発火か、このキーに対してこのウィンドウがすでに何回発火したかを判断できます。
Window: 入力要素が属するウィンドウにアクセスするには、コンテキスト引数にpardo.paneInfoParam()を追加します。beam.PaneInfoを使用すると、これが早期発火か遅延発火か、このキーに対してこのウィンドウがすでに何回発火したかを判断できます。
.of(new DoFn<String, String>() {
     public void processElement(@Element String word, PaneInfo paneInfo) {
  }})
import apache_beam as beam
class ProcessRecord(beam.DoFn):
def process(self, element, pane_info=beam.DoFn.PaneInfoParam):
# access pane info, e.g. pane_info.is_first, pane_info.is_last, pane_info.timing
passfunc extractWordsFn(pn beam.PaneInfo, line string, emitWords func(string)) {
if pn.Timing == typex.PaneEarly || pn.Timing == typex.PaneOnTime {
// ... perform operation ...
}
if pn.Timing == typex.PaneLate {
// ... perform operation ...
}
if pn.IsFirst {
// ... perform operation ...
}
if pn.IsLast {
// ... perform operation ...
}
words := strings.Split(line, " ")
for _, w := range words {
emitWords(w)
}
}pcoll.map(processWithPaneInfo, { timestamp: pardo.paneInfoParam() });PipelineOptions: 現在のパイプラインのPipelineOptionsは、常にパラメータとして追加することで、処理メソッドでアクセスできます。
.of(new DoFn<String, String>() {
     public void processElement(@Element String word, PipelineOptions options) {
}})@OnTimerメソッドもこれらのパラメータの多くにアクセスできます。Timestamp、Window、キー、PipelineOptions、OutputReceiver、MultiOutputReceiverパラメータはすべて、@OnTimerメソッドでアクセスできます。さらに、@OnTimerメソッドは、タイマーがイベント時間に基づくか処理時間に基づくかを伝えるTimeDomain型の変数を取ることもできます。タイマーについては、Apache Beamを使用したタイムリー(かつステートフル)な処理ブログ記事で詳しく説明されています。
TimerとState: 前述のパラメータに加えて、ユーザー定義のTimerとStateパラメータをステートフルDoFnで使用できます。タイマーとステートについては、Apache Beamを使用したタイムリー(かつステートフル)な処理ブログ記事で詳しく説明されています。
TimerとState: ユーザー定義のStateとTimerパラメータをステートフルDoFnで使用できます。タイマーとステートについては、Apache Beamを使用したタイムリー(かつステートフル)な処理ブログ記事で詳しく説明されています。
TimerとState: この機能はTypeScript SDKではまだ実装されていませんが、コントリビューションを歓迎します。それまでは、ステートとタイマーを使用したいTypeScriptパイプラインは、クロス言語変換を使用できます。
class StatefulDoFn(beam.DoFn):
  """An example stateful DoFn with state and timer"""

  BUFFER_STATE_1 = BagStateSpec('buffer1', beam.BytesCoder())
  BUFFER_STATE_2 = BagStateSpec('buffer2', beam.VarIntCoder())
  WATERMARK_TIMER = TimerSpec('watermark_timer', TimeDomain.WATERMARK)

  def process(self,
              element,
              timestamp=beam.DoFn.TimestampParam,
              window=beam.DoFn.WindowParam,
              buffer_1=beam.DoFn.StateParam(BUFFER_STATE_1),
              buffer_2=beam.DoFn.StateParam(BUFFER_STATE_2),
              watermark_timer=beam.DoFn.TimerParam(WATERMARK_TIMER)):

    # Do your processing here
    key, value = element
    # Read all the data from buffer1
    all_values_in_buffer_1 = [x for x in buffer_1.read()]

    if StatefulDoFn._is_clear_buffer_1_required(all_values_in_buffer_1):
        # clear the buffer data if required conditions are met.
        buffer_1.clear()

    # add the value to buffer 2
    buffer_2.add(value)

    if StatefulDoFn._all_condition_met():
      # Clear the timer if certain condition met and you don't want to trigger
      # the callback method.
      watermark_timer.clear()

    yield element

  @on_timer(WATERMARK_TIMER)
  def on_expiry_1(self,
                  timestamp=beam.DoFn.TimestampParam,
                  window=beam.DoFn.WindowParam,
                  key=beam.DoFn.KeyParam,
                  buffer_1=beam.DoFn.StateParam(BUFFER_STATE_1),
                  buffer_2=beam.DoFn.StateParam(BUFFER_STATE_2)):
    # Window and key parameters are really useful especially for debugging issues.
    yield 'expired1'

  @staticmethod
  def _all_condition_met():
      # some logic
      return True

  @staticmethod
  def _is_clear_buffer_1_required(buffer_1_data):
      # Some business logic
      return True
// stateAndTimersFn is an example stateful DoFn with state and a timer.
type stateAndTimersFn struct {
Buffer1 state.Bag[string]
Buffer2 state.Bag[int64]
Watermark timers.EventTime
}
func (s *stateAndTimersFn) ProcessElement(sp state.Provider, tp timers.Provider, w beam.Window, key string, value int64, emit func(string, int64)) error {
// ... handle processing elements here, set a callback timer...
// Read all the data from Buffer1 in this window.
vals, ok, err := s.Buffer1.Read(sp)
if err != nil {
return err
}
if ok && s.shouldClearBuffer(vals) {
// clear the buffer data if required conditions are met.
s.Buffer1.Clear(sp)
}
// Add the value to Buffer2.
s.Buffer2.Add(sp, value)
if s.allConditionsMet() {
// Clear the timer if certain condition met and you don't want to trigger
// the callback method.
s.Watermark.Clear(tp)
}
emit(key, value)
return nil
}
func (s *stateAndTimersFn) OnTimer(sp state.Provider, tp timers.Provider, w beam.Window, key string, timer timers.Context, emit func(string, int64)) error {
// Window and key parameters are really useful especially for debugging issues.
switch timer.Family {
case s.Watermark.Family:
// timer expired, emit a different signal
emit(key, -1)
}
return nil
}
func (s *stateAndTimersFn) shouldClearBuffer([]string) bool {
// some business logic
return false
}
func (s *stateAndTimersFn) allConditionsMet() bool {
// other business logic
return true
}// Not yet implemented.
4.6. 複合変換
変換は入れ子構造を持つことができ、複雑な変換は複数の単純な変換(複数のParDo、Combine、GroupByKey、または他の複合変換など)を実行します。これらの変換は複合変換と呼ばれます。複数の変換を入れ子にして単一の複合変換内に配置することで、コードのモジュール性を高め、理解しやすくなります。
Beam SDKには、多くの便利な複合変換が含まれています。変換の一覧については、APIリファレンスページを参照してください。
4.6.1. 複合変換の例
WordCountサンプルプログラムのCountWords変換は、複合変換の例です。CountWordsは、複数の入れ子になった変換で構成されるPTransformサブクラスです。
そのexpandメソッドでは、The CountWords変換は次の変換操作を適用します。
- テキスト行の入力
PCollectionに対してParDoを適用し、個々の単語の出力PCollectionを生成します。 - 単語の
PCollectionに対してBeam SDKライブラリ変換Countを適用し、キー/値ペアのPCollectionを生成します。各キーはテキスト内の単語を表し、各値はその単語が元のデータに何回出現したかを示します。
  public static class CountWords extends PTransform<PCollection<String>,
      PCollection<KV<String, Long>>> {
    @Override
    public PCollection<KV<String, Long>> expand(PCollection<String> lines) {

      // Convert lines of text into individual words.
      PCollection<String> words = lines.apply(
          ParDo.of(new ExtractWordsFn()));

      // Count the number of times each word occurs.
      PCollection<KV<String, Long>> wordCounts =
          words.apply(Count.<String>perElement());

      return wordCounts;
    }
  }
# The CountWords Composite Transform inside the WordCount pipeline.
@beam.ptransform_fn
def CountWords(pcoll):
return (
pcoll
# Convert lines of text into individual words.
| 'ExtractWords' >> beam.ParDo(ExtractWordsFn())
# Count the number of times each word occurs.
| beam.combiners.Count.PerElement()
# Format each word and count into a printable string.
| 'FormatCounts' >> beam.ParDo(FormatCountsFn()))// CountWords is a function that builds a composite PTransform
// to count the number of times each word appears.
func CountWords(s beam.Scope, lines beam.PCollection) beam.PCollection {
// A subscope is required for a function to become a composite transform.
// We assign it to the original scope variable s to shadow the original
// for the rest of the CountWords function.
s = s.Scope("CountWords")
// Since the same subscope is used for the following transforms,
// they are in the same composite PTransform.
// Convert lines of text into individual words.
words := beam.ParDo(s, extractWordsFn, lines)
// Count the number of times each word occurs.
wordCounts := stats.Count(s, words)
// Return any PCollections that should be available after
// the composite transform.
return wordCounts
}function countWords(lines: PCollection<string>) {
return lines //
.map((s: string) => s.toLowerCase())
.flatMap(function* splitWords(line: string) {
yield* line.split(/[^a-z]+/);
})
.apply(beam.countPerElement());
}
const counted = lines.apply(countWords);注記:
Count自体が複合変換であるため、CountWordsも入れ子になった複合変換です。
4.6.2. 複合変換の作成
TypeScript SDKのPTransformは、PCollectionなどのPValueを受け入れて返す関数です。
独自の複合変換を作成するには、PTransformクラスのサブクラスを作成し、expandメソッドをオーバーライドして実際の処理ロジックを指定します。その後、この変換をBeam SDKの組み込み変換と同様に使用できます。
PTransformクラスの型パラメータには、変換が入力として受け入れ、出力として生成するPCollection型を渡します。複数のPCollectionを入力として受け入れる場合、または複数のPCollectionを出力として生成する場合は、関連する型パラメータにマルチコレクション型のいずれかを使用します。
独自の複合PTransformを作成するには、現在のパイプラインスコープ変数でScopeメソッドを呼び出します。この新しいサブScopeに渡される変換は、同じ複合PTransformの一部になります。
複合変換を再利用できるようにするには、通常のGo関数またはメソッド内でビルドします。この関数はスコープと入力PCollectionを受け取り、生成する出力PCollectionを返します。**注記:** このような関数は、ParDo関数に直接渡すことはできません。
次のコードサンプルは、入力としてStringのPCollectionを受け入れ、出力としてIntegerのPCollectionを出力するPTransformを宣言する方法を示しています。
  static class ComputeWordLengths
    extends PTransform<PCollection<String>, PCollection<Integer>> {
    ...
  }
class ComputeWordLengths(beam.PTransform):
def expand(self, pcoll):
# Transform logic goes here.
return pcoll | beam.Map(lambda x: len(x))// CountWords is a function that builds a composite PTransform
// to count the number of times each word appears.
func CountWords(s beam.Scope, lines beam.PCollection) beam.PCollection {
// A subscope is required for a function to become a composite transform.
// We assign it to the original scope variable s to shadow the original
// for the rest of the CountWords function.
s = s.Scope("CountWords")
// Since the same subscope is used for the following transforms,
// they are in the same composite PTransform.
// Convert lines of text into individual words.
words := beam.ParDo(s, extractWordsFn, lines)
// Count the number of times each word occurs.
wordCounts := stats.Count(s, words)
// Return any PCollections that should be available after
// the composite transform.
return wordCounts
}PTransformサブクラス内では、expandメソッドをオーバーライドする必要があります。expandメソッドは、PTransformの処理ロジックを追加する場所です。expandのオーバーライドは、適切な型の入力PCollectionをパラメータとして受け入れ、戻り値として出力PCollectionを指定する必要があります。
次のコードサンプルは、前の例で宣言されたComputeWordLengthsクラスのexpandをオーバーライドする方法を示しています。
次のコードサンプルは、CountWords複合PTransformを呼び出してパイプラインに追加する方法を示しています。
  static class ComputeWordLengths
      extends PTransform<PCollection<String>, PCollection<Integer>> {
    @Override
    public PCollection<Integer> expand(PCollection<String>) {
      ...
      // transform logic goes here
      ...
    }
class ComputeWordLengths(beam.PTransform):
def expand(self, pcoll):
# Transform logic goes here.
return pcoll | beam.Map(lambda x: len(x))lines := ... // a PCollection of strings.
// A Composite PTransform function is called like any other function.
wordCounts := CountWords(s, lines) // returns a PCollection<KV<string,int>>
PTransformサブクラスのexpandメソッドを、適切な入力PCollectionを受け入れ、対応する出力PCollectionを返すようにオーバーライドする限り、必要な数の変換を含めることができます。これらの変換には、コア変換、複合変換、またはBeam SDKライブラリに含まれる変換を含めることができます。
複合PTransformには、必要な数の変換を含めることができます。これらの変換には、コア変換、他の複合変換、またはBeam SDKライブラリに含まれる変換を含めることができます。また、必要な数のPCollectionを消費および返すこともできます。
複合変換のパラメータと戻り値は、変換の中間データの型が複数回変化する場合でも、変換全体の初期入力型と最終戻り値の型と一致する必要があります。
注記: PTransformのexpandメソッドは、変換のユーザーが直接呼び出すことを意図したものではありません。代わりに、変換を引数としてPCollection自体でapplyメソッドを呼び出す必要があります。これにより、変換をパイプラインの構造内にネストすることができます。
4.6.3. PTransformスタイルガイド
PTransformスタイルガイドには、スタイルガイド、ログとテストのガイダンス、言語固有の考慮事項など、ここに含まれていない追加情報が含まれています。新しい複合PTransformを作成する場合、このガイドは役立つ出発点となります。
5. パイプラインI/O
パイプラインを作成する際には、ファイルやデータベースなど、外部ソースからデータを読み取る必要があることがよくあります。同様に、パイプラインの結果データを外部ストレージシステムに出力することもできます。Beamは、多くの一般的なデータストレージタイプの読み取りと書き込みの変換を提供します。組み込みの変換でサポートされていないデータストレージ形式から読み取ったり、書き込んだりする必要がある場合は、独自の読み取りと書き込みの変換を実装できます。
5.1. 入力データの読み取り
読み取り変換は、外部ソースからデータを読み取り、パイプラインで使用するためのデータのPCollection表現を返します。パイプラインの構築中にいつでも読み取り変換を使用して新しいPCollectionを作成できますが、パイプラインの先頭で最も一般的です。
PCollection<String> lines = p.apply(TextIO.read().from("gs://some/inputData.txt"));lines = pipeline | beam.io.ReadFromText('gs://some/inputData.txt')lines := textio.Read(scope, 'gs://some/inputData.txt')
5.2. 出力データの書き込み
書き込み変換は、PCollection内のデータを外部データソースに書き込みます。パイプラインの最終結果を出力するために、パイプラインの最後に書き込み変換を使用することが最も一般的です。ただし、パイプライン内の任意の時点でPCollectionのデータを出力するために書き込み変換を使用できます。
output.apply(TextIO.write().to("gs://some/outputData"));output | beam.io.WriteToText('gs://some/outputData')textio.Write(scope, 'gs://some/inputData.txt', output)
5.3. ファイルベースの入力および出力データ
5.3.1. 複数の場所からの読み取り
多くの読み取り変換は、指定したglob演算子に一致する複数の入力ファイルからの読み取りをサポートしています。glob演算子はファイルシステム固有であり、ファイルシステム固有の一貫性モデルに従うことに注意してください。次のTextIOの例では、glob演算子(*)を使用して、指定された場所にある「input-」というプレフィックスと「.csv」というサフィックスを持つすべての入力ファイルを読み取ります。
p.apply("ReadFromText",
    TextIO.read().from("protocol://my_bucket/path/to/input-*.csv"));
lines = pipeline | 'ReadFromText' >> beam.io.ReadFromText(
'path/to/input-*.csv')lines := textio.Read(scope, "path/to/input-*.csv")異なるソースから単一のPCollectionにデータを読み取るには、それぞれを個別に読み取り、次にFlatten変換を使用して単一のPCollectionを作成します。
5.3.2. 複数の出力ファイルへの書き込み
ファイルベースの出力データの場合、書き込み変換はデフォルトで複数の出力ファイルに書き込みます。書き込み変換に出力ファイル名を渡すと、ファイル名は、書き込み変換が生成するすべての出力ファイルのプレフィックスとして使用されます。サフィックスを指定することで、各出力ファイルにサフィックスを追加できます。
次の書き込み変換の例では、複数の出力ファイルを1つの場所に書き込みます。各ファイルには、「numbers」というプレフィックス、数値タグ、および「.csv」というサフィックスがあります。
records.apply("WriteToText",
    TextIO.write().to("protocol://my_bucket/path/to/numbers")
                .withSuffix(".csv"));
filtered_words | 'WriteToText' >> beam.io.WriteToText(
'/path/to/numbers', file_name_suffix='.csv')// The Go SDK textio doesn't support sharding on writes yet.
// See https://github.com/apache/beam/issues/21031 for ways
// to contribute a solution.
5.4. Beam提供のI/O変換
現在利用可能なI/O変換のリストについては、Beam提供のI/O変換ページを参照してください。
6. スキーマ
多くの場合、処理されるレコードの種類には、明らかな構造があります。一般的なBeamソースは、JSON、Avro、Protocol Buffer、またはデータベースの行オブジェクトを生成します。これらすべてのタイプには、よく定義された構造があり、その構造は多くの場合、タイプを調べることで判断できます。SDKパイプライン内でも、Simple Java POJO(または他の言語の同等の構造)が中間タイプとして頻繁に使用され、これらにもクラスを検査することで推測できる明確な構造があります。パイプラインのレコードの構造を理解することで、データ処理のためのより簡潔なAPIを提供できます。
6.1. スキーマとは?
ほとんどの構造化レコードは、いくつかの共通の特性を共有しています。
- 個別の名前付きフィールドに分割できます。フィールドは通常文字列名を持ちますが、インデックス付きタプルなど、数値インデックスを持つこともあります。
- フィールドが持つことができるプリミティブタイプのリストは限定されています。これらは多くの場合、ほとんどのプログラミング言語のプリミティブタイプ(int、long、stringなど)と一致します。
- 多くの場合、フィールドタイプはオプション(null許容と呼ばれる場合もあります)または必須としてマークできます。
多くの場合、レコードはネストされた構造を持っています。ネストされた構造は、フィールド自体にサブフィールドがある場合、つまりフィールド自体のタイプにスキーマがある場合に発生します。配列またはマップタイプのフィールドも、これらの構造化レコードの一般的な機能です。
たとえば、架空の電子商取引会社の行動を表す次のスキーマを考えてみましょう。
Purchase
| フィールド名 | フィールドタイプ |
|---|---|
| userId | STRING |
| itemId | INT64 |
| shippingAddress | ROW(ShippingAddress) |
| cost | INT64 |
| transactions | ARRAY[ROW(Transaction)] |
ShippingAddress
| フィールド名 | フィールドタイプ |
|---|---|
| streetAddress | STRING |
| city | STRING |
| state | nullable STRING |
| country | STRING |
| postCode | STRING |
Transaction
| フィールド名 | フィールドタイプ |
|---|---|
| bank | STRING |
| purchaseAmount | DOUBLE |
購入イベントレコードは、上記の購入スキーマによって表されます。各購入イベントには配送先住所が含まれており、これは独自のスキーマを含むネストされた行です。各購入にはクレジットカード取引の配列(リスト、購入が複数のクレジットカードに分割される可能性があるため)も含まれており、取引リストの各項目は独自のスキーマを持つ行です。
これは、特定のプログラミング言語から抽象化された、関連するタイプの抽象的な説明を提供します。
スキーマは、特定のプログラミング言語の型とは独立したBeamレコードの型システムを提供します。同じスキーマを持つJavaクラスが複数存在する可能性があり(たとえば、Protocol-BufferクラスまたはPOJOクラス)、Beamはこれらの型間のシームレスな変換を可能にします。スキーマは、異なるプログラミング言語のAPI間で型を推論するための簡単な方法も提供します。
スキーマを持つPCollectionには、Coderを指定する必要はありません。Beamは、スキーマ行のエンコードとデコード方法を知っているためです。Beamは、スキーマタイプをエンコードするために特別なコーダーを使用します。
6.2. プログラミング言語の型に対するスキーマ
スキーマ自体は言語に依存しませんが、使用されているBeam SDKのプログラミング言語に自然に埋め込まれるように設計されています。これにより、Beamユーザーはネイティブタイプを引き続き使用しながら、Beamが要素スキーマを理解するという利点を得ることができます。
Javaでは、次のクラスセットを使用して購入スキーマを表すことができます。Beamは、クラスのメンバーに基づいて正しいスキーマを自動的に推測します。
Pythonでは、次のクラスセットを使用して購入スキーマを表すことができます。Beamは、クラスのメンバーに基づいて正しいスキーマを自動的に推測します。
Goでは、エクスポートされたフィールドがスキーマの一部になるため、構造体の型に対してスキーマエンコーディングがデフォルトで使用されます。Beamは、構造体のフィールドとフィールドタグ、およびその順序に基づいてスキーマを自動的に推測します。
Typescriptでは、JSONオブジェクトを使用してスキーマ付きデータを表します。残念ながら、Typescriptの型情報はランタイムレイヤーに伝播されないため、いくつかの場所(例:クロス言語パイプラインを使用する場合)で手動で指定する必要があります。
Beam YAMLでは、すべての変換がスキーマ付きデータを生成および受け入れ、パイプラインの検証に使用されます。
場合によっては、Beamはマッピング関数の出力タイプを判断できません。この場合は、JSONスキーマ構文を使用して手動で指定できます。
@DefaultSchema(JavaBeanSchema.class)
public class Purchase {
  public String getUserId();  // Returns the id of the user who made the purchase.
  public long getItemId();  // Returns the identifier of the item that was purchased.
  public ShippingAddress getShippingAddress();  // Returns the shipping address, a nested type.
  public long getCostCents();  // Returns the cost of the item.
  public List<Transaction> getTransactions();  // Returns the transactions that paid for this purchase (returns a list, since the purchase might be spread out over multiple credit cards).

  @SchemaCreate
  public Purchase(String userId, long itemId, ShippingAddress shippingAddress, long costCents,
                  List<Transaction> transactions) {
      ...
  }
}

@DefaultSchema(JavaBeanSchema.class)
public class ShippingAddress {
  public String getStreetAddress();
  public String getCity();
  @Nullable public String getState();
  public String getCountry();
  public String getPostCode();

  @SchemaCreate
  public ShippingAddress(String streetAddress, String city, @Nullable String state, String country,
                         String postCode) {
     ...
  }
}

@DefaultSchema(JavaBeanSchema.class)
public class Transaction {
  public String getBank();
  public double getPurchaseAmount();

  @SchemaCreate
  public Transaction(String bank, double purchaseAmount) {
     ...
  }
}
import typing
class Purchase(typing.NamedTuple):
user_id: str # The id of the user who made the purchase.
item_id: int # The identifier of the item that was purchased.
shipping_address: ShippingAddress # The shipping address, a nested type.
cost_cents: int # The cost of the item
transactions: typing.Sequence[Transaction] # The transactions that paid for this purchase (a list, since the purchase might be spread out over multiple credit cards).
class ShippingAddress(typing.NamedTuple):
street_address: str
city: str
state: typing.Optional[str]
country: str
postal_code: str
class Transaction(typing.NamedTuple):
bank: str
purchase_amount: floattype Purchase struct {
// ID of the user who made the purchase.
UserID string `beam:"userId"`
// Identifier of the item that was purchased.
ItemID int64 `beam:"itemId"`
// The shipping address, a nested type.
ShippingAddress ShippingAddress `beam:"shippingAddress"`
// The cost of the item in cents.
Cost int64 `beam:"cost"`
// The transactions that paid for this purchase.
// A slice since the purchase might be spread out over multiple
// credit cards.
Transactions []Transaction `beam:"transactions"`
}
type ShippingAddress struct {
StreetAddress string `beam:"streetAddress"`
City string `beam:"city"`
State *string `beam:"state"`
Country string `beam:"country"`
PostCode string `beam:"postCode"`
}
type Transaction struct {
Bank string `beam:"bank"`
PurchaseAmount float64 `beam:"purchaseAmount"`
}const pcoll = root
.apply(
beam.create([
{ intField: 1, stringField: "a" },
{ intField: 2, stringField: "b" },
])
)
// Let beam know the type of the elements by providing an exemplar.
.apply(beam.withRowCoder({ intField: 0, stringField: "" }));type: MapToFields
config:
language: python
fields:
new_field:
expression: "hex(weight)"
output_type: { "type": "string" }上記のようにJavaBeanクラスを使用することは、スキーマをJavaクラスにマッピングする1つの方法です。ただし、複数のJavaクラスが同じスキーマを持つ可能性があり、その場合、異なるJavaタイプを多くの場合相互に使用できます。Beamは、スキーマが一致するタイプ間で暗黙の変換を追加します。たとえば、上記のTransactionクラスは、次のクラスと同じスキーマを持っています。
@DefaultSchema(JavaFieldSchema.class)
public class TransactionPojo {
  public String bank;
  public double purchaseAmount;
}したがって、次のような2つのPCollectionがあったとします。
PCollection<Transaction> transactionBeans = readTransactionsAsJavaBean();
PCollection<TransactionPojos> transactionPojos = readTransactionsAsPojo();これらの2つのPCollectionは、Javaの型が異なっていても、同じスキーマを持ちます。つまり、たとえば、次の2つのコードスニペットは有効です。
transactionBeans.apply(ParDo.of(new DoFn<...>() {
   @ProcessElement public void process(@Element TransactionPojo pojo) {
      ...
   }
}));
そして
transactionPojos.apply(ParDo.of(new DoFn<...>() {
   @ProcessElement public void process(@Element Transaction row) {
    }
}));両方のケースで@ElementパラメータがPCollectionのJavaタイプと異なる場合でも、スキーマが同じであるため、Beamは自動的に変換を行います。組み込みのConvert変換を使用して、同等のスキーマを持つJavaタイプ間で変換することもできます(下記参照)。
6.3. スキーマ定義
PCollectionのスキーマは、そのPCollectionの要素を、名前付きフィールドの順序付きリストとして定義します。各フィールドには、名前、タイプ、およびユーザーオプションのセットがあります。フィールドのタイプはプリミティブまたは複合にすることができます。現在Beamでサポートされているプリミティブタイプを以下に示します。
| タイプ | 説明 |
|---|---|
| BYTE | 8ビット符号付き値 |
| INT16 | 16ビット符号付き値 |
| INT32 | 32ビット符号付き値 |
| INT64 | 64ビット符号付き値 |
| DECIMAL | 任意精度の10進数型 |
| FLOAT | 32ビットIEEE 754浮動小数点数 |
| DOUBLE | 64ビットIEEE 754浮動小数点数 |
| STRING | 文字列 |
| DATETIME | エポックからのミリ秒単位で表されるタイムスタンプ |
| BOOLEAN | ブール値 |
| BYTES | 生のバイト配列 |
フィールドはネストされたスキーマを参照することもできます。この場合、フィールドのタイプはROWになり、ネストされたスキーマはこのフィールドタイプの属性になります。
フィールドタイプとして3つのコレクションタイプがサポートされています:ARRAY、ITERABLE、およびMAP
- ARRAY これは、繰り返し値のタイプを表し、繰り返される要素にはサポートされている任意のタイプを含めることができます。ネストされた行の配列と配列の配列の両方がサポートされています。
- 反復可能オブジェクト (ITERABLE) 配列型と非常に似ており、繰り返し値を表しますが、反復処理されるまでアイテムの完全なリストはわかりません。これは、反復可能オブジェクトが使用可能なメモリよりも大きく、外部ストレージによってバックアップされる場合(たとえば、
GroupByKeyによって返される反復可能オブジェクトの場合)を意図したものです。繰り返し要素には、サポートされている任意の型を使用できます。 - マップ (MAP) これは、キーと値の関連付けマップを表します。キーと値の両方に、すべてのスキーマ型がサポートされています。マップ型を含む値は、グループ化操作のキーとして使用できません。
6.4. 論理型
ユーザーはスキーマ型システムを拡張して、フィールドとして使用できるカスタム論理型を追加できます。論理型は、一意の識別子と引数によって識別されます。論理型は、ストレージに使用される基盤となるスキーマ型と、その型との間の変換も指定します。例として、論理和は常に、null許容のフィールドを持つ行として表すことができます。ただし、これは煩雑で管理が複雑になる可能性があります。OneOf論理型は、基盤となるストレージとしてnull許容のフィールドを持つ行を使用しながらも、和型をより簡単に管理できる値クラスを提供します。各論理型には一意の識別子もあるため、他の言語でも解釈できます。論理型のさらなる例を以下に示します。
6.4.1. 論理型の定義
論理型を定義するには、基盤となる型を表すために使用するスキーマ型と、その型の一意の識別子を指定する必要があります。論理型は、スキーマ型の上に追加のセマンティクスを課します。たとえば、ナノ秒タイムスタンプを表す論理型は、INT64フィールドとINT32フィールドを含むスキーマとして表されます。このスキーマだけでは、この型の解釈方法については何も言及されていませんが、論理型によって、これはナノ秒タイムスタンプを表し、INT64フィールドは秒を表し、INT32フィールドはナノ秒を表すことがわかります。
論理型は引数によっても指定され、関連する型のクラスを作成できます。たとえば、精度制限付きの10進型には、表される精度の桁数を示す整数引数があります。引数はスキーマ型で表されるため、それ自体が複雑な型になる可能性があります。
Javaでは、論理型はLogicalTypeクラスのサブクラスとして指定されます。論理型を表すカスタムJavaクラスを指定でき、このJavaクラスと基盤となるスキーマ型の表現との間で変換するための変換関数を供給する必要があります。たとえば、ナノ秒タイムスタンプを表す論理型は、次のように実装できます。
Goでは、論理型はbeam.SchemaProviderインターフェースのカスタム実装で指定されます。たとえば、ナノ秒タイムスタンプを表す論理型プロバイダーは、次のように実装できます。
Typescriptでは、論理型はLogicalTypeInfoインターフェースによって定義され、論理型のURNとその表現、およびこの表現との間の変換を関連付けます。
// A Logical type using java.time.Instant to represent the logical type.
public class TimestampNanos implements LogicalType<Instant, Row> {
  // The underlying schema used to represent rows.
  private final Schema SCHEMA = Schema.builder().addInt64Field("seconds").addInt32Field("nanos").build();
  @Override public String getIdentifier() { return "timestampNanos"; }
  @Override public FieldType getBaseType() { return schema; }

  // Convert the representation type to the underlying Row type. Called by Beam when necessary.
  @Override public Row toBaseType(Instant instant) {
    return Row.withSchema(schema).addValues(instant.getEpochSecond(), instant.getNano()).build();
  }

  // Convert the underlying Row type to an Instant. Called by Beam when necessary.
  @Override public Instant toInputType(Row base) {
    return Instant.of(row.getInt64("seconds"), row.getInt32("nanos"));
  }

     ...
}
// Define a logical provider like so:
// TimestampNanos is a logical type using time.Time, but
// encodes as a schema type.
type TimestampNanos time.Time
func (tn TimestampNanos) Seconds() int64 {
return time.Time(tn).Unix()
}
func (tn TimestampNanos) Nanos() int32 {
return int32(time.Time(tn).UnixNano() % 1000000000)
}
// tnStorage is the storage schema for TimestampNanos.
type tnStorage struct {
Seconds int64 `beam:"seconds"`
Nanos int32 `beam:"nanos"`
}
var (
// reflect.Type of the Value type of TimestampNanos
tnType = reflect.TypeOf((*TimestampNanos)(nil)).Elem()
tnStorageType = reflect.TypeOf((*tnStorage)(nil)).Elem()
)
// TimestampNanosProvider implements the beam.SchemaProvider interface.
type TimestampNanosProvider struct{}
// FromLogicalType converts checks if the given type is TimestampNanos, and if so
// returns the storage type.
func (p *TimestampNanosProvider) FromLogicalType(rt reflect.Type) (reflect.Type, error) {
if rt != tnType {
return nil, fmt.Errorf("unable to provide schema.LogicalType for type %v, want %v", rt, tnType)
}
return tnStorageType, nil
}
// BuildEncoder builds a Beam schema encoder for the TimestampNanos type.
func (p *TimestampNanosProvider) BuildEncoder(rt reflect.Type) (func(any, io.Writer) error, error) {
if _, err := p.FromLogicalType(rt); err != nil {
return nil, err
}
enc, err := coder.RowEncoderForStruct(tnStorageType)
if err != nil {
return nil, err
}
return func(iface any, w io.Writer) error {
v := iface.(TimestampNanos)
return enc(tnStorage{
Seconds: v.Seconds(),
Nanos: v.Nanos(),
}, w)
}, nil
}
// BuildDecoder builds a Beam schema decoder for the TimestampNanos type.
func (p *TimestampNanosProvider) BuildDecoder(rt reflect.Type) (func(io.Reader) (any, error), error) {
if _, err := p.FromLogicalType(rt); err != nil {
return nil, err
}
dec, err := coder.RowDecoderForStruct(tnStorageType)
if err != nil {
return nil, err
}
return func(r io.Reader) (any, error) {
s, err := dec(r)
if err != nil {
return nil, err
}
tn := s.(tnStorage)
return TimestampNanos(time.Unix(tn.Seconds, int64(tn.Nanos))), nil
}, nil
}
// Register it like so:
beam.RegisterSchemaProvider(tnType, &TimestampNanosProvider{})// Register a logical type:
class Foo {
constructor(public value: string) {}
}
requireForSerialization("apache-beam", { Foo });
row_coder.registerLogicalType({
urn: "beam:logical_type:typescript_foo:v1",
reprType: row_coder.RowCoder.inferTypeFromJSON("string", false),
toRepr: (foo) => foo.value,
fromRepr: (value) => new Foo(value),
});
// And use it as follows:
const pcoll = root
.apply(beam.create([new Foo("a"), new Foo("b")]))
// Use beamLogicalType in the exemplar to indicate its use.
.apply(
beam.withRowCoder({
beamLogicalType: "beam:logical_type:typescript_foo:v1",
} as any)
);6.4.2. 役立つ論理型
現在、Python SDKはMicrosInstantを処理する場合を除き、最小限の利便性論理型を提供しています。
現在、Go SDKは追加の整数プリミティブとtime.Timeを処理する場合を除き、最小限の利便性論理型を提供しています。
列挙型 (EnumerationType)
この便利なビルダーは、Python SDKにはまだ存在しません。
この便利なビルダーは、Go SDKにはまだ存在しません。
この論理型を使用すると、一連の名前付き定数からなる列挙型を作成できます。
Schema schema = Schema.builder()
               …
     .addLogicalTypeField("color", EnumerationType.create("RED", "GREEN", "BLUE"))
     .build();
このフィールドの値は、行にINT32型として格納されますが、論理型は、列挙を文字列または値のいずれかとしてアクセスできる値型を定義します。例:
EnumerationType.Value enumValue = enumType.valueOf("RED");
enumValue.getValue();  // Returns 0, the integer value of the constant.
enumValue.toString();  // Returns "RED", the string value of the constant
列挙フィールドを持つ行オブジェクトが与えられると、列挙値としてフィールドを抽出することもできます。
EnumerationType.Value enumValue = row.getLogicalTypeValue("color", EnumerationType.Value.class);Java POJOとJava Beanからの自動スキーマ推論は、Java列挙をEnumerationType論理型に自動的に変換します。
OneOfType
この便利なビルダーは、Python SDKにはまだ存在しません。
この便利なビルダーは、Go SDKにはまだ存在しません。
OneOfTypeを使用すると、一連のスキーマフィールドに対して非交和型を作成できます。例:
Schema schema = Schema.builder()
               …
     .addLogicalTypeField("oneOfField",
        OneOfType.create(Field.of("intField", FieldType.INT32),
                         Field.of("stringField", FieldType.STRING),
                         Field.of("bytesField", FieldType.BYTES)))
      .build();
このフィールドの値は、行に別のRow型として格納され、すべてのフィールドはnull許容としてマークされます。ただし、論理型は、設定されたフィールドを示す列挙値を含むValueオブジェクトを定義し、そのフィールドのみを取得できるようにします。
// Returns an enumeration indicating all possible case values for the enum.
// For the above example, this will be
// EnumerationType.create("intField", "stringField", "bytesField");
EnumerationType oneOfEnum = onOfType.getCaseEnumType();

// Creates an instance of the union with the string field set.
OneOfType.Value oneOfValue = oneOfType.createValue("stringField", "foobar");

// Handle the oneof
switch (oneOfValue.getCaseEnumType().toString()) {
  case "intField":
    return processInt(oneOfValue.getValue(Integer.class));
  case "stringField":
    return processString(oneOfValue.getValue(String.class));
  case "bytesField":
    return processBytes(oneOfValue.getValue(bytes[].class));
}
上記の例では、明確にするためにswitch文でフィールド名を使用しましたが、列挙の整数値を使用することもできます。
6.5. スキーマの作成
スキーマを利用するには、PCollectionにスキーマを添付する必要があります。多くの場合、ソース自体がPCollectionにスキーマを添付します。たとえば、Avroファイルを読み取るためにAvroIOを使用する場合、ソースはAvroスキーマからBeamスキーマを自動的に推論し、それをBeam PCollectionに添付できます。ただし、すべてのソースがスキーマを生成するわけではありません。さらに、Beamパイプラインには中間段階と型が含まれることが多く、それらもスキーマの表現力の恩恵を受けることができます。
6.5.1. スキーマの推論
残念ながら、Beamは実行時にTypescriptの型情報にアクセスできません。スキーマはbeam.withRowCoderで手動で宣言する必要があります。一方、GroupByなどのスキーマ認識操作は、明示的に宣言されたスキーマなしで使用できます。
Beamは、さまざまな一般的なJava型からスキーマを推論できます。@DefaultSchemaアノテーションを使用して、特定の型からスキーマを推論するようにBeamに指示できます。このアノテーションはSchemaProviderを引数として受け取り、一般的なJava型にはすでにSchemaProviderクラスが組み込まれています。Java型自体にアノテーションを付けることが現実的ではない場合、SchemaRegistryをプログラムで呼び出すこともできます。
Java POJO
POJO(Plain Old Java Object)は、Java言語仕様以外の制限を受けないJavaオブジェクトです。POJOには、プリミティブ型、他のPOJO、それらのコレクションマップまたは配列であるメンバ変数を含めることができます。POJOは、事前に指定されたクラスを拡張したり、特定のインターフェースを拡張する必要はありません。
POJOクラスに@DefaultSchema(JavaFieldSchema.class)アノテーションが付いている場合、Beamはこのクラスのスキーマを自動的に推論します。ネストされたクラスもサポートされており、List、配列、Mapフィールドを持つクラスもサポートされています。
たとえば、次のクラスにアノテーションを付けることで、BeamはこのPOJOクラスからスキーマを推論し、任意のPCollection<TransactionPojo>に適用するように指示します。
@DefaultSchema(JavaFieldSchema.class)
public class TransactionPojo {
  public final String bank;
  public final double purchaseAmount;
  @SchemaCreate
  public TransactionPojo(String bank, double purchaseAmount) {
    this.bank = bank;
    this.purchaseAmount = purchaseAmount;
  }
}
// Beam will automatically infer the correct schema for this PCollection. No coder is needed as a result.
PCollection<TransactionPojo> pojos = readPojos();@SchemaCreateアノテーションは、コンストラクタパラメータがフィールド名と同じ名前を持っていると仮定して、TransactionPojoのインスタンスを作成するためにこのコンストラクタを使用できることをBeamに伝えます。@SchemaCreateは、クラスの静的ファクトリメソッドにもアノテーションを付けることができ、コンストラクタをプライベートのままにすることができます。@SchemaCreateアノテーションがない場合、すべてのフィールドはfinalではなく、クラスにはゼロ引数のコンストラクタが必要です。
Beamがスキーマを推論する方法に影響を与える、他にいくつかの便利なアノテーションがあります。デフォルトでは、推論されたスキーマフィールド名は、クラスフィールド名と一致します。ただし、@SchemaFieldNameを使用して、スキーマフィールドに使用する別の名前を指定できます。@SchemaIgnoreを使用して、推論されたスキーマから除外する特定のクラスフィールドをマークできます。たとえば、スキーマに含めるべきではない一時的なフィールド(ハッシュの計算コストを回避するためにハッシュ値をキャッシュするなど)がクラスに含まれていることが多く、@SchemaIgnoreを使用してこれらのフィールドを除外できます。無視されたフィールドは、これらのレコードのエンコードには含まれないことに注意してください。
POJOクラスにアノテーションを付けることが不便な場合があります。たとえば、POJOがBeamパイプラインの作成者によって所有されていない別のパッケージにある場合などです。このような場合、パイプラインのメイン関数でスキーマ推論をプログラムでトリガーできます。
pipeline.getSchemaRegistry().registerPOJO(TransactionPOJO.class);Java Bean
Java Beanは、Javaで再利用可能なプロパティクラスを作成するための事実上の標準です。完全な標準には多くの特性がありますが、重要な特性は、すべてプロパティがゲッターとセッタークラスを介してアクセスされ、これらのゲッターとセッターの命名形式が標準化されていることです。Java Beanクラスには@DefaultSchema(JavaBeanSchema.class)アノテーションを付けることができ、Beamはこのクラスのスキーマを自動的に推論します。例:
@DefaultSchema(JavaBeanSchema.class)
public class TransactionBean {
  public TransactionBean() { … }
  public String getBank() { … }
  public void setBank(String bank) { … }
  public double getPurchaseAmount() { … }
  public void setPurchaseAmount(double purchaseAmount) { … }
}
// Beam will automatically infer the correct schema for this PCollection. No coder is needed as a result.
PCollection<TransactionBean> beans = readBeans();@SchemaCreateアノテーションを使用して、コンストラクタまたは静的ファクトリメソッドを指定できます。その場合、セッターとゼロ引数のコンストラクタを省略できます。
@DefaultSchema(JavaBeanSchema.class)
public class TransactionBean {
  @SchemaCreate
  Public TransactionBean(String bank, double purchaseAmount) { … }
  public String getBank() { … }
  public double getPurchaseAmount() { … }
}@SchemaFieldNameと@SchemaIgnoreを使用して、POJOクラスと同様に、推論されたスキーマを変更できます。
AutoValue
Java値クラスは、正しく生成することが非常に困難です。値クラスを適切に実装するには、多くの定型コードを作成する必要があります。AutoValueは、単純な抽象基本クラスを実装することで、そのようなクラスを簡単に生成するための一般的なライブラリです。
Beamは、AutoValueクラスからスキーマを推論できます。例:
@DefaultSchema(AutoValueSchema.class)
@AutoValue
public abstract class TransactionValue {
  public abstract String getBank();
  public abstract double getPurchaseAmount();
}これは、単純なAutoValueクラスを生成するために必要なすべてであり、上記の@DefaultSchemaアノテーションは、Beamにそこからスキーマを推論するように指示します。これにより、AutoValue要素をPCollection内で使用することもできます。
@SchemaFieldNameと@SchemaIgnoreを使用して、推論されたスキーマを変更できます。
Beamには、Pythonコードからスキーマを推論するためのいくつかの異なるメカニズムがあります。
NamedTupleクラス
NamedTupleクラスは、tupleをラップし、各要素に名前を割り当て、特定の型に制限するPythonクラスです。Beamは、NamedTuple出力型を持つPCollectionのスキーマを自動的に推論します。例:
class Transaction(typing.NamedTuple):
  bank: str
  purchase_amount: float

pc = input | beam.Map(lambda ...).with_output_types(Transaction)
beam.RowとSelect
アドホックスキーマ宣言を作成する方法もあります。まず、beam.Rowのインスタンスを返すラムダ式を使用できます。
input_pc = ... # {"bank": ..., "purchase_amount": ...}
output_pc = input_pc | beam.Map(lambda item: beam.Row(bank=item["bank"],
purchase_amount=item["purchase_amount"])場合によっては、Select変換を使用して同じロジックをより簡潔に表現できます。
input_pc = ... # {"bank": ..., "purchase_amount": ...}
output_pc = input_pc | beam.Select(bank=lambda item: item["bank"],
purchase_amount=lambda item: item["purchase_amount"])これらの宣言には、bankフィールドとpurchase_amountフィールドの型に関する具体的な情報は含まれていないため、Beamは型情報を推論しようとします。推論できない場合、一般的な型Anyに戻ります。これは必ずしも理想的ではないため、キャストを使用して、Beamがbeam.RowまたはSelectで型を正しく推論するようにすることができます。
input_pc = ... # {"bank": ..., "purchase_amount": ...}
output_pc = input_pc | beam.Map(lambda item: beam.Row(bank=str(item["bank"]),
                                                      purchase_amount=float(item["purchase_amount"])))
Beamは現在、Go構造体のエクスポートされたフィールドのスキーマのみを推論します。
構造体 (Structs)
Beamは、PCollection要素として使用されるすべてのGo構造体のスキーマを自動的に推論し、スキーマエンコーディングを使用してエンコードすることをデフォルトにします。
type Transaction struct{
  Bank string
  PurchaseAmount float64

  checksum []byte // ignored
}
エクスポートされていないフィールドは無視され、スキーマの一部として自動的に推論することはできません。func型、channel型、unsafe.Pointer型、またはuintptr型のフィールドは、推論によって無視されます。インターフェース型のフィールドは、それらに対してスキーマプロバイダーが登録されていない限り、無視されます。
デフォルトでは、スキーマフィールド名はエクスポートされた構造体フィールド名と一致します。上記の例では、「Bank」と「PurchaseAmount」がスキーマフィールド名です。スキーマフィールド名は、フィールドの構造体タグでオーバーライドできます。
type Transaction struct{
  Bank           string  `beam:"bank"`
  PurchaseAmount float64 `beam:"purchase_amount"`
}
スキーマフィールド名のオーバーライドは、クロス言語変換の互換性のために役立ちます。スキーマフィールドには、Goエクスポートフィールドとは異なる要件または制限がある場合があります。
6.6. スキーマ変換の使用
PCollectionのスキーマにより、さまざまなリレーショナル変換が可能になります。各レコードが名前付きフィールドで構成されているため、SQL式のアグリゲーションと同様に、名前でフィールドを参照するシンプルで読みやすい集計が可能になります。
Beamは、Goでスキーマ変換をネイティブにサポートしていません。ただし、次の動作で実装されます。
6.6.1. フィールド選択構文
スキーマの利点は、名前で要素フィールドを参照できることです。Beamは、ネストされたフィールドや繰り返しフィールドを含む、フィールドを参照するための選択構文を提供します。この構文は、操作対象のフィールドを参照する場合、すべてのスキーマ変換によって使用されます。この構文は、処理するスキーマフィールドを指定するためにDoFn内でも使用できます。
名前でフィールドをアドレス指定しても、パイプライングラフが構築されるときにスキーマが一致するかどうかをBeamがチェックするため、型安全性は維持されます。スキーマに存在しないフィールドが指定されている場合、パイプラインは起動に失敗します。さらに、スキーマ内のフィールドの型と一致しない型でフィールドが指定されている場合、パイプラインは起動に失敗します。
フィールド名には、以下の文字を使用できません。. * [ ] { }
トップレベルフィールド
スキーマのトップレベルにあるフィールドを選択するには、フィールド名を指定します。たとえば、購入のPCollectionからユーザーIDのみを選択するには、(Select変換を使用して)次のように記述します。
purchases.apply(Select.fieldNames("userId"));input_pc = ... # {"user_id": ...,"bank": ..., "purchase_amount": ...}
output_pc = input_pc | beam.Select("user_id")ネストされたフィールド
Python SDKでは、ネストされたフィールドのサポートはまだ開発されていません。
Go SDKでは、ネストされたフィールドのサポートはまだ開発されていません。
個々のネストされたフィールドは、ドット演算子を使用して指定できます。たとえば、配送先の住所から郵便番号のみを選択するには、次のように記述します。
purchases.apply(Select.fieldNames("shippingAddress.postCode"));ワイルドカード
Python SDKでは、ワイルドカードのサポートはまだ開発されていません。
Go SDKでは、ワイルドカードのサポートはまだ開発されていません。
*演算子は、任意のネストレベルで指定して、そのレベルのすべてのフィールドを表すことができます。たとえば、すべての配送先住所フィールドを選択するには、次のように記述します。
purchases.apply(Select.fieldNames("shippingAddress.*"));配列
配列要素の型が行である配列フィールドには、要素型のサブフィールドにもアクセスできます。選択すると、結果は選択されたサブフィールド型の配列になります。例:
Python SDKでは、配列フィールドのサポートはまだ開発されていません。
Go SDKでは、配列フィールドのサポートはまだ開発されていません。
purchases.apply(Select.fieldNames("transactions[].bank"));結果として、要素型が文字列である配列フィールドを含む行が生成され、各トランザクションの銀行のリストが含まれます。
配列要素が選択されていることを明確にするために、セレクターで[]ブラケットを使用することをお勧めしますが、簡潔にするために省略することもできます。将来的には、配列のスライスがサポートされ、配列の一部を選択できるようになります。
マップ
値の型が行であるマップフィールドには、値型のサブフィールドにもアクセスできます。選択すると、キーは元のマップと同じですが、値は指定された型であるマップが生成されます。配列と同様に、セレクターで{}中括弧を使用することをお勧めしますが、マップの値要素が選択されていることを明確にするために、簡潔にするために省略することもできます。将来的には、マップキーセレクターがサポートされ、マップから特定のキーを選択できるようになります。次のスキーマがあるとします。
PurchasesByType
| フィールド名 | フィールドタイプ |
|---|---|
| purchases | MAP{STRING, ROW{PURCHASE} |
次の
purchasesByType.apply(Select.fieldNames("purchases{}.userId"));Python SDKでは、マップフィールドのサポートはまだ開発されていません。
Go SDKでは、マップフィールドのサポートはまだ開発されていません。
キー型が文字列で値型が文字列であるマップフィールドを含む行が生成されます。選択されたマップには、元のマップのすべてのキーが含まれ、値には購入レコードに含まれるuserIdが含まれます。
マップの値要素が選択されていることを明確にするために、セレクターで{}ブラケットを使用することをお勧めしますが、簡潔にするために省略することもできます。将来的には、マップのスライスがサポートされ、マップから特定のキーを選択できるようになります。
6.6.2. スキーマ変換
Beamは、スキーマでネイティブに動作する変換のコレクションを提供します。これらの変換は非常に表現力豊かで、名前付きスキーマフィールドに関して選択と集計を可能にします。以下は、便利なスキーマ変換の例です。
入力の選択
多くの場合、計算は入力PCollectionのフィールドのサブセットのみに関心があります。Select変換を使用すると、関心のあるフィールドのみを簡単に投影できます。結果のPCollectionには、各選択されたフィールドがトップレベルフィールドとして含まれるスキーマがあります。トップレベルフィールドとネストされたフィールドの両方を選択できます。たとえば、Purchaseスキーマでは、userIdとstreetAddressフィールドのみを次のように選択できます。
purchases.apply(Select.fieldNames("userId", "shippingAddress.streetAddress"));Python SDKでは、ネストされたフィールドのサポートはまだ開発されていません。
Go SDKでは、ネストされたフィールドのサポートはまだ開発されていません。
結果のPCollectionは、次のスキーマになります。
| フィールド名 | フィールドタイプ |
|---|---|
| userId | STRING |
| streetAddress | STRING |
ワイルドカード選択についても同様です。次の
purchases.apply(Select.fieldNames("userId", "shippingAddress.*"));Python SDKでは、ワイルドカードのサポートはまだ開発されていません。
Go SDKでは、ワイルドカードのサポートはまだ開発されていません。
次のスキーマになります。
| フィールド名 | フィールドタイプ |
|---|---|
| userId | STRING |
| streetAddress | STRING |
| city | STRING |
| state | nullable STRING |
| country | STRING |
| postCode | STRING |
配列の中にネストされたフィールドを選択する場合、選択された各フィールドが結果の行のトップレベルフィールドとして個別に表示されるという同じルールが適用されます。つまり、同じネストされた行から複数のフィールドを選択した場合、選択された各フィールドは独自の配列フィールドとして表示されます。例:
purchases.apply(Select.fieldNames( "transactions.bank", "transactions.purchaseAmount"));Python SDKでは、ネストされたフィールドのサポートはまだ開発されていません。
Go SDKでは、ネストされたフィールドのサポートはまだ開発されていません。
次のスキーマになります。
| フィールド名 | フィールドタイプ |
|---|---|
| bank | ARRAY[STRING] |
| purchaseAmount | ARRAY[DOUBLE] |
ワイルドカード選択は、各フィールドを個別に選択することと同じです。
マップの中にネストされたフィールドを選択することには、配列と同じセマンティクスがあります。マップから複数のフィールドを選択すると、選択された各フィールドはトップレベルで独自のマップに展開されます。これは、マップキーのセットが、選択された各フィールドに対して1回コピーされることを意味します。
異なるネストされた行で、同じ名前のフィールドを持つ場合があります。これらのフィールドを複数選択すると、選択されたすべてのフィールドが同じ行スキーマに配置されるため、名前の競合が発生します。このような状況が発生した場合は、Select.withFieldNameAsビルダーメソッドを使用して、選択したフィールドの代替名を指定できます。
Select変換のもう1つの用途は、ネストされたスキーマを単一のフラットスキーマにフラット化することです。例:
purchases.apply(Select.flattenedSchema());Python SDKでは、ネストされたフィールドのサポートはまだ開発されていません。
Go SDKでは、ネストされたフィールドのサポートはまだ開発されていません。
次のスキーマになります。
| フィールド名 | フィールドタイプ |
|---|---|
| userId | STRING |
| itemId | STRING |
| shippingAddress_streetAddress | STRING |
| shippingAddress_city | nullable STRING |
| shippingAddress_state | STRING |
| shippingAddress_country | STRING |
| shippingAddress_postCode | STRING |
| costCents | INT64 |
| transactions_bank | ARRAY[STRING] |
| transactions_purchaseAmount | ARRAY[DOUBLE] |
グループ化集計
Group変換を使用すると、入力スキーマの任意の数のフィールドでデータを簡単にグループ化し、それらのグループに集計を適用し、それらの集計の結果を新しいスキーマフィールドに格納できます。Group変換の出力には、実行された各集計に対応するフィールドが1つあるスキーマがあります。
GroupBy変換を使用すると、入力スキーマの任意の数のフィールドでデータを簡単にグループ化し、それらのグループに集計を適用し、それらの集計の結果を新しいスキーマフィールドに格納できます。GroupBy変換の出力には、実行された各集計に対応するフィールドが1つあるスキーマがあります。
Groupの最も簡単な使用方法では、集計を指定しません。その場合、指定されたフィールドのセットに一致するすべての入力がITERABLEフィールドにグループ化されます。例:
GroupByの最も簡単な使用方法では、集計を指定しません。その場合、指定されたフィールドのセットに一致するすべての入力がITERABLEフィールドにグループ化されます。例:
purchases.apply(Group.byFieldNames("userId", "bank"));input_pc = ... # {"user_id": ...,"bank": ..., "purchase_amount": ...}
output_pc = input_pc | beam.GroupBy('user_id','bank')Go SDKでは、スキーマ対応のグループ化のサポートはまだ開発されていません。
これの出力がスキーマは以下のとおりです。
| フィールド名 | フィールドタイプ |
|---|---|
| key | ROW{userId:STRING, bank:STRING} |
| values | ITERABLE[ROW[Purchase]] |
keyフィールドにはグループ化キーが含まれ、valuesフィールドにはそのキーに一致したすべての値のリストが含まれています。
出力スキーマのkeyフィールドとvaluesフィールドの名前は、次のwithKeyFieldとwithValueFieldビルダーを使用して制御できます。
purchases.apply(Group.byFieldNames("userId", "shippingAddress.streetAddress")
    .withKeyField("userAndStreet")
    .withValueField("matchingPurchases"));
グループ化された結果に1つ以上の集計を適用することは非常に一般的です。各集計は、集計する1つ以上のフィールド、集計関数、および出力スキーマの結果フィールド名を指定できます。たとえば、次のアプリケーションは、userId別にグループ化された3つの集計を計算し、すべての集計を単一の出力スキーマに表現します。
purchases.apply(Group.byFieldNames("userId")
    .aggregateField("itemId", Count.combineFn(), "numPurchases")
    .aggregateField("costCents", Sum.ofLongs(), "totalSpendCents")
    .aggregateField("costCents", Top.<Long>largestLongsFn(10), "topPurchases"));
input_pc = ... # {"user_id": ..., "item_Id": ..., "cost_cents": ...}
output_pc = input_pc | beam.GroupBy("user_id")
.aggregate_field("item_id", CountCombineFn, "num_purchases")
.aggregate_field("cost_cents", sum, "total_spendcents")
.aggregate_field("cost_cents", TopCombineFn, "top_purchases")Go SDKでは、スキーマ対応のグループ化のサポートはまだ開発されていません。
この集計の結果は、次のスキーマになります。
| フィールド名 | フィールドタイプ |
|---|---|
| key | ROW{userId:STRING} |
| value | ROW{numPurchases: INT64, totalSpendCents: INT64, topPurchases: ARRAY[INT64]} |
多くの場合、Selected.flattenedSchemaを使用して、結果をネストされていないフラットスキーマにフラット化します。
結合
Beamは、スキーマPCollectionsでの等結合をサポートしています。つまり、結合条件がフィールドのサブセットの等価性に依存する結合です。たとえば、次の例では、Purchasesスキーマを使用して、トランザクションと、そのトランザクションに関連付けられている可能性のあるレビュー(ユーザーと製品の両方がトランザクションと一致)を結合します。これは「自然結合」であり、左辺と右辺の両方で同じフィールド名を使用する結合であり、usingキーワードで指定されます。
Python SDKでは、結合のサポートはまだ開発されていません。
Go SDKでは、結合のサポートはまだ開発されていません。
PCollection<Transaction> transactions = readTransactions();
PCollection<Review> reviews = readReviews();
PCollection<Row> joined = transactions.apply(
    Join.innerJoin(reviews).using("userId", "productId"));
結果のスキーマは以下のとおりです。
| フィールド名 | フィールドタイプ |
|---|---|
| lhs | ROW{Transaction} |
| rhs | ROW{Review} |
結果の各行には、結合条件に一致したトランザクションとレビューが1つずつ含まれています。
2つのスキーマで一致させるフィールドの名前が異なる場合は、on関数を使用できます。たとえば、Reviewスキーマでそれらのフィールド名がTransactionスキーマとは異なる名前で付けられている場合、次のように記述できます。
Python SDKでは、結合のサポートはまだ開発されていません。
Go SDKでは、結合のサポートはまだ開発されていません。
PCollection<Row> joined = transactions.apply(
    Join.innerJoin(reviews).on(
      FieldsEqual
         .left("userId", "productId")
         .right("reviewUserId", "reviewProductId")));
内部結合に加えて、Join変換は完全外部結合、左外部結合、右外部結合をサポートしています。
複雑な結合
ほとんどの結合は2項結合(2つの入力を結合する)になりがちですが、共通のキーで結合する必要がある入力ストリームが2つ以上ある場合もあります。CoGroup変換を使用すると、スキーマフィールドの等価性に基づいて複数のPCollectionsを結合できます。各PCollectionは、最終的な結合レコードで必須またはオプションとしてマークでき、外部結合を2つ以上の入力PCollectionを持つ結合に一般化します。出力はオプションで展開できます。Join変換のように、個々の結合レコードを提供します。出力は未展開形式で処理することもできます。結合キーと、そのキーに一致した各入力からのすべてのレコードの反復可能オブジェクトを提供します。
Python SDKでは、結合のサポートはまだ開発されていません。
Go SDKでは、結合のサポートはまだ開発されていません。
イベントのフィルタリング
Filter変換は、一連の述語で構成できます。各述語は、指定されたフィールドに基づいています。すべての述語がtrueを返すレコードのみがフィルターを通過します。たとえば、次の
purchases.apply(Filter.create()
    .whereFieldName("costCents", c -> c > 100 * 20)
    .whereFieldName("shippingAddress.country", c -> c.equals("de"));
は、20セントを超える購入価格でドイツで購入されたすべての購入を生成します。
スキーマへのフィールドの追加
AddFields変換を使用して、新しいフィールドでスキーマを拡張できます。入力行は、新しいフィールドにnull値を挿入することで新しいスキーマに拡張されますが、代替のデフォルト値を指定することもできます。デフォルトのnull値が使用される場合、新しいフィールド型はnull許容としてマークされます。配列またはマップ値内のネストされたフィールドを含む、フィールド選択構文を使用して、ネストされたサブフィールドを追加できます。
たとえば、次のアプリケーション
purchases.apply(AddFields.<PurchasePojo>create()
    .field("timeOfDaySeconds", FieldType.INT32)
    .field("shippingAddress.deliveryNotes", FieldType.STRING)
.field("transactions.isFlagged", FieldType.BOOLEAN, false));は、拡張されたスキーマを持つPCollectionになります。入力のすべての行とフィールドに加えて、指定されたフィールドがスキーマに追加されます。結果のすべての行には、**timeOfDaySeconds**と**shippingAddress.deliveryNotes**フィールドにはnull値が、**transactions.isFlagged**フィールドにはfalse値が挿入されます。
スキーマからのフィールドの削除
DropFields は、スキーマから特定のフィールドを削除できます。入力行のスキーマは切り詰められ、削除されたフィールドの値は出力から削除されます。フィールド選択構文を使用して、ネストされたフィールドも削除できます。
例えば、以下のスニペット
purchases.apply(DropFields.fields("userId", "shippingAddress.streetAddress"));これにより、これらの2つのフィールドとその対応する値が削除された入力のコピーが生成されます。
スキーマフィールドの名前変更
RenameFields は、スキーマ内の特定のフィールドの名前を変更できます。入力行のフィールド値は変更されず、スキーマのみが変更されます。この変換は、RDBMSなどのスキーマ認識シンクへの出力を準備し、PCollectionスキーマのフィールド名がその出力のものと一致するようにするために、よく使用されます。SQLのSELECT ASと同様に、他の変換によって生成されたフィールドの名前を変更して、より使いやすくすることもできます。フィールド選択構文を使用して、ネストされたフィールドの名前も変更できます。
例えば、以下のスニペット
purchases.apply(RenameFields.<PurchasePojo>create()
  .rename("userId", "userIdentifier")
.rename("shippingAddress.streetAddress", "shippingAddress.street"));同じ一連の変更されていない入力要素が生成されますが、PCollectionのスキーマは、**userId**を**userIdentifier**に、**shippingAddress.streetAddress**を**shippingAddress.street**に名前変更するように変更されています。
型間の変換
前述のように、Beamは、それらの型に同等のスキーマがある限り、異なるJava型間を自動的に変換できます。これを行う1つの方法は、次のようにConvert変換を使用することです。
PCollection<PurchaseBean> purchaseBeans = readPurchasesAsBeans();
PCollection<PurchasePojo> pojoPurchases =
purchaseBeans.apply(Convert.to(PurchasePojo.class));Beamは、PurchasePojoの推論されたスキーマが入力PCollectionのスキーマと一致することを検証し、PCollection<PurchasePojo>にキャストします。
Rowクラスは任意のスキーマをサポートできるため、スキーマを持つ任意のPCollectionをRowのPCollectionにキャストできます。以下に例を示します。
PCollection<Row> purchaseRows = purchaseBeans.apply(Convert.toRows());ソース型が単一フィールドスキーマの場合、Convertは要求された場合はフィールドの型にも変換し、事実上行のアンボクシングを行います。例えば、単一のINT64フィールドを持つスキーマの場合、以下のようにPCollection<Long>に変換されます。
PCollection<Long> longs = rows.apply(Convert.to(TypeDescriptors.longs()));いずれの場合も、型チェックはパイプライングラフの構築時に実行され、型がスキーマと一致しない場合は、パイプラインは起動に失敗します。
6.6.3. ParDoでのスキーマ
スキーマを持つPCollectionは、他のPCollectionと同様にParDoを適用できます。ただし、BeamランナーはParDoの適用時にスキーマを認識しており、追加の機能が有効になります。
入力変換
BeamはまだGoでの入力変換をサポートしていません。
BeamはソースPCollectionのスキーマを認識しているため、一致するスキーマがわかっている任意のJava型に要素を自動的に変換できます。例えば、上記のTransactionスキーマを使用して、次のPCollectionがあるとします。
PCollection<PurchasePojo> purchases = readPurchases();スキーマがない場合、適用されたDoFnはTransactionPojo型の要素を受け入れる必要があります。しかし、スキーマがあるため、次のDoFnを適用できます。
purchases.apply(ParDo.of(new DoFn<PurchasePojo, PurchasePojo>() {
  @ProcessElement public void process(@Element PurchaseBean purchase) {
      ...
  }
}));@ElementパラメーターがPCollectionのJava型と一致しない場合でも、一致するスキーマがあるため、Beamは要素を自動的に変換します。スキーマが一致しない場合、Beamはグラフ構築時にこれを検出し、型エラーでジョブを失敗させます。
すべてのスキーマはRow型で表すことができるため、ここでRowも使用できます。
purchases.appy(ParDo.of(new DoFn<PurchasePojo, PurchasePojo>() {
  @ProcessElement public void process(@Element Row purchase) {
      ...
  }
}));
入力選択
入力にスキーマがあるため、DoFnで処理する特定のフィールドを自動的に選択することもできます。
上記のpurchases PCollectionについて、userIdとitemIdフィールドのみを処理するとします。これらは、上記で説明した選択式を使用して、次のように実行できます。
purchases.appy(ParDo.of(new DoFn<PurchasePojo, PurchasePojo>() {
@ProcessElement public void process(
@FieldAccess("userId") String userId, @FieldAccess("itemId") long itemId) {
...
}
}));ネストされたフィールドも選択できます。以下に例を示します。
purchases.appy(ParDo.of(new DoFn<PurchasePojo, PurchasePojo>() {
@ProcessElement public void process(
@FieldAccess("shippingAddress.street") String street) {
...
}
}));詳細については、フィールド選択式のセクションを参照してください。サブスキーマを選択する場合、行全体を読み取るときと同様に、Beamは一致するスキーマ型に自動的に変換します。
7. データエンコーディングと型安全性
Beamランナーがパイプラインを実行するときは、多くの場合、PCollectionの中間データを具体化する必要があります。そのためには、要素をバイト文字列との間で変換する必要があります。Beam SDKは、特定のPCollectionの要素をどのようにエンコードおよびデコードできるかを記述するCoderと呼ばれるオブジェクトを使用します。
コーダーは、外部データソースまたはシンクと対話するときのデータの解析またはフォーマットとは無関係であることに注意してください。このような解析またはフォーマットは、通常、
ParDoやMapElementsなどの変換を使用して明示的に行う必要があります。
Java用のBeam SDKでは、型Coderはデータのエンコードとデコードに必要なメソッドを提供します。Java用のSDKは、Integer、Long、Double、StringUtf8など、さまざまな標準Java型で動作する多くのCoderサブクラスを提供します。利用可能なCoderサブクラスはすべて、Coderパッケージにあります。
Python用のBeam SDKでは、型Coderはデータのエンコードとデコードに必要なメソッドを提供します。Python用のSDKは、プリミティブ型、Tuple、Iterable、StringUtf8など、さまざまな標準Python型で動作する多くのCoderサブクラスを提供します。利用可能なCoderサブクラスはすべて、apache_beam.codersパッケージにあります。
int、int64、float64、[]byte、stringなどの標準的なGo型は、組み込みのコーダーを使用してコード化されます。構造体と構造体へのポインターは、Beam Schema Rowエンコーディングを使用してデフォルトで設定されます。ただし、ユーザーはbeam.RegisterCoderを使用してカスタムコーダーを構築して登録できます。利用可能なCoder関数は、coderパッケージにあります。
number、UInt8Array、stringなどの標準的なTypeScript型は、組み込みのコーダーを使用してコード化されます。JSONオブジェクトと配列はBSONエンコーディングでエンコードされます。これらの型の場合、クロス言語変換と対話しない限り、コーダーを指定する必要はありません。ユーザーはbeam.coders.Coderを拡張してカスタムコーダーを構築し、withCoderInternalで使用できますが、一般的にはこの場合、論理型が優先されます。
コーダーは必ずしも型と1対1の関係があるわけではないことに注意してください。例えば、Integer型には複数の有効なコーダーがあり、入力データと出力データでは異なるIntegerコーダーを使用できます。変換には、BigEndianIntegerCoderを使用するInteger型の入力データと、VarIntCoderを使用するInteger型の出力データが含まれる場合があります。
7.1. コーダーの指定
Beam SDKは、パイプライン内のすべてのPCollectionにコーダーを必要とします。ほとんどの場合、Beam SDKは要素型またはそれを生成する変換に基づいてPCollectionのCoderを自動的に推論できますが、場合によっては、パイプラインの作者がCoderを明示的に指定するか、カスタム型用のCoderを開発する必要があります。
PCollection.setCoderメソッドを使用して、既存のPCollectionのコーダーを明示的に設定できます。.applyを呼び出すなどして、最終決定されたPCollectionにはsetCoderを呼び出すことはできません。
getCoderメソッドを使用して、既存のPCollectionのコーダーを取得できます。コーダーが設定されておらず、指定されたPCollectionに対して推論できない場合、このメソッドはIllegalStateExceptionで失敗します。
Beam SDKは、PCollectionのCoderを自動的に推論しようとするときに、さまざまなメカニズムを使用します。
各パイプラインオブジェクトには、CoderRegistryがあります。CoderRegistryは、Java型と、各型のPCollectionにパイプラインが使用するデフォルトのコーダーのマッピングを表します。
Python用のBeam SDKには、Python型と、各型のPCollectionに使用されるデフォルトのコーダーのマッピングを表すCoderRegistryがあります。
Go用のBeam SDKでは、ユーザーはbeam.RegisterCoderを使用してデフォルトのコーダー実装を登録できます。
デフォルトでは、Java用のBeam SDKは、DoFnなどの変換の関数オブジェクトからの型パラメーターを使用して、PTransformによって生成されたPCollectionの要素のCoderを自動的に推論します。例えば、ParDoの場合、DoFn<Integer, String>関数オブジェクトは、Integer型の入力要素を受け入れ、String型の出力要素を生成します。このような場合、Java用のSDKは、出力PCollection<String>のデフォルトCoderを自動的に推論します(デフォルトのパイプラインCoderRegistryでは、これはStringUtf8Coderです)。
デフォルトでは、Python用のBeam SDKは、DoFnなどの変換の関数オブジェクトからの型ヒントを使用して、出力PCollectionの要素のCoderを自動的に推論します。例えば、ParDoの場合、型ヒント@beam.typehints.with_input_types(int)と@beam.typehints.with_output_types(str)を持つDoFnは、int型の入力要素を受け入れ、str型の出力要素を生成します。このような場合、Python用のBeam SDKは、出力PCollectionのデフォルトCoderを自動的に推論します(デフォルトのパイプラインCoderRegistryでは、これはBytesCoderです)。
デフォルトでは、Go用のBeam SDKは、DoFnなどの変換の関数オブジェクトの出力によって、出力PCollectionの要素のCoderを自動的に推論します。例えば、ParDoの場合、v int, emit func(string)のパラメーターを持つDoFnは、int型の入力要素を受け入れ、string型の出力要素を生成します。このような場合、Go用のBeam SDKは、出力PCollectionのデフォルトCoderをstring_utf8コーダーに自動的に推論します。
**注記:**
Create変換を使用してメモリ内データからPCollectionを作成する場合、コーダーの推論とデフォルトのコーダーに依存することはできません。Createは引数に関する型情報にアクセスできず、引数リストにデフォルトのコーダーが登録されていない正確な実行時クラスの値が含まれている場合、コーダーを推論できない場合があります。
Createを使用する場合、正しいコーダーがあることを確認する最も簡単な方法は、Create変換を適用するときにwithCoderを呼び出すことです。
7.2. デフォルトコーダーとCoderRegistry
各PipelineオブジェクトにはCoderRegistryオブジェクトがあり、これは言語型を、パイプラインがそれらの型に対して使用するデフォルトのコーダーにマップします。CoderRegistryを使用して、特定の型のデフォルトコーダーを検索したり、特定の型の新しいデフォルトコーダーを登録したりできます。
CoderRegistryには、Beam SDK for JavaPythonを使用して作成する任意のパイプラインの標準JavaPython型へのコーダーのデフォルトマッピングが含まれています。次の表に、標準マッピングを示します。
| Java型 | デフォルトコーダー |
|---|---|
| Double | DoubleCoder |
| Instant | InstantCoder |
| Integer | VarIntCoder |
| Iterable | IterableCoder |
| KV | KvCoder |
| List | ListCoder |
| マップ | MapCoder |
| Long | VarLongCoder |
| String | StringUtf8Coder |
| TableRow | TableRowJsonCoder |
| Void | VoidCoder |
| byte[ ] | ByteArrayCoder |
| TimestampedValue | TimestampedValueCoder |
| Pythonデータ型 | デフォルトコーダー |
|---|---|
| int | VarIntCoder |
| float | FloatCoder |
| str | BytesCoder |
| bytes | StrUtf8Coder |
| Tuple | TupleCoder |
7.2.1. デフォルトコーダーの検索
Java型に対するデフォルトのCoderを決定するには、CoderRegistry.getCoderメソッドを使用できます。特定のパイプラインのCoderRegistryにアクセスするには、Pipeline.getCoderRegistryメソッドを使用します。これにより、パイプラインごとにJava型のデフォルトのCoderを決定(または設定)できます。つまり、「このパイプラインでは、Integer値がBigEndianIntegerCoderを使用してエンコードされていることを確認します。」
Python型に対するデフォルトのCoderを決定するには、CoderRegistry.get_coderメソッドを使用できます。CoderRegistryにアクセスするには、coders.registryを使用します。これにより、Python型のデフォルトのCoderを決定(または設定)できます。
Go型に対するデフォルトのCoderを決定するには、beam.NewCoder関数を使用できます。
7.2.2. 型のデフォルトコーダーの設定
特定のパイプラインに対してJava/Python型のデフォルトのCoderを設定するには、パイプラインのCoderRegistryを取得して変更します。CoderRegistryオブジェクトを取得するには、Pipeline.getCoderRegistry coders.registryメソッドを使用し、新しいCoderをターゲット型に登録するには、CoderRegistry.registerCoder CoderRegistry.register_coderメソッドを使用します。
Go型のデフォルトのCoderを設定するには、beam.RegisterCoder関数を使用して、ターゲット型に対するエンコーダとデコーダの関数を登録します。ただし、int、string、float64などの組み込み型は、そのコーダを上書きできません。
次のコード例は、パイプラインのIntegerint値に対して、デフォルトのCoderとしてBigEndianIntegerCoderを設定する方法を示しています。
次のコード例は、MyCustomType要素に対してカスタムCoderを設定する方法を示しています。
PipelineOptions options = PipelineOptionsFactory.create();
Pipeline p = Pipeline.create(options);
CoderRegistry cr = p.getCoderRegistry();
cr.registerCoder(Integer.class, BigEndianIntegerCoder.class);apache_beam.coders.registry.register_coder(int, BigEndianIntegerCoder)type MyCustomType struct{
...
}
// See documentation on beam.RegisterCoder for other supported coder forms.
func encode(MyCustomType) []byte { ... }
func decode(b []byte) MyCustomType { ... }
func init() {
beam.RegisterCoder(reflect.TypeOf((*MyCustomType)(nil)).Elem(), encode, decode)
}7.2.3. デフォルトコーダーを使用してカスタムデータ型に注釈を付ける
パイプラインプログラムでカスタムデータ型を定義する場合、@DefaultCoderアノテーションを使用して、その型で使用されるコーダを指定できます。デフォルトでは、BeamはJavaシリアライゼーションを使用するSerializableCoderを使用しますが、欠点があります。
エンコードサイズと速度において非効率です。このJavaシリアライゼーションメソッドの比較を参照してください。
非決定論的です。2つの等価なオブジェクトに対して異なるバイナリエンコーディングを生成する場合があります。
キー/値ペアの場合、キーベースの操作(GroupByKey、Combine)とキーごとの状態の正確性は、キーに決定論的なコーダがある場合に依存します。
次のように@DefaultCoderアノテーションを使用して、新しいデフォルトを設定できます。
@DefaultCoder(AvroCoder.class)
public class MyCustomDataType {
...
}データ型に一致するカスタムコーダを作成し、@DefaultCoderアノテーションを使用する場合は、コーダクラスで静的Coder.of(Class<T>)ファクトリメソッドを実装する必要があります。
public class MyCustomCoder implements Coder {
public static Coder<T> of(Class<T> clazz) {...}
...
}
@DefaultCoder(MyCustomCoder.class)
public class MyCustomDataType {
...
}Python/Go用のBeam SDKでは、データ型にデフォルトのコーダを注釈することはサポートされていません。デフォルトのコーダを設定する場合は、前のセクション「型のデフォルトコーダの設定」で説明されているメソッドを使用してください。
8. ウィンドウイング
ウィンドウ化は、個々の要素のタイムスタンプに従ってPCollectionを細分化します。GroupByKeyやCombineなど、複数の要素を集約する変換は、暗黙的にウィンドウごとに機能します。つまり、コレクション全体が無限のサイズである可能性がありますが、各PCollectionは複数の有限ウィンドウの連続として処理されます。
関連する概念であるトリガーは、無制限のデータの到着時に集約の結果をいつ出力するかを決定します。トリガーを使用して、PCollectionのウィンドウ化戦略を調整できます。トリガーを使用すると、遅延データに対処したり、早期の結果を提供したりできます。詳細については、「トリガー」セクションを参照してください。
8.1. ウィンドウイングの基礎
GroupByKeyやCombineなど、一部のBeam変換は、共通のキーで複数の要素をグループ化します。通常、そのグループ化操作は、データセット全体で同じキーを持つすべての要素をグループ化します。無制限のデータセットでは、新しい要素が絶えず追加され、無限に多くなる可能性があるため(例:ストリーミングデータ)、すべての要素を収集することは不可能です。無制限のPCollectionを操作している場合は、ウィンドウ化が特に役立ちます。
Beamモデルでは、(無制限のPCollectionを含む)すべてのPCollectionを論理ウィンドウに分割できます。PCollectionのウィンドウ化関数に従って、PCollectionの各要素は1つ以上のウィンドウに割り当てられ、各ウィンドウには有限数の要素が含まれます。次に、グループ化変換は、ウィンドウごとにPCollectionの要素を考慮します。たとえば、GroupByKeyは、暗黙的にPCollectionの要素をキーとウィンドウでグループ化します。
注意:Beamのデフォルトのウィンドウ化動作は、無制限のPCollectionでも、PCollectionのすべての要素を単一のグローバルウィンドウに割り当て、遅延データを破棄することです。無制限のPCollectionでGroupByKeyなどのグループ化変換を使用する前に、少なくとも次のいずれかを実行する必要があります。
- グローバル以外のウィンドウ化関数を設定します。「PCollectionのウィンドウ化関数の設定」を参照してください。
- デフォルト以外のトリガーを設定します。これにより、デフォルトのウィンドウ化動作(すべてのデータの到着を待機)は決して発生しないため、グローバルウィンドウは他の条件下で結果を出力できます。
無制限のPCollectionに対してグローバル以外のウィンドウ化関数またはデフォルト以外のトリガーを設定せず、その後GroupByKeyまたはCombineなどのグループ化変換を使用すると、パイプラインの構築時にエラーが発生し、ジョブが失敗します。
8.1.1. ウィンドウイングの制約
PCollectionのウィンドウ化関数を設定した後、そのPCollectionにグループ化変換を適用する次回に、要素のウィンドウが使用されます。ウィンドウグループ化は、必要に応じて行われます。Window変換を使用してウィンドウ化関数を設定した場合、各要素はウィンドウに割り当てられますが、ウィンドウはGroupByKeyまたはCombineがウィンドウとキー全体で集約されるまで考慮されません。これはパイプラインに異なる影響を与える可能性があります。以下の図の例パイプラインを検討してください。

図3:ウィンドウ化を適用するパイプライン
上記のパイプラインでは、KafkaIOを使用してキー/値ペアのセットを読み取ることで無制限のPCollectionを作成し、次にWindow変換を使用してそのコレクションにウィンドウ化関数を適用します。次に、コレクションにParDoを適用し、後でGroupByKeyを使用してそのParDoの結果をグループ化します。ウィンドウはGroupByKeyに必要なまで実際には使用されないため、ウィンドウ化関数はParDo変換に影響を与えません。ただし、後続の変換はGroupByKeyの結果に適用されます。データはキーとウィンドウの両方でグループ化されます。
8.1.2. 境界のあるPCollectionでのウィンドウイング
有界PCollectionの固定サイズデータセットでウィンドウ化を使用できます。ただし、ウィンドウ化はPCollectionの各要素に添付された暗黙的なタイムスタンプのみを考慮し、固定データセットを作成するデータソース(TextIOなど)はすべての要素に同じタイムスタンプを割り当てます。これは、すべての要素がデフォルトで単一のグローバルウィンドウの一部であることを意味します。
固定データセットでウィンドウ化を使用するには、各要素に独自のタイムスタンプを割り当てることができます。要素にタイムスタンプを割り当てるには、新しいタイムスタンプ(たとえば、Java用Beam SDKのWithTimestamps変換)を持つ各要素を出力するDoFnを使用してParDo変換を使用します。
有界PCollectionを使用したウィンドウ化がパイプラインのデータ処理方法にどのように影響するかを示すために、次のパイプラインを検討してください。

図4:ウィンドウ化なしのGroupByKeyとParDo、有界コレクションの場合。
上記のパイプラインでは、TextIOを使用してファイルから行を読み取ることで有界PCollectionを作成します。次に、GroupByKeyを使用してコレクションをグループ化し、グループ化されたPCollectionにParDo変換を適用します。この例では、GroupByKeyは一意のキーのコレクションを作成し、ParDoはキーごとに正確に1回適用されます。
ウィンドウ化関数を設定しなくても、ウィンドウはまだ存在します。PCollectionのすべての要素は単一のグローバルウィンドウに割り当てられます。
次に、ウィンドウ化関数を使用した同じパイプラインを検討してください。

図5:ウィンドウ化を使用したGroupByKeyとParDo、有界コレクションの場合。
前と同様に、パイプラインはファイルから行を読み取ることで有界PCollectionを作成します。次に、そのPCollectionにウィンドウ化関数を設定します。GroupByKey変換は、ウィンドウ化関数に基づいて、PCollectionの要素をキーとウィンドウの両方でグループ化します。後続のParDo変換は、キーごとに複数回、ウィンドウごとに1回適用されます。
8.2. 提供されているウィンドウイング関数
PCollectionの要素を分割するために、さまざまな種類のウィンドウを定義できます。Beamは、次のものを含むいくつかのウィンドウ化関数を提供します。
- 固定時間ウィンドウ
- スライド時間ウィンドウ
- セッションウィンドウ
- 単一グローバルウィンドウ
- カレンダーベースのウィンドウ(PythonまたはGo用のBeam SDKではサポートされていません)
より複雑なニーズがある場合は、独自のWindowFnを定義することもできます。
使用するウィンドウ化関数に応じて、各要素は論理的に複数のウィンドウに属することができることに注意してください。たとえば、スライド時間ウィンドウ化では、単一の要素が複数のウィンドウに割り当てられる可能性のある重複するウィンドウを作成できます。ただし、PCollectionの各要素は1つのウィンドウにしか存在できないため、要素が複数のウィンドウに割り当てられている場合、要素は概念的に各ウィンドウに複製され、ウィンドウを除いて各要素は同一です。
8.2.1. 固定時間ウィンドウ
ウィンドウ化の最も単純な形式は、固定時間ウィンドウを使用することです。継続的に更新されている可能性のあるタイムスタンプ付きPCollectionが与えられると、各ウィンドウは(たとえば)30秒間隔に該当するタイムスタンプを持つすべての要素をキャプチャする可能性があります。
固定時間ウィンドウは、データストリームの一貫した期間、重複しない時間間隔を表します。30秒間の期間のウィンドウを検討してください。タイムスタンプ値が0:00:00から(0:00:30を含まない)までの無制限のPCollectionのすべての要素は最初のウィンドウに属し、タイムスタンプ値が0:00:30から(0:01:00を含まない)までの要素は2番目のウィンドウに属し、以降も同様です。

図6:期間30秒の固定時間ウィンドウ。
8.2.2. スライディング時間ウィンドウ
スライド時間ウィンドウもデータストリームの時間間隔を表しますが、スライド時間ウィンドウは重複する可能性があります。たとえば、各ウィンドウは60秒分のデータをキャプチャする可能性がありますが、新しいウィンドウは30秒ごとに開始されます。スライドウィンドウが開始される頻度は、期間と呼ばれます。したがって、私たちの例では、ウィンドウの期間は60秒、周期は30秒になります。
複数のウィンドウが重複するため、データセットのほとんどの要素は複数のウィンドウに属します。この種のウィンドウ化は、データの移動平均を取得するのに役立ちます。スライド時間ウィンドウを使用すると、私たちの例では、過去60秒間のデータの移動平均を30秒ごとに更新して計算できます。

図7:ウィンドウ期間1分、ウィンドウ周期30秒のスライド時間ウィンドウ。
8.2.3. セッションウィンドウ
セッションウィンドウ関数は、特定のギャップ期間内の要素を含むウィンドウを定義します。セッションウィンドウ化はキーごとに適用され、時間に関して不規則に分布しているデータに役立ちます。たとえば、ユーザーのマウスアクティビティを表すデータストリームには、クリックの高濃度が散在する長いアイドル時間が含まれる場合があります。指定された最小ギャップ期間後にデータが到着すると、新しいウィンドウの開始が開始されます。

図8:最小ギャップ期間のあるセッションウィンドウ。データの分布に応じて、各データキーに異なるウィンドウがあることに注意してください。
8.2.4. シングルグローバルウィンドウ
デフォルトでは、PCollectionのすべてのデータは単一のグローバルウィンドウに割り当てられ、遅延データは破棄されます。データセットのサイズが固定されている場合は、PCollectionにグローバルウィンドウのデフォルトを使用できます。
無制限のデータセット(ストリーミングデータソースなど)を処理する場合は、単一のグローバルウィンドウを使用できますが、GroupByKeyやCombineなどの集約変換を適用する際には注意が必要です。デフォルトのトリガーを使用する単一のグローバルウィンドウは、一般的に処理を開始する前にデータセット全体が利用可能である必要がありますが、継続的に更新されるデータではこれは不可能です。グローバルウィンドウを使用する無制限のPCollectionで集約を実行するには、そのPCollectionにデフォルト以外のトリガーを指定する必要があります。
8.3. PCollectionのウィンドウイング関数の設定
Window変換を適用することで、PCollectionのウィンドウイング関数を設定できます。Window変換を適用する際には、WindowFnを指定する必要があります。WindowFnは、固定時間ウィンドウやスライド時間ウィンドウなど、後続のグループ化変換でPCollectionが使用するウィンドウイング関数を決定します。
ウィンドウイング関数を設定する際には、PCollectionのトリガーを設定することも検討してください。トリガーは、各個々のウィンドウが集約され、出力されるタイミングを決定し、遅延データや早期結果の計算に関するウィンドウイング関数の動作を調整するのに役立ちます。詳細については、トリガーセクションを参照してください。
Beam YAMLのウィンドウイング仕様は、明示的なWindowInto変換を必要とせずに、任意の変換に直接配置することもできます。
8.3.1. 固定時間ウィンドウ
次のコード例は、Windowを適用してPCollectionを長さ60秒の固定ウィンドウに分割する方法を示しています。
PCollection<String> items = ...;
PCollection<String> fixedWindowedItems = items.apply(
Window.<String>into(FixedWindows.of(Duration.standardSeconds(60))));from apache_beam import window
fixed_windowed_items = (
items | 'window' >> beam.WindowInto(window.FixedWindows(60)))fixedWindowedItems := beam.WindowInto(s,
window.NewFixedWindows(60*time.Second),
items)pcoll
.apply(beam.windowInto(windowings.fixedWindows(60)))type: WindowInto
windowing:
type: fixed
size: 60s8.3.2. スライディング時間ウィンドウ
次のコード例は、Windowを適用してPCollectionをスライド時間ウィンドウに分割する方法を示しています。各ウィンドウの長さは30秒で、5秒ごとに新しいウィンドウが始まります。
PCollection<String> items = ...;
PCollection<String> slidingWindowedItems = items.apply(
Window.<String>into(SlidingWindows.of(Duration.standardSeconds(30)).every(Duration.standardSeconds(5))));from apache_beam import window
sliding_windowed_items = (
items | 'window' >> beam.WindowInto(window.SlidingWindows(30, 5)))slidingWindowedItems := beam.WindowInto(s,
window.NewSlidingWindows(5*time.Second, 30*time.Second),
items)pcoll
.apply(beam.windowInto(windowings.slidingWindows(30, 5)))type: WindowInto
windowing:
type: sliding
size: 5m
period: 30s8.3.3. セッションウィンドウ
次のコード例は、Windowを適用してPCollectionをセッションウィンドウに分割する方法を示しています。各セッションは、少なくとも10分(600秒)の時間間隔で区切られる必要があります。
PCollection<String> items = ...;
PCollection<String> sessionWindowedItems = items.apply(
Window.<String>into(Sessions.withGapDuration(Duration.standardSeconds(600))));from apache_beam import window
session_windowed_items = (
items | 'window' >> beam.WindowInto(window.Sessions(10 * 60)))sessionWindowedItems := beam.WindowInto(s,
window.NewSessions(600*time.Second),
items)pcoll
.apply(beam.windowInto(windowings.sessions(10 * 60)))type: WindowInto
windowing:
type: sessions
gap: 60sセッションはキーごとに分けられることに注意してください。コレクション内の各キーには、データの分布に応じて独自のセッショングループがあります。
8.3.4. シングルグローバルウィンドウ
PCollectionがバウンドされている場合(サイズが固定されている場合)、すべての要素を単一のグローバルウィンドウに割り当てることができます。次のコード例は、PCollectionに単一のグローバルウィンドウを設定する方法を示しています。
PCollection<String> items = ...;
PCollection<String> batchItems = items.apply(
Window.<String>into(new GlobalWindows()));from apache_beam import window
global_windowed_items = (
items | 'window' >> beam.WindowInto(window.GlobalWindows()))globalWindowedItems := beam.WindowInto(s,
window.NewGlobalWindows(),
items)pcoll
.apply(beam.windowInto(windowings.globalWindows()))type: WindowInto
windowing:
type: global8.4. ウォーターマークと遅延データ
あらゆるデータ処理システムにおいて、データイベントが発生した時間(データ要素自体のタイムスタンプによって決定される「イベント時間」)と、パイプラインの任意の段階でデータ要素が実際に処理される時間(要素を処理するシステムの時計によって決定される「処理時間」)との間には、一定の遅延があります。さらに、データイベントが生成された順序と同じ順序でパイプラインに表示されるという保証はありません。
たとえば、5分間の固定時間ウィンドウを使用するPCollectionがあるとします。各ウィンドウについて、Beamは、指定されたウィンドウ範囲内(最初のウィンドウでは0:00~4:59など)のイベント時間タイムスタンプを持つすべてのデータを収集する必要があります。その範囲外のタイムスタンプを持つデータ(5:00以降のデータ)は、別のウィンドウに属します。
ただし、データが常に時間順に、または常に予測可能な間隔でパイプラインに到着するとは限りません。Beamはウォーターマークを追跡します。これは、特定のウィンドウ内のすべてのデータがパイプラインに到着すると予想されるシステムの概念です。ウォーターマークがウィンドウの終わりを超えると、そのウィンドウのタイムスタンプを持つ後続の要素は遅延データとみなされます。
上記の例では、データのタイムスタンプ(イベント時間)とデータがパイプラインに表示される時間(処理時間)との間の遅延時間が約30秒であると仮定する単純なウォーターマークがあるとします。この場合、Beamは最初のウィンドウを5:30に閉じます。5:34にデータレコードが到着しますが、そのタイムスタンプは0:00~4:59のウィンドウ(たとえば、3:38)に属している場合、そのレコードは遅延データです。
注:簡略化のため、遅延時間を推定する非常に単純なウォーターマークを使用していることを想定しています。実際には、PCollectionのデータソースがウォーターマークを決定し、ウォーターマークはより正確で複雑になる可能性があります。
Beamのデフォルトのウィンドウイング設定は、(データソースの種類に基づいて)すべてのデータが到着したタイミングを判断し、ウォーターマークをウィンドウの終わりを超えて進めます。このデフォルトの設定では、遅延データは許可されません。トリガーを使用すると、PCollectionのウィンドウイング戦略を変更および調整できます。トリガーを使用して、各個々のウィンドウが集約して結果を出力するタイミング、およびウィンドウが遅延要素を出力する方法を決定できます。
8.4.1. 遅延データの管理
PCollectionのウィンドウイング戦略を設定する際に.withAllowedLateness操作を呼び出すことで、遅延データを許可できます。次のコード例は、ウィンドウの終了後最大2日間遅延データを許可するウィンドウイング戦略を示しています。
PCollection<String> items = ...;
PCollection<String> fixedWindowedItems = items.apply(
Window.<String>into(FixedWindows.of(Duration.standardMinutes(1)))
.withAllowedLateness(Duration.standardDays(2))); pc = [Initial PCollection]
pc | beam.WindowInto(
FixedWindows(60),
trigger=trigger_fn,
accumulation_mode=accumulation_mode,
timestamp_combiner=timestamp_combiner,
allowed_lateness=Duration(seconds=2*24*60*60)) # 2 dayswindowedItems := beam.WindowInto(s,
window.NewFixedWindows(1*time.Minute), items,
beam.AllowedLateness(2*24*time.Hour), // 2 days
)PCollectionで.withAllowedLatenessを設定すると、その許容遅延時間は、最初に許容遅延時間を適用したPCollectionから派生した後続のPCollectionに伝播します。パイプラインの後続で許容遅延時間を変更する場合は、Window.configure().withAllowedLateness()を適用して明示的に行う必要があります。
8.5. PCollectionの要素へのタイムスタンプの追加
無制限のソースは、各要素のタイムスタンプを提供します。無制限のソースによっては、生のデータストリームからタイムスタンプを抽出する方法を構成する必要がある場合があります。
ただし、バウンドされたソース(TextIOからのファイルなど)はタイムスタンプを提供しません。タイムスタンプが必要な場合は、PCollectionの要素に追加する必要があります。
ParDo変換を適用することで、設定したタイムスタンプを持つ新しい要素を出力するPCollectionの要素に新しいタイムスタンプを割り当てることができます。
たとえば、パイプラインが入力ファイルからログレコードを読み取り、各ログレコードにタイムスタンプフィールドが含まれている場合、パイプラインがファイルからレコードを読み取るため、ファイルソースはタイムスタンプを自動的に割り当てません。各レコードからタイムスタンプフィールドを解析し、DoFnを使用してParDo変換を使用して、PCollectionの各要素にタイムスタンプをアタッチできます。
PCollection<LogEntry> unstampedLogs = ...;
PCollection<LogEntry> stampedLogs =
unstampedLogs.apply(ParDo.of(new DoFn<LogEntry, LogEntry>() {
public void processElement(@Element LogEntry element, OutputReceiver<LogEntry> out) {
// Extract the timestamp from log entry we're currently processing.
Instant logTimeStamp = extractTimeStampFromLogEntry(element);
// Use OutputReceiver.outputWithTimestamp (rather than
// OutputReceiver.output) to emit the entry with timestamp attached.
out.outputWithTimestamp(element, logTimeStamp);
}
}));class AddTimestampDoFn(beam.DoFn):
def process(self, element):
# Extract the numeric Unix seconds-since-epoch timestamp to be
# associated with the current log entry.
unix_timestamp = extract_timestamp_from_log_entry(element)
# Wrap and emit the current entry and new timestamp in a
# TimestampedValue.
yield beam.window.TimestampedValue(element, unix_timestamp)
timestamped_items = items | 'timestamp' >> beam.ParDo(AddTimestampDoFn())// AddTimestampDoFn extracts an event time from a LogEntry.
func AddTimestampDoFn(element LogEntry, emit func(beam.EventTime, LogEntry)) {
et := extractEventTime(element)
// Defining an emitter with beam.EventTime as the first parameter
// allows the DoFn to set the event time for the emitted element.
emit(mtime.FromTime(et), element)
}
// Use the DoFn with ParDo as normal.
stampedLogs := beam.ParDo(s, AddTimestampDoFn, unstampedLogs)type: AssignTimestamps
config:
language: python
timestamp:
callable: |
import datetime
def extract_timestamp(x):
raw = datetime.datetime.strptime(
x.external_timestamp_field, "%Y-%m-%d")
return raw.astimezone(datetime.timezone.utc) 9. トリガー
注:GoのBeam SDKのトリガーAPIは現在実験段階であり、変更される可能性があります。
データを収集してウィンドウにグループ化する際、Beamはトリガーを使用して、各ウィンドウの集約された結果(ペインと呼ばれる)を出力するタイミングを決定します。Beamのデフォルトのウィンドウイング設定とデフォルトのトリガーを使用する場合、Beamはすべてのデータが到着したと推定されたときに集約された結果を出力し、そのウィンドウのその後のすべてのデータを破棄します。
PCollectionのトリガーを設定して、このデフォルトの動作を変更できます。Beamは、設定できるいくつかの事前構築されたトリガーを提供しています。
- イベントタイムトリガー。これらのトリガーは、各データ要素のタイムスタンプによって示されるイベント時間で動作します。Beamのデフォルトのトリガーはイベントタイムベースです。
- 処理タイムトリガー。これらのトリガーは、処理時間、つまりデータ要素がパイプラインの任意の段階で処理される時間で動作します。
- データ駆動型トリガー。これらのトリガーは、データが各ウィンドウに到着する際にデータを調べ、そのデータが特定のプロパティを満たしたときに起動します。現在、データ駆動型トリガーは、特定の数のデータ要素の後でのみ起動することをサポートしています。
- 複合トリガー。これらのトリガーは、複数のトリガーをさまざまな方法で組み合わせます。
高いレベルでは、トリガーはウィンドウの終わりに出力するだけで比べて、2つの追加機能を提供します。
- トリガーにより、Beamは、特定のウィンドウ内のすべてのデータが到着する前に、早期の結果を出力できます。たとえば、一定の時間経過後、または一定数の要素が到着した後に出力します。
- トリガーにより、イベント時間ウォーターマークがウィンドウの終わりを超えた後にトリガーすることで、遅延データの処理が可能になります。
これらの機能により、ユースケースに応じてさまざまな要因のバランスを取りながら、データの流れを制御できます。
- 完全性:結果を計算する前に、すべてのデータを持つことがどの程度重要ですか?
- レイテンシ:データの待機時間をどの程度にしますか?たとえば、すべてのデータが到着したと思われるまで待ちますか?データが到着したらすぐに処理しますか?
- コスト:レイテンシを低減するために、どの程度の計算能力/費用を費やすことができますか?
たとえば、時間的に重要な更新を必要とするシステムは、N秒ごとにウィンドウを出力する厳密な時間ベースのトリガーを使用し、データの完全性よりも迅速性を優先する可能性があります。データの完全性を結果の正確なタイミングよりも重視するシステムは、ウィンドウの終わりに起動するBeamのデフォルトのトリガーを使用することを選択する可能性があります。
ウィンドウイング関数に単一のグローバルウィンドウを使用する無制限のPCollectionのトリガーを設定することもできます。これは、パイプラインが無制限のデータセット(たとえば、現在までに提供されたすべてのデータの移動平均をN秒ごとまたはN要素ごとに更新する)に関する定期的な更新を提供する場合に役立ちます。
9.1. イベントタイムトリガー
AfterWatermarkトリガーはイベント時間で動作します。AfterWatermarkトリガーは、データ要素にアタッチされているタイムスタンプに基づいて、ウォーターマークがウィンドウの終わりを超えた後にウィンドウの内容を出力します。ウォーターマークはグローバルな進捗状況指標であり、任意の時点でパイプライン内の入力の完全性に関するBeamの概念です。AfterWatermark.pastEndOfWindow() AfterWatermark trigger.AfterEndOfWindowは、ウォーターマークがウィンドウの終わりを超えた場合のみ起動します。
さらに、パイプラインがウィンドウの終わり前または後にデータを受信した場合に起動するトリガーを構成できます。
次の例は課金シナリオを示しており、早期と後期の両方の起動を使用しています。
// Create a bill at the end of the month.
AfterWatermark.pastEndOfWindow()
// During the month, get near real-time estimates.
.withEarlyFirings(
AfterProcessingTime
.pastFirstElementInPane()
.plusDuration(Duration.standardMinutes(1))
// Fire on any late data so the bill can be corrected.
.withLateFirings(AfterPane.elementCountAtLeast(1))AfterWatermark(
early=AfterProcessingTime(delay=1 * 60), late=AfterCount(1))trigger := trigger.AfterEndOfWindow().
EarlyFiring(trigger.AfterProcessingTime().
PlusDelay(60 * time.Second)).
LateFiring(trigger.Repeat(trigger.AfterCount(1)))9.1.1. デフォルトトリガー
PCollectionのデフォルトのトリガーはイベント時間に基づいており、Beamのウォーターマークがウィンドウの終わりを超えたときにウィンドウの結果を出力し、その後、遅延データが到着するたびに起動します。
ただし、デフォルトのウィンドウ設定とデフォルトのトリガーの両方を使用している場合、デフォルトのトリガーはちょうど一度だけ発行され、遅延データは破棄されます。これは、デフォルトのウィンドウ設定の許容遅延値が0であるためです。この動作を変更する方法については、「遅延データの処理」セクションを参照してください。
9.2. 処理時間トリガー
AfterProcessingTimeトリガーは、処理時間に基づいて動作します。たとえば、AfterProcessingTime.pastFirstElementInPane() AfterProcessingTime trigger.AfterProcessingTime()トリガーは、データ受信後、一定の処理時間が経過した後にウィンドウを発行します。処理時間は、データ要素のタイムスタンプではなく、システムクロックによって決定されます。
AfterProcessingTimeトリガーは、特に単一グローバルウィンドウなど、時間枠の広いウィンドウからの早期結果のトリガーに役立ちます。
9.3. データ駆動型トリガー
Beamは、データ駆動型トリガーとしてAfterPane.elementCountAtLeast() AfterCount trigger.AfterCount()を提供します。このトリガーは要素数に基づいて動作し、現在のペインが少なくともN個の要素を収集した後に発火します。これにより、ウィンドウは(すべてのデータが蓄積される前に)早期結果を出力できます。これは、単一グローバルウィンドウを使用している場合に特に役立ちます。
たとえば、.elementCountAtLeast(50) AfterCount(50) trigger.AfterCount(50)を指定し、32個の要素しか到着しなかった場合、その32個の要素は永久に保持されます。32個の要素が重要な場合は、複数の条件を組み合わせる複合トリガーの使用を検討してください。これにより、「50個の要素を受信したとき、または1秒ごとに発火する」など、複数の発火条件を指定できます。
9.4. トリガーの設定
WindowWindowIntobeam.WindowInto変換を使用してPCollectionにウィンドウ関数を設定する場合、トリガーも指定できます。
Window.into()変換の結果に対して.triggering()メソッドを呼び出すことで、PCollectionのトリガーを設定します。このコードサンプルは、そのウィンドウの最初の要素が処理されてから1分後に結果を出力する、時間ベースのトリガーをPCollectionに設定しています。コードサンプルの最後の行である.discardingFiredPanes()は、ウィンドウの蓄積モードを設定します。
WindowInto変換を使用する際にtriggerパラメーターを設定することで、PCollectionのトリガーを設定します。このコードサンプルは、そのウィンドウの最初の要素が処理されてから1分後に結果を出力する、時間ベースのトリガーをPCollectionに設定しています。accumulation_modeパラメーターは、ウィンドウの蓄積モードを設定します。
beam.WindowInto変換を使用する際にbeam.Triggerパラメーターを渡すことで、PCollectionのトリガーを設定します。このコードサンプルは、そのウィンドウの最初の要素が処理されてから1分後に結果を出力する、時間ベースのトリガーをPCollectionに設定しています。beam.AccumulationModeパラメーターは、ウィンドウの蓄積モードを設定します。
PCollection<String> pc = ...;
pc.apply(Window.<String>into(FixedWindows.of(1, TimeUnit.MINUTES))
.triggering(AfterProcessingTime.pastFirstElementInPane()
.plusDelayOf(Duration.standardMinutes(1)))
.discardingFiredPanes()); pcollection | WindowInto(
FixedWindows(1 * 60),
trigger=AfterProcessingTime(1 * 60),
accumulation_mode=AccumulationMode.DISCARDING)windowedItems := beam.WindowInto(s,
window.NewFixedWindows(1*time.Minute), pcollection,
beam.Trigger(trigger.AfterProcessingTime().
PlusDelay(1*time.Minute)),
beam.AllowedLateness(30*time.Minute),
beam.PanesDiscard(),
)9.4.1. ウィンドウの蓄積モード
トリガーを指定する場合は、ウィンドウの蓄積モードも設定する必要があります。トリガーが発火すると、ウィンドウの現在の内容がペインとして出力されます。トリガーは複数回発火できるため、蓄積モードは、システムがトリガーの発火時にウィンドウペインを蓄積するか、破棄するかを決定します。
トリガーの発火時に生成されたペインを蓄積するようにウィンドウを設定するには、トリガーの設定時に.accumulatingFiredPanes()を呼び出します。発火したペインを破棄するようにウィンドウを設定するには、.discardingFiredPanes()を呼び出します。
トリガーの発火時に生成されたペインを蓄積するようにウィンドウを設定するには、トリガーの設定時にaccumulation_modeパラメーターをACCUMULATINGに設定します。発火したペインを破棄するようにウィンドウを設定するには、accumulation_modeをDISCARDINGに設定します。
トリガーの発火時に生成されたペインを蓄積するようにウィンドウを設定するには、トリガーの設定時にbeam.AccumulationModeパラメーターをbeam.PanesAccumulate()に設定します。発火したペインを破棄するようにウィンドウを設定するには、beam.AccumulationModeをbeam.PanesDiscard()に設定します。
固定時間ウィンドウとデータベースのトリガーを使用するPCollectionの例を見てみましょう。これは、たとえば、各ウィンドウが10分間の移動平均を表す場合、10分ごとよりも頻繁にUIに平均の現在の値を表示したい場合に行う操作です。次の条件を想定します。
PCollectionは10分間の固定時間ウィンドウを使用します。PCollectionは、3つの要素が到着するたびに発火する繰り返しトリガーを持っています。
次の図は、キーXのデータイベントがPCollectionに到着し、ウィンドウに割り当てられる様子を示しています。図を簡略化するために、イベントはすべて順序どおりにパイプラインに到着すると仮定します。

9.4.1.1. 蓄積モード
トリガーが蓄積モードに設定されている場合、トリガーは発火するたびに次の値を出力します。トリガーは3つの要素が到着するたびに発火することに注意してください。
First trigger firing: [5, 8, 3]
Second trigger firing: [5, 8, 3, 15, 19, 23]
Third trigger firing: [5, 8, 3, 15, 19, 23, 9, 13, 10]
9.4.1.2. 破棄モード
トリガーが破棄モードに設定されている場合、トリガーは発火するたびに次の値を出力します。
First trigger firing: [5, 8, 3]
Second trigger firing: [15, 19, 23]
Third trigger firing: [9, 13, 10]
9.4.2. 遅延データの処理
ウォーターマークがウィンドウの終了時刻を超えた後に到着するデータをパイプラインで処理する場合は、ウィンドウ設定時に許容遅延を適用できます。これにより、トリガーは遅延データに対応できます。許容遅延が設定されている場合、デフォルトのトリガーは、遅延データが到着するたびにすぐに新しい結果を出力します。
ウィンドウ関数を設定する際に.withAllowedLateness() allowed_lateness beam.AllowedLateness()を使用して、許容遅延を設定します。
PCollection<String> pc = ...;
pc.apply(Window.<String>into(FixedWindows.of(1, TimeUnit.MINUTES))
.triggering(AfterProcessingTime.pastFirstElementInPane()
.plusDelayOf(Duration.standardMinutes(1)))
.withAllowedLateness(Duration.standardMinutes(30)); pc = [Initial PCollection]
pc | beam.WindowInto(
FixedWindows(60),
trigger=AfterProcessingTime(60),
allowed_lateness=1800) # 30 minutes
| ...allowedToBeLateItems := beam.WindowInto(s,
window.NewFixedWindows(1*time.Minute), pcollection,
beam.Trigger(trigger.AfterProcessingTime().
PlusDelay(1*time.Minute)),
beam.AllowedLateness(30*time.Minute),
)この許容遅延は、元のPCollectionに変換を適用した結果として派生したすべてのPCollectionに伝播します。パイプラインの後半で許容遅延を変更する場合は、Window.configure().withAllowedLateness() allowed_lateness beam.AllowedLateness()を明示的に再度適用できます。
9.5. 複合トリガー
複数のトリガーを組み合わせて複合トリガーを作成し、結果を繰り返し、最大1回、またはその他のカスタム条件で出力するようにトリガーを指定できます。
9.5.1. 複合トリガーの種類
Beamには次の複合トリガーが含まれています。
AfterWatermark.pastEndOfWindowには、.withEarlyFiringsと.withLateFiringsを使用して、追加の早期発火または遅延発火を追加できます。Repeatedly.foreverは、無限に実行されるトリガーを指定します。トリガーの条件が満たされるたびに、ウィンドウが結果を出力し、リセットされて再開されます。Repeatedly.foreverを.orFinallyと組み合わせることで、繰り返しトリガーを停止させる条件を指定するのに役立ちます。AfterEach.inOrderは、複数のトリガーを組み合わせて特定の順序で発火させます。シーケンス内のトリガーがウィンドウを出力するたびに、シーケンスは次のトリガーに進みます。AfterFirstは複数のトリガーを受け取り、その引数のトリガーのいずれかが最初に満たされたときに発火します。これは、複数のトリガーに対する論理OR演算に相当します。AfterAllは複数のトリガーを受け取り、その引数のトリガーのすべてが満たされたときに発火します。これは、複数のトリガーに対する論理AND演算に相当します。orFinallyは、任意のトリガーに最終的に1回だけ発火させ、二度と発火させないようにするための最終的な条件として機能します。
9.5.2. AfterWatermarkとの合成
最も有用な複合トリガーの一部は、Beamがすべてのデータが到着したと推定したとき(つまり、ウォーターマークがウィンドウの終了時刻を超えたとき)に1回だけ発火し、次のいずれか、または両方と組み合わされます。
部分的な結果のより高速な処理を可能にするために、ウォーターマークがウィンドウの終了時刻を超える前に発生する推測的発火。
遅延データの処理を可能にするために、ウォーターマークがウィンドウの終了時刻を超えた後に発生する遅延発火。
このパターンはAfterWatermarkを使用して表現できます。たとえば、次の例トリガーコードは、次の条件で発火します。
Beamがすべてのデータが到着したと推定したとき(ウォーターマークがウィンドウの終了時刻を超えたとき)。
10分間の遅延の後、遅延データが到着したとき。
- 2日後、関連するデータが到着しないと仮定し、トリガーの実行が停止します。
.apply(Window
.configure()
.triggering(AfterWatermark
.pastEndOfWindow()
.withLateFirings(AfterProcessingTime
.pastFirstElementInPane()
.plusDelayOf(Duration.standardMinutes(10))))
.withAllowedLateness(Duration.standardDays(2)));pcollection | WindowInto(
FixedWindows(1 * 60),
trigger=AfterWatermark(late=AfterProcessingTime(10 * 60)),
allowed_lateness=10,
accumulation_mode=AccumulationMode.DISCARDING)compositeTriggerItems := beam.WindowInto(s,
window.NewFixedWindows(1*time.Minute), pcollection,
beam.Trigger(trigger.AfterEndOfWindow().
LateFiring(trigger.AfterProcessingTime().
PlusDelay(10*time.Minute))),
beam.AllowedLateness(2*24*time.Hour),
)9.5.3. その他の複合トリガー
他の種類の複合トリガーを作成することもできます。次のコード例は、ペインに少なくとも100個の要素がある場合、または1分後に発火する単純な複合トリガーを示しています。
Repeatedly.forever(AfterFirst.of(
AfterPane.elementCountAtLeast(100),
AfterProcessingTime.pastFirstElementInPane().plusDelayOf(Duration.standardMinutes(1))))pcollection | WindowInto(
FixedWindows(1 * 60),
trigger=Repeatedly(
AfterAny(AfterCount(100), AfterProcessingTime(1 * 60))),
accumulation_mode=AccumulationMode.DISCARDING)10. メトリクス
Beamモデルでは、メトリクスはユーザーパイプラインの現在の状態に関する洞察を、パイプラインの実行中にも提供します。たとえば、次のような理由が考えられます。
- パイプライン内の特定のステップの実行中に発生したエラーの数をチェックします。
- バックエンドサービスへのRPCの数を監視します。
- 処理された要素の正確な数を取得します。
- …など。
10.1. Beamメトリクスの主な概念
- 名前付き。各メトリクスには、名前空間と実際の名前で構成される名前があります。名前空間は、同じ名前の複数のメトリクスを区別するために使用でき、特定の名前空間内のすべてのメトリクスをクエリすることもできます。
- スコープ付き。各メトリクスは、パイプライン内の特定のステップに対して報告され、メトリクスが増分されたときに実行されていたコードを示します。
- 動的に作成される。ロガーを作成する方法とほぼ同じように、メトリクスは実行時に事前宣言せずに作成できます。これにより、ユーティリティコードでメトリクスを生成し、それらを有用な形で報告することが容易になります。
- 段階的に機能低下する。ランナーがメトリクスのレポートの一部をサポートしていない場合、フォールバック動作は、パイプラインに失敗させるのではなく、メトリックの更新を削除することです。ランナーがメトリックのクエリの一部をサポートしていない場合、ランナーは関連するデータを返しません。
報告されたメトリクスは、暗黙的に、それらを報告したパイプライン内のトランスフォームにスコープされます。これにより、複数の場所で同じメトリクス名を報告し、各トランスフォームが報告した値を特定し、パイプライン全体でメトリクスを集計することができます。
注記: メトリクスがパイプライン実行中にアクセス可能か、ジョブが完了した後にのみアクセス可能かは、ランナーによって異なります。
10.2. メトリクスの種類
現時点では、Counter、Distribution、Gaugeの3種類のメトリクスがサポートされています。
Go 用の Beam SDK では、フレームワークによって提供されるcontext.Contextをメトリクスに渡す必要があります。渡さないと、メトリクス値は記録されません。フレームワークは、それが最初の引数のとき、ProcessElementや同様のメソッドに有効なcontext.Contextを自動的に提供します。
Counter: 単一の long 値を報告し、インクリメントまたはデクリメントできるメトリクス。
Counter counter = Metrics.counter( "namespace", "counter1");
@ProcessElement
public void processElement(ProcessContext context) {
// count the elements
counter.inc();
...
}var counter = beam.NewCounter("namespace", "counter1")
func (fn *MyDoFn) ProcessElement(ctx context.Context, ...) {
// count the elements
counter.Inc(ctx, 1)
...
}from apache_beam import metrics
class MyDoFn(beam.DoFn):
def __init__(self):
self.counter = metrics.Metrics.counter("namespace", "counter1")
def process(self, element):
self.counter.inc()
yield elementDistribution: 報告された値の分布に関する情報を報告するメトリクス。
Distribution distribution = Metrics.distribution( "namespace", "distribution1");
@ProcessElement
public void processElement(ProcessContext context) {
Integer element = context.element();
// create a distribution (histogram) of the values
distribution.update(element);
...
}var distribution = beam.NewDistribution("namespace", "distribution1")
func (fn *MyDoFn) ProcessElement(ctx context.Context, v int64, ...) {
// create a distribution (histogram) of the values
distribution.Update(ctx, v)
...
}class MyDoFn(beam.DoFn):
def __init__(self):
self.distribution = metrics.Metrics.distribution("namespace", "distribution1")
def process(self, element):
self.distribution.update(element)
yield elementGauge: 報告された値のうち最新の値を報告するメトリクス。メトリクスは多くのワーカーから収集されるため、値は絶対的な最新値ではない場合があり、最新の値の1つになります。
Gauge gauge = Metrics.gauge( "namespace", "gauge1");
@ProcessElement
public void processElement(ProcessContext context) {
Integer element = context.element();
// create a gauge (latest value received) of the values
gauge.set(element);
...
}var gauge = beam.NewGauge("namespace", "gauge1")
func (fn *MyDoFn) ProcessElement(ctx context.Context, v int64, ...) {
// create a gauge (latest value received) of the values
gauge.Set(ctx, v)
...
}class MyDoFn(beam.DoFn):
def __init__(self):
self.gauge = metrics.Metrics.gauge("namespace", "gauge1")
def process(self, element):
self.gauge.set(element)
yield element10.3. メトリクスのクエリ
PipelineResultには、メトリクスへのアクセスを可能にするMetricResultsオブジェクトを返すmetrics()メソッドがあります。MetricResultsで利用可能な主なメソッドでは、特定のフィルタに一致するすべてのメトリクスを照会できます。
beam.PipelineResultには、メトリクスへのアクセスを可能にするmetrics.Resultsオブジェクトを返すMetrics()メソッドがあります。metrics.Resultsで利用可能な主なメソッドでは、特定のフィルタに一致するすべてのメトリクスを照会できます。これは、SingleResultパラメータ型を持つ述語を受け入れ、カスタムフィルタに使用できます。
PipelineResultには、MetricResultsオブジェクトを返すmetricsメソッドがあります。MetricResultsオブジェクトを使用すると、メトリクスにアクセスできます。MetricResultsオブジェクトで利用可能な主なメソッドであるqueryを使用すると、特定のフィルタに一致するすべてのメトリクスを照会できます。queryメソッドはMetricsFilterオブジェクトを受け入れ、複数の異なる基準でフィルタリングするために使用できます。MetricResultsオブジェクトを照会すると、MetricResultオブジェクトのリストのディクショナリが返されます。ディクショナリは、Counter、Distribution、Gaugeなど、タイプ別に整理されます。MetricResultオブジェクトには、メトリクスの値を取得するresult関数と、keyプロパティが含まれています。keyプロパティには、名前空間とメトリクスの名前に関する情報が含まれています。
public interface PipelineResult {
MetricResults metrics();
}
public abstract class MetricResults {
public abstract MetricQueryResults queryMetrics(@Nullable MetricsFilter filter);
}
public interface MetricQueryResults {
Iterable<MetricResult<Long>> getCounters();
Iterable<MetricResult<DistributionResult>> getDistributions();
Iterable<MetricResult<GaugeResult>> getGauges();
}
public interface MetricResult<T> {
MetricName getName();
String getStep();
T getCommitted();
T getAttempted();
}func queryMetrics(pr beam.PipelineResult, ns, n string) metrics.QueryResults {
return pr.Metrics().Query(func(r beam.MetricResult) bool {
return r.Namespace() == ns && r.Name() == n
})
}class PipelineResult:
def metrics(self) -> MetricResults:
"""Returns a the metric results from the pipeline."""
class MetricResults:
def query(self, filter: MetricsFilter) -> Dict[str, List[MetricResult]]:
"""Filters the results against the specified filter."""
class MetricResult:
def result(self):
"""Returns the value of the metric."""10.4. パイプラインでのメトリクスの使用
以下は、ユーザーパイプラインでCounterメトリクスを使用する方法の簡単な例です。
// creating a pipeline with custom metrics DoFn
pipeline
.apply(...)
.apply(ParDo.of(new MyMetricsDoFn()));
pipelineResult = pipeline.run().waitUntilFinish(...);
// request the metric called "counter1" in namespace called "namespace"
MetricQueryResults metrics =
pipelineResult
.metrics()
.queryMetrics(
MetricsFilter.builder()
.addNameFilter(MetricNameFilter.named("namespace", "counter1"))
.build());
// print the metric value - there should be only one line because there is only one metric
// called "counter1" in the namespace called "namespace"
for (MetricResult<Long> counter: metrics.getCounters()) {
System.out.println(counter.getName() + ":" + counter.getAttempted());
}
public class MyMetricsDoFn extends DoFn<Integer, Integer> {
private final Counter counter = Metrics.counter( "namespace", "counter1");
@ProcessElement
public void processElement(ProcessContext context) {
// count the elements
counter.inc();
context.output(context.element());
}
}func addMetricDoFnToPipeline(s beam.Scope, input beam.PCollection) beam.PCollection {
return beam.ParDo(s, &MyMetricsDoFn{}, input)
}
func executePipelineAndGetMetrics(ctx context.Context, p *beam.Pipeline) (metrics.QueryResults, error) {
pr, err := beam.Run(ctx, runner, p)
if err != nil {
return metrics.QueryResults{}, err
}
// Request the metric called "counter1" in namespace called "namespace"
ms := pr.Metrics().Query(func(r beam.MetricResult) bool {
return r.Namespace() == "namespace" && r.Name() == "counter1"
})
// Print the metric value - there should be only one line because there is
// only one metric called "counter1" in the namespace called "namespace"
for _, c := range ms.Counters() {
fmt.Println(c.Namespace(), "-", c.Name(), ":", c.Committed)
}
return ms, nil
}
type MyMetricsDoFn struct {
counter beam.Counter
}
func init() {
beam.RegisterType(reflect.TypeOf((*MyMetricsDoFn)(nil)))
}
func (fn *MyMetricsDoFn) Setup() {
// While metrics can be defined in package scope or dynamically
// it's most efficient to include them in the DoFn.
fn.counter = beam.NewCounter("namespace", "counter1")
}
func (fn *MyMetricsDoFn) ProcessElement(ctx context.Context, v beam.V, emit func(beam.V)) {
// count the elements
fn.counter.Inc(ctx, 1)
emit(v)
}class MyMetricsDoFn(beam.DoFn):
def __init__(self):
self.counter = metrics.Metrics.counter("namespace", "counter1")
def process(self, element):
counter.inc()
yield element
pipeline = beam.Pipeline()
pipeline | beam.ParDo(MyMetricsDoFn())
result = pipeline.run().wait_until_finish()
metrics = result.metrics().query(
metrics.MetricsFilter.with_namespace("namespace").with_name("counter1"))
for metric in metrics["counters"]:
print(metric)10.5. メトリクスのエクスポート
Beamメトリクスは、外部のシンクにエクスポートできます。構成でメトリクスシンクが設定されている場合、ランナーはデフォルトで5秒間隔でメトリクスをプッシュします。MetricsOptionsクラスには構成が保持されます。これには、プッシュ期間の構成と、タイプやURLなどのシンク固有のオプションが含まれています。現時点では、REST HTTPとGraphiteシンクのみがサポートされており、メトリクスのエクスポートをサポートしているのはFlinkとSparkランナーのみです。
また、Beamメトリクスは、それぞれのUIで確認できる内部のSparkおよびFlinkダッシュボードにもエクスポートされます。
11. 状態とタイマー
Beamのウィンドウ処理とトリガー機能は、タイムスタンプに基づいて無制限の入力データをグループ化および集計するための強力な抽象化を提供します。ただし、開発者がウィンドウとトリガーによって提供されるものよりも高度な制御を必要とする集計のユースケースがあります。Beamは、キーごとの状態を手動で管理するためのAPIを提供し、集計に対するきめ細かい制御を可能にします。
Beamの状態APIは、キーごとの状態をモデル化します。状態APIを使用するには、キー付きPCollectionから始めます。Javaでは、これはPCollection<KV<K, V>>としてモデル化されます。このPCollectionを処理するParDoは、状態変数を宣言できます。ParDo内では、これらの状態変数を使用して、現在のキーの状態を書き込んだり更新したり、そのキーに対して書き込まれた以前の状態を読み取ったりできます。状態は常に、現在の処理キーのみに完全にスコープされます。
状態付き処理と併せてウィンドウ処理を使用することもできます。キーのすべての状態は、現在のウィンドウにスコープされます。これは、特定のウィンドウに対してキーが最初に検出された場合、状態の読み取りはすべて空の結果を返し、ウィンドウが完了するとランナーが状態をガベージコレクションできることを意味します。状態付き演算子の前に、Beamのウィンドウ化された集計を使用することも多くの場合役立ちます。たとえば、コンバイナーを使用してデータを事前に集計し、集計されたデータを状態内に格納します。状態とタイマーを使用している場合、ウィンドウのマージは現在サポートされていません。
状態付き処理は、DoFn内でステートマシンスタイルの処理を実装するために使用されることがあります。これを行う際には、入力PCollectionの要素には順序が保証されておらず、プログラムロジックがこの点で復元力があることを確認する必要があることに注意する必要があります。DirectRunnerを使用して記述された単体テストは、要素処理の順序をシャッフルし、正確性をテストするために推奨されます。
Javaでは、DoFnは、各状態を表す最終的なStateSpecメンバー変数を生成することで、アクセスする状態を宣言します。各状態は、StateIdアノテーションを使用して名前を付ける必要があります。この名前はグラフ内のParDoに対して一意であり、グラフ内の他のノードとは関係ありません。DoFnは複数の状態変数を宣言できます。
Pythonでは、DoFnは、各状態を表すStateSpecクラスメンバー変数を生成することで、アクセスする状態を宣言します。各StateSpecは名前付きで初期化されます。この名前はグラフ内のParDoに対して一意であり、グラフ内の他のノードとは関係ありません。DoFnは複数の状態変数を宣言できます。
Goでは、DoFnは、各状態を表す状態構造体メンバー変数を生成することで、アクセスする状態を宣言します。各状態変数はキー付きで初期化されます。このキーはグラフ内のParDoに対して一意であり、グラフ内の他のノードとは関係ありません。名前が指定されていない場合、キーはメンバー変数の名前にデフォルト設定されます。DoFnは複数の状態変数を宣言できます。
注記: Typescript 用の Beam SDK はまだ State および Timer API をサポートしていませんが、クロス言語パイプラインからこれらの機能を使用することは可能です(下記参照)。
11.1. 状態の種類
Beamはいくつかの状態の種類を提供します。
ValueState
ValueStateはスカラー状態値です。入力の各キーについて、ValueStateは、DoFnの@ProcessElementまたは@OnTimerメソッド内で読み取りおよび変更できる型付き値を格納します。ValueStateの型にコーダーが登録されている場合、Beamは状態値のコーダーを自動的に推測します。それ以外の場合は、ValueStateを作成するときにコーダーを明示的に指定できます。たとえば、次のParDoは、検出された要素の数を累積する単一の状態変数を作成します。
注記: ValueStateは、Python SDKではReadModifyWriteStateと呼ばれています。
PCollection<KV<String, ValueT>> perUser = readPerUser();
perUser.apply(ParDo.of(new DoFn<KV<String, ValueT>, OutputT>() {
@StateId("state") private final StateSpec<ValueState<Integer>> numElements = StateSpecs.value();
@ProcessElement public void process(@StateId("state") ValueState<Integer> state) {
// Read the number element seen so far for this user key.
// state.read() returns null if it was never set. The below code allows us to have a default value of 0.
int currentValue = MoreObjects.firstNonNull(state.read(), 0);
// Update the state.
state.write(currentValue + 1);
}
}));// valueStateFn keeps track of the number of elements seen.
type valueStateFn struct {
Val state.Value[int]
}
func (s *valueStateFn) ProcessElement(p state.Provider, book string, word string, emitWords func(string)) error {
// Get the value stored in our state
val, ok, err := s.Val.Read(p)
if err != nil {
return err
}
if !ok {
s.Val.Write(p, 1)
} else {
s.Val.Write(p, val+1)
}
if val > 10000 {
// Example of clearing and starting again with an empty bag
s.Val.Clear(p)
}
return nil
}Beamでは、ValueState値のコーダーを明示的に指定することもできます。たとえば、
PCollection<KV<String, ValueT>> perUser = readPerUser();
perUser.apply(ParDo.of(new DoFn<KV<String, ValueT>, OutputT>() {
@StateId("state") private final StateSpec<ValueState<MyType>> numElements = StateSpecs.value(new MyTypeCoder());
...
}));class ReadModifyWriteStateDoFn(DoFn):
STATE_SPEC = ReadModifyWriteStateSpec('num_elements', VarIntCoder())
def process(self, element, state=DoFn.StateParam(STATE_SPEC)):
# Read the number element seen so far for this user key.
current_value = state.read() or 0
state.write(current_value+1)
_ = (p | 'Read per user' >> ReadPerUser()
| 'state pardo' >> beam.ParDo(ReadModifyWriteStateDoFn()))type valueStateDoFn struct {
Val state.Value[MyCustomType]
}
func encode(m MyCustomType) []byte {
return m.Bytes()
}
func decode(b []byte) MyCustomType {
return MyCustomType{}.FromBytes(b)
}
func init() {
beam.RegisterCoder(reflect.TypeOf((*MyCustomType)(nil)).Elem(), encode, decode)
}const pcoll = root.apply(
beam.create([
{ key: "a", value: 1 },
{ key: "b", value: 10 },
{ key: "a", value: 100 },
])
);
const result: PCollection<number> = await pcoll
.apply(
withCoderInternal(
new KVCoder(new StrUtf8Coder(), new VarIntCoder())
)
)
.applyAsync(
pythonTransform(
// Construct a new Transform from source.
"__constructor__",
[
pythonCallable(`
# Define a DoFn to be used below.
class ReadModifyWriteStateDoFn(beam.DoFn):
STATE_SPEC = beam.transforms.userstate.ReadModifyWriteStateSpec(
'num_elements', beam.coders.VarIntCoder())
def process(self, element, state=beam.DoFn.StateParam(STATE_SPEC)):
current_value = state.read() or 0
state.write(current_value + 1)
yield current_value + 1
class MyPythonTransform(beam.PTransform):
def expand(self, pcoll):
return pcoll | beam.ParDo(ReadModifyWriteStateDoFn())
`),
],
// Keyword arguments to pass to the transform, if any.
{},
// Output type if it cannot be inferred
{ requestedOutputCoders: { output: new VarIntCoder() } }
)
);CombiningState
CombiningStateを使用すると、Beamコンバイナーを使用して更新される状態オブジェクトを作成できます。たとえば、前のValueStateの例は、CombiningStateを使用して書き直すことができます。
PCollection<KV<String, ValueT>> perUser = readPerUser();
perUser.apply(ParDo.of(new DoFn<KV<String, ValueT>, OutputT>() {
@StateId("state") private final StateSpec<CombiningState<Integer, int[], Integer>> numElements =
StateSpecs.combining(Sum.ofIntegers());
@ProcessElement public void process(@StateId("state") ValueState<Integer> state) {
state.add(1);
}
}));class CombiningStateDoFn(DoFn):
SUM_TOTAL = CombiningValueStateSpec('total', sum)
def process(self, element, state=DoFn.StateParam(SUM_TOTAL)):
state.add(1)
_ = (p | 'Read per user' >> ReadPerUser()
| 'Combine state pardo' >> beam.ParDo(CombiningStateDofn()))// combiningStateFn keeps track of the number of elements seen.
type combiningStateFn struct {
// types are the types of the accumulator, input, and output respectively
Val state.Combining[int, int, int]
}
func (s *combiningStateFn) ProcessElement(p state.Provider, book string, word string, emitWords func(string)) error {
// Get the value stored in our state
val, _, err := s.Val.Read(p)
if err != nil {
return err
}
s.Val.Add(p, 1)
if val > 10000 {
// Example of clearing and starting again with an empty bag
s.Val.Clear(p)
}
return nil
}
func combineState(s beam.Scope, input beam.PCollection) beam.PCollection {
// ...
// CombineFn param can be a simple fn like this or a structural CombineFn
cFn := state.MakeCombiningState[int, int, int]("stateKey", func(a, b int) int {
return a + b
})
combined := beam.ParDo(s, combiningStateFn{Val: cFn}, input)
// ...
BagState
状態の一般的なユースケースは、複数の要素を累積することです。BagStateを使用すると、要素の順序付けられていない集合を累積できます。これにより、コレクション全体を最初に読み取る必要なしにコレクションに要素を追加できるため、効率が向上します。さらに、ページ付き読み取りをサポートするランナーでは、使用可能なメモリよりも大きい個々のバッグを許可できます。
PCollection<KV<String, ValueT>> perUser = readPerUser();
perUser.apply(ParDo.of(new DoFn<KV<String, ValueT>, OutputT>() {
@StateId("state") private final StateSpec<BagState<ValueT>> numElements = StateSpecs.bag();
@ProcessElement public void process(
@Element KV<String, ValueT> element,
@StateId("state") BagState<ValueT> state) {
// Add the current element to the bag for this key.
state.add(element.getValue());
if (shouldFetch()) {
// Occasionally we fetch and process the values.
Iterable<ValueT> values = state.read();
processValues(values);
state.clear(); // Clear the state for this key.
}
}
}));class BagStateDoFn(DoFn):
ALL_ELEMENTS = BagStateSpec('buffer', coders.VarIntCoder())
def process(self, element_pair, state=DoFn.StateParam(ALL_ELEMENTS)):
state.add(element_pair[1])
if should_fetch():
all_elements = list(state.read())
process_values(all_elements)
state.clear()
_ = (p | 'Read per user' >> ReadPerUser()
| 'Bag state pardo' >> beam.ParDo(BagStateDoFn()))// bagStateFn only emits words that haven't been seen
type bagStateFn struct {
Bag state.Bag[string]
}
func (s *bagStateFn) ProcessElement(p state.Provider, book, word string, emitWords func(string)) error {
// Get all values we've written to this bag state in this window.
vals, ok, err := s.Bag.Read(p)
if err != nil {
return err
}
if !ok || !contains(vals, word) {
emitWords(word)
s.Bag.Add(p, word)
}
if len(vals) > 10000 {
// Example of clearing and starting again with an empty bag
s.Bag.Clear(p)
}
return nil
}11.2. 遅延状態読み取り
DoFnに複数の状態仕様が含まれている場合、それぞれを順番に読み取ると速度が低下する可能性があります。状態に対してread()関数を呼び出すと、ランナーがブロッキング読み取りを実行することがあります。複数のブロッキング読み取りを連続して実行すると、要素処理の待ち時間が増加します。状態が常に読み取られることがわかっている場合は、@AlwaysFetchedとして注釈を付けることができます。そうすると、ランナーは必要なすべての状態をプリフェッチできます。たとえば、
PCollection<KV<String, ValueT>> perUser = readPerUser();
perUser.apply(ParDo.of(new DoFn<KV<String, ValueT>, OutputT>() {
@StateId("state1") private final StateSpec<ValueState<Integer>> state1 = StateSpecs.value();
@StateId("state2") private final StateSpec<ValueState<String>> state2 = StateSpecs.value();
@StateId("state3") private final StateSpec<BagState<ValueT>> state3 = StateSpecs.bag();
@ProcessElement public void process(
@AlwaysFetched @StateId("state1") ValueState<Integer> state1,
@AlwaysFetched @StateId("state2") ValueState<String> state2,
@AlwaysFetched @StateId("state3") BagState<ValueT> state3) {
state1.read();
state2.read();
state3.read();
}
}));This is not supported yet, see https://github.com/apache/beam/issues/20739.This is not supported yet, see https://github.com/apache/beam/issues/22964.
ただし、状態がフェッチされないコードパスがある場合、@AlwaysFetchedで注釈を付けると、それらのパスに対して不要なフェッチが追加されます。この場合、readLaterメソッドを使用すると、ランナーは後で状態が読み取られることを認識できるため、複数の状態読み取りをまとめてバッチ処理できます。
PCollection<KV<String, ValueT>> perUser = readPerUser();
perUser.apply(ParDo.of(new DoFn<KV<String, ValueT>, OutputT>() {
@StateId("state1") private final StateSpec<ValueState<Integer>> state1 = StateSpecs.value();
@StateId("state2") private final StateSpec<ValueState<String>> state2 = StateSpecs.value();
@StateId("state3") private final StateSpec<BagState<ValueT>> state3 = StateSpecs.bag();
@ProcessElement public void process(
@StateId("state1") ValueState<Integer> state1,
@StateId("state2") ValueState<String> state2,
@StateId("state3") BagState<ValueT> state3) {
if (/* should read state */) {
state1.readLater();
state2.readLater();
state3.readLater();
}
// The runner can now batch all three states into a single read, reducing latency.
processState1(state1.read());
processState2(state2.read());
processState3(state3.read());
}
}));11.3. タイマー
Beamは、キーごとのタイマーコールバックAPIを提供します。これにより、状態APIを使用して格納されたデータの遅延処理が可能になります。タイマーは、イベントタイムまたは処理タイムのタイムスタンプのいずれかでコールバックするように設定できます。すべてのタイマーは、TimerIdで識別されます。キーの特定のタイマーは、単一のタイムスタンプに対してのみ設定できます。タイマーに対してsetを呼び出すと、そのキーのタイマーの以前の発火時間が上書きされます。
11.3.1. イベントタイムタイマー
イベントタイムタイマーは、DoFnの入力ウォーターマークがタイマーが設定されている時刻を超えたときに発火します。つまり、ランナーは、タイマーのタイムスタンプより前にタイムスタンプが付けられた要素がさらに処理されないと考えています。これにより、イベントタイムの集計が可能になります。
PCollection<KV<String, ValueT>> perUser = readPerUser();
perUser.apply(ParDo.of(new DoFn<KV<String, ValueT>, OutputT>() {
@StateId("state") private final StateSpec<ValueState<Integer>> state = StateSpecs.value();
@TimerId("timer") private final TimerSpec timer = TimerSpecs.timer(TimeDomain.EVENT_TIME);
@ProcessElement public void process(
@Element KV<String, ValueT> element,
@Timestamp Instant elementTs,
@StateId("state") ValueState<Integer> state,
@TimerId("timer") Timer timer) {
...
// Set an event-time timer to the element timestamp.
timer.set(elementTs);
}
@OnTimer("timer") public void onTimer() {
//Process timer.
}
}));class EventTimerDoFn(DoFn):
ALL_ELEMENTS = BagStateSpec('buffer', coders.VarIntCoder())
TIMER = TimerSpec('timer', TimeDomain.WATERMARK)
def process(self,
element_pair,
t = DoFn.TimestampParam,
buffer = DoFn.StateParam(ALL_ELEMENTS),
timer = DoFn.TimerParam(TIMER)):
buffer.add(element_pair[1])
# Set an event-time timer to the element timestamp.
timer.set(t)
@on_timer(TIMER)
def expiry_callback(self, buffer = DoFn.StateParam(ALL_ELEMENTS)):
state.clear()
_ = (p | 'Read per user' >> ReadPerUser()
| 'EventTime timer pardo' >> beam.ParDo(EventTimerDoFn()))type eventTimerDoFn struct {
State state.Value[int64]
Timer timers.EventTime
}
func (fn *eventTimerDoFn) ProcessElement(ts beam.EventTime, sp state.Provider, tp timers.Provider, book, word string, emitWords func(string)) {
// ...
// Set an event-time timer to the element timestamp.
fn.Timer.Set(tp, ts.ToTime())
// ...
}
func (fn *eventTimerDoFn) OnTimer(sp state.Provider, tp timers.Provider, w beam.Window, key string, timer timers.Context, emitWords func(string)) {
switch timer.Family {
case fn.Timer.Family:
// process callback for this timer
}
}
func AddEventTimeDoFn(s beam.Scope, in beam.PCollection) beam.PCollection {
return beam.ParDo(s, &eventTimerDoFn{
// Timers are given family names so their callbacks can be handled independantly.
Timer: timers.InEventTime("processWatermark"),
State: state.MakeValueState[int64]("latest"),
}, in)
}11.3.2. 処理時間タイマー
処理タイムタイマーは、実際の壁時計時間が経過したときに発火します。これは、処理前により大きなデータバッチを作成するために使用されることがよくあります。特定の時間に発生する必要があるイベントをスケジュールするためにも使用できます。イベントタイムタイマーと同様に、処理タイムタイマーはキーごとに別々で、各キーにはタイマーの個別のコピーがあります。
処理タイムタイマーは絶対タイムスタンプに設定できますが、現在の時刻に対するオフセットに設定することが非常に一般的です。Javaでは、Timer.offsetとTimer.setRelativeメソッドを使用してこれを実現できます。
PCollection<KV<String, ValueT>> perUser = readPerUser();
perUser.apply(ParDo.of(new DoFn<KV<String, ValueT>, OutputT>() {
@TimerId("timer") private final TimerSpec timer = TimerSpecs.timer(TimeDomain.PROCESSING_TIME);
@ProcessElement public void process(@TimerId("timer") Timer timer) {
...
// Set a timer to go off 30 seconds in the future.
timer.offset(Duration.standardSeconds(30)).setRelative();
}
@OnTimer("timer") public void onTimer() {
//Process timer.
}
}));class ProcessingTimerDoFn(DoFn):
ALL_ELEMENTS = BagStateSpec('buffer', coders.VarIntCoder())
TIMER = TimerSpec('timer', TimeDomain.REAL_TIME)
def process(self,
element_pair,
buffer = DoFn.StateParam(ALL_ELEMENTS),
timer = DoFn.TimerParam(TIMER)):
buffer.add(element_pair[1])
# Set a timer to go off 30 seconds in the future.
timer.set(Timestamp.now() + Duration(seconds=30))
@on_timer(TIMER)
def expiry_callback(self, buffer = DoFn.StateParam(ALL_ELEMENTS)):
# Process timer.
state.clear()
_ = (p | 'Read per user' >> ReadPerUser()
| 'ProcessingTime timer pardo' >> beam.ParDo(ProcessingTimerDoFn()))type processingTimerDoFn struct {
Timer timers.ProcessingTime
}
func (fn *processingTimerDoFn) ProcessElement(sp state.Provider, tp timers.Provider, book, word string, emitWords func(string)) {
// ...
// Set a timer to go off 30 seconds in the future.
fn.Timer.Set(tp, time.Now().Add(30*time.Second))
// ...
}
func (fn *processingTimerDoFn) OnTimer(sp state.Provider, tp timers.Provider, w beam.Window, key string, timer timers.Context, emitWords func(string)) {
switch timer.Family {
case fn.Timer.Family:
// process callback for this timer
}
}
func AddProcessingTimeDoFn(s beam.Scope, in beam.PCollection) beam.PCollection {
return beam.ParDo(s, &processingTimerDoFn{
// Timers are given family names so their callbacks can be handled independantly.
Timer: timers.InProcessingTime("timer"),
}, in)
}11.3.3. 動的タイマータグ
Beamは、Java SDKでTimerMapを使用してタイマータグを動的に設定することもサポートしています。これにより、DoFnで複数の異なるタイマーを設定し、タイマータグを動的に選択できるようになります(例:入力要素のデータに基づく)。特定のタグを持つタイマーは単一のタイムスタンプに対してのみ設定できるため、タイマーを再度設定すると、そのタグを持つタイマーの以前の有効期限が上書きされます。各TimerMapはタイマーファミリIDで識別され、異なるタイマーファミリのタイマーは独立しています。
Python SDKでは、set()またはclear()を呼び出すときに、動的なタイマータグを指定できます。指定しない場合、タイマータグはデフォルトで空文字列になります。
PCollection<KV<String, ValueT>> perUser = readPerUser();
perUser.apply(ParDo.of(new DoFn<KV<String, ValueT>, OutputT>() {
@TimerFamily("actionTimers") private final TimerSpec timer =
TimerSpecs.timerMap(TimeDomain.EVENT_TIME);
@ProcessElement public void process(
@Element KV<String, ValueT> element,
@Timestamp Instant elementTs,
@TimerFamily("actionTimers") TimerMap timers) {
timers.set(element.getValue().getActionType(), elementTs);
}
@OnTimerFamily("actionTimers") public void onTimer(@TimerId String timerId) {
LOG.info("Timer fired with id " + timerId);
}
}));class TimerDoFn(DoFn):
ALL_ELEMENTS = BagStateSpec('buffer', coders.VarIntCoder())
TIMER = TimerSpec('timer', TimeDomain.REAL_TIME)
def process(self,
element_pair,
buffer = DoFn.StateParam(ALL_ELEMENTS),
timer = DoFn.TimerParam(TIMER)):
buffer.add(element_pair[1])
# Set a timer to go off 30 seconds in the future with dynamic timer tag 'first_timer'.
# And set a timer to go off 60 seconds in the future with dynamic timer tag 'second_timer'.
timer.set(Timestamp.now() + Duration(seconds=30), dynamic_timer_tag='first_timer')
timer.set(Timestamp.now() + Duration(seconds=60), dynamic_timer_tag='second_timer')
# Note that a timer can also be explicitly cleared if previously set with a dynamic timer tag:
# timer.clear(dynamic_timer_tag=...)
@on_timer(TIMER)
def expiry_callback(self, buffer = DoFn.StateParam(ALL_ELEMENTS), timer_tag=DoFn.DynamicTimerTagParam):
# Process timer, the dynamic timer tag associated with expiring timer can be read back with DoFn.DynamicTimerTagParam.
buffer.clear()
yield (timer_tag, 'fired')
_ = (p | 'Read per user' >> ReadPerUser()
| 'ProcessingTime timer pardo' >> beam.ParDo(TimerDoFn()))type hasAction interface {
Action() string
}
type dynamicTagsDoFn[V hasAction] struct {
Timer timers.EventTime
}
func (fn *dynamicTagsDoFn[V]) ProcessElement(ts beam.EventTime, tp timers.Provider, key string, value V, emitWords func(string)) {
// ...
// Set a timer to go off 30 seconds in the future.
fn.Timer.Set(tp, ts.ToTime(), timers.WithTag(value.Action()))
// ...
}
func (fn *dynamicTagsDoFn[V]) OnTimer(tp timers.Provider, w beam.Window, key string, timer timers.Context, emitWords func(string)) {
switch timer.Family {
case fn.Timer.Family:
tag := timer.Tag // Do something with fired tag
_ = tag
}
}
func AddDynamicTimerTagsDoFn[V hasAction](s beam.Scope, in beam.PCollection) beam.PCollection {
return beam.ParDo(s, &dynamicTagsDoFn[V]{
Timer: timers.InEventTime("actionTimers"),
}, in)
}11.3.4. タイマー出力タイムスタンプ
デフォルトでは、イベントタイムタイマーは、ParDoの出力ウォーターマークをタイマーのタイムスタンプに保持します。これは、タイマーが12時に設定されている場合、パイプライングラフの後続のウィンドウ化された集計やイベントタイムタイマーで12時以降に終了するものは期限切れにならないことを意味します。タイマーのタイムスタンプは、タイマーコールバックのデフォルトの出力タイムスタンプでもあります。これは、onTimerメソッドから出力される要素のタイムスタンプは、タイマーの発火時刻と同じになることを意味します。処理タイムタイマーの場合、デフォルトの出力タイムスタンプとウォーターマークの保持は、タイマーが設定された時点の入力ウォーターマークの値です。
場合によっては、DoFnはタイマーの有効期限よりも前のタイムスタンプを出力する必要があるため、出力ウォーターマークをそれらのタイムスタンプに保持する必要があります。たとえば、レコードを一時的に状態にバッチ処理し、状態を排出するためのタイマーを設定する次のパイプラインを考えてみましょう。このコードは正しいように見えるかもしれませんが、正しく機能しません。
PCollection<KV<String, ValueT>> perUser = readPerUser();
perUser.apply(ParDo.of(new DoFn<KV<String, ValueT>, OutputT>() {
@StateId("elementBag") private final StateSpec<BagState<ValueT>> elementBag = StateSpecs.bag();
@StateId("timerSet") private final StateSpec<ValueState<Boolean>> timerSet = StateSpecs.value();
@TimerId("outputState") private final TimerSpec timer = TimerSpecs.timer(TimeDomain.PROCESSING_TIME);
@ProcessElement public void process(
@Element KV<String, ValueT> element,
@StateId("elementBag") BagState<ValueT> elementBag,
@StateId("timerSet") ValueState<Boolean> timerSet,
@TimerId("outputState") Timer timer) {
// Add the current element to the bag for this key.
elementBag.add(element.getValue());
if (!MoreObjects.firstNonNull(timerSet.read(), false)) {
// If the timer is not current set, then set it to go off in a minute.
timer.offset(Duration.standardMinutes(1)).setRelative();
timerSet.write(true);
}
}
@OnTimer("outputState") public void onTimer(
@StateId("elementBag") BagState<ValueT> elementBag,
@StateId("timerSet") ValueState<Boolean> timerSet,
OutputReceiver<ValueT> output) {
for (ValueT bufferedElement : elementBag.read()) {
// Output each element.
output.outputWithTimestamp(bufferedElement, bufferedElement.timestamp());
}
elementBag.clear();
// Note that the timer has now fired.
timerSet.clear();
}
}));type badTimerOutputTimestampsFn[V any] struct {
ElementBag state.Bag[V]
TimerSet state.Value[bool]
OutputState timers.ProcessingTime
}
func (fn *badTimerOutputTimestampsFn[V]) ProcessElement(sp state.Provider, tp timers.Provider, key string, value V, emit func(string)) error {
// Add the current element to the bag for this key.
if err := fn.ElementBag.Add(sp, value); err != nil {
return err
}
set, _, err := fn.TimerSet.Read(sp)
if err != nil {
return err
}
if !set {
fn.OutputState.Set(tp, time.Now().Add(1*time.Minute))
fn.TimerSet.Write(sp, true)
}
return nil
}
func (fn *badTimerOutputTimestampsFn[V]) OnTimer(sp state.Provider, tp timers.Provider, w beam.Window, key string, timer timers.Context, emit func(string)) error {
switch timer.Family {
case fn.OutputState.Family:
vs, _, err := fn.ElementBag.Read(sp)
if err != nil {
return err
}
for _, v := range vs {
// Output each element
emit(fmt.Sprintf("%v", v))
}
fn.ElementBag.Clear(sp)
// Note that the timer has now fired.
fn.TimerSet.Clear(sp)
}
return nil
}このコードの問題点は、ParDoが要素をバッファリングしているにもかかわらず、ウォーターマークがそれらの要素のタイムスタンプを超えて進むのを防ぐものが何もないため、それらの要素はすべて古いデータとして削除される可能性があることです。これを防ぐために、ウォーターマークが最小要素のタイムスタンプを超えて進むのを防ぐために、タイマーに出力タイムスタンプを設定する必要があります。次のコードはこれを示しています。
PCollection<KV<String, ValueT>> perUser = readPerUser();
perUser.apply(ParDo.of(new DoFn<KV<String, ValueT>, OutputT>() {
// The bag of elements accumulated.
@StateId("elementBag") private final StateSpec<BagState<ValueT>> elementBag = StateSpecs.bag();
// The timestamp of the timer set.
@StateId("timerTimestamp") private final StateSpec<ValueState<Long>> timerTimestamp = StateSpecs.value();
// The minimum timestamp stored in the bag.
@StateId("minTimestampInBag") private final StateSpec<CombiningState<Long, long[], Long>>
minTimestampInBag = StateSpecs.combining(Min.ofLongs());
@TimerId("outputState") private final TimerSpec timer = TimerSpecs.timer(TimeDomain.PROCESSING_TIME);
@ProcessElement public void process(
@Element KV<String, ValueT> element,
@StateId("elementBag") BagState<ValueT> elementBag,
@AlwaysFetched @StateId("timerTimestamp") ValueState<Long> timerTimestamp,
@AlwaysFetched @StateId("minTimestampInBag") CombiningState<Long, long[], Long> minTimestamp,
@TimerId("outputState") Timer timer) {
// Add the current element to the bag for this key.
elementBag.add(element.getValue());
// Keep track of the minimum element timestamp currently stored in the bag.
minTimestamp.add(element.getValue().timestamp());
// If the timer is already set, then reset it at the same time but with an updated output timestamp (otherwise
// we would keep resetting the timer to the future). If there is no timer set, then set one to expire in a minute.
Long timerTimestampMs = timerTimestamp.read();
Instant timerToSet = (timerTimestamp.isEmpty().read())
? Instant.now().plus(Duration.standardMinutes(1)) : new Instant(timerTimestampMs);
// Setting the outputTimestamp to the minimum timestamp in the bag holds the watermark to that timestamp until the
// timer fires. This allows outputting all the elements with their timestamp.
timer.withOutputTimestamp(minTimestamp.read()).s et(timerToSet).
timerTimestamp.write(timerToSet.getMillis());
}
@OnTimer("outputState") public void onTimer(
@StateId("elementBag") BagState<ValueT> elementBag,
@StateId("timerTimestamp") ValueState<Long> timerTimestamp,
OutputReceiver<ValueT> output) {
for (ValueT bufferedElement : elementBag.read()) {
// Output each element.
output.outputWithTimestamp(bufferedElement, bufferedElement.timestamp());
}
// Note that the timer has now fired.
timerTimestamp.clear();
}
}));Timer output timestamps is not yet supported in Python SDK. See https://github.com/apache/beam/issues/20705.type element[V any] struct {
Timestamp int64
Value V
}
type goodTimerOutputTimestampsFn[V any] struct {
ElementBag state.Bag[element[V]] // The bag of elements accumulated.
TimerTimerstamp state.Value[int64] // The timestamp of the timer set.
MinTimestampInBag state.Combining[int64, int64, int64] // The minimum timestamp stored in the bag.
OutputState timers.ProcessingTime // The timestamp of the timer.
}
func (fn *goodTimerOutputTimestampsFn[V]) ProcessElement(et beam.EventTime, sp state.Provider, tp timers.Provider, key string, value V, emit func(beam.EventTime, string)) error {
// ...
// Add the current element to the bag for this key, and preserve the event time.
if err := fn.ElementBag.Add(sp, element[V]{Timestamp: et.Milliseconds(), Value: value}); err != nil {
return err
}
// Keep track of the minimum element timestamp currently stored in the bag.
fn.MinTimestampInBag.Add(sp, et.Milliseconds())
// If the timer is already set, then reset it at the same time but with an updated output timestamp (otherwise
// we would keep resetting the timer to the future). If there is no timer set, then set one to expire in a minute.
ts, ok, _ := fn.TimerTimerstamp.Read(sp)
var tsToSet time.Time
if ok {
tsToSet = time.UnixMilli(ts)
} else {
tsToSet = time.Now().Add(1 * time.Minute)
}
minTs, _, _ := fn.MinTimestampInBag.Read(sp)
outputTs := time.UnixMilli(minTs)
// Setting the outputTimestamp to the minimum timestamp in the bag holds the watermark to that timestamp until the
// timer fires. This allows outputting all the elements with their timestamp.
fn.OutputState.Set(tp, tsToSet, timers.WithOutputTimestamp(outputTs))
fn.TimerTimerstamp.Write(sp, tsToSet.UnixMilli())
return nil
}
func (fn *goodTimerOutputTimestampsFn[V]) OnTimer(sp state.Provider, tp timers.Provider, w beam.Window, key string, timer timers.Context, emit func(beam.EventTime, string)) error {
switch timer.Family {
case fn.OutputState.Family:
vs, _, err := fn.ElementBag.Read(sp)
if err != nil {
return err
}
for _, v := range vs {
// Output each element with their timestamp
emit(beam.EventTime(v.Timestamp), fmt.Sprintf("%v", v.Value))
}
fn.ElementBag.Clear(sp)
// Note that the timer has now fired.
fn.TimerTimerstamp.Clear(sp)
}
return nil
}
func AddTimedOutputBatching[V any](s beam.Scope, in beam.PCollection) beam.PCollection {
return beam.ParDo(s, &goodTimerOutputTimestampsFn[V]{
ElementBag: state.MakeBagState[element[V]]("elementBag"),
TimerTimerstamp: state.MakeValueState[int64]("timerTimestamp"),
MinTimestampInBag: state.MakeCombiningState[int64, int64, int64]("minTimestampInBag", func(a, b int64) int64 {
if a < b {
return a
}
return b
}),
OutputState: timers.InProcessingTime("outputState"),
}, in)
}11.4. ガベージコレクション状態
キーごとの状態はガベージコレクションする必要があります。そうでないと、状態のサイズが増加し続け、パフォーマンスに悪影響を与える可能性があります。状態をガベージコレクションするための一般的な戦略は2つあります。
11.4.1. **ガベージコレクションのためのウィンドウの使用**
キーのすべての状態とタイマーは、それが属するウィンドウにスコープされます。これは、入力要素のタイムスタンプに応じて、ParDoがウィンドウに該当する要素の状態に対して異なる値を参照することを意味します。さらに、入力ウォーターマークがウィンドウの終わりを超えると、ランナーは当該ウィンドウのすべての状態をガベージコレクションする必要があります。(注:ウィンドウに対して許容遅延が正の値に設定されている場合、ランナーはウォーターマークがウィンドウの終わりと許容遅延を超えるまで待機してから、状態をガベージコレクションする必要があります)。これは、ガベージコレクション戦略として使用できます。
例えば、以下のような場合
PCollection<KV<String, ValueT>> perUser = readPerUser();
perUser.apply(Window.into(CalendarWindows.days(1)
.withTimeZone(DateTimeZone.forID("America/Los_Angeles"))));
.apply(ParDo.of(new DoFn<KV<String, ValueT>, OutputT>() {
@StateId("state") private final StateSpec<ValueState<Integer>> state = StateSpecs.value();
...
@ProcessElement public void process(@Timestamp Instant ts, @StateId("state") ValueState<Integer> state) {
// The state is scoped to a calendar day window. That means that if the input timestamp ts is after
// midnight PST, then a new copy of the state will be seen for the next day.
}
}));class StateDoFn(DoFn):
ALL_ELEMENTS = BagStateSpec('buffer', coders.VarIntCoder())
def process(self,
element_pair,
buffer = DoFn.StateParam(ALL_ELEMENTS)):
...
_ = (p | 'Read per user' >> ReadPerUser()
| 'Windowing' >> beam.WindowInto(FixedWindows(60 * 60 * 24))
| 'DoFn' >> beam.ParDo(StateDoFn())) items := beam.ParDo(s, statefulDoFn{
S: state.MakeValueState[int]("S"),
}, elements)
out := beam.WindowInto(s, window.NewFixedWindows(24*time.Hour), items)このParDoは、日ごとに状態を保存します。パイプラインが特定の日のデータ処理を完了すると、その日のすべての状態はガベージコレクションされます。
11.4.1. **ガベージコレクションのためのタイマーの使用**
場合によっては、目的のガベージコレクション戦略をモデル化するウィンドウイング戦略を見つけることが困難です。例えば、よくある要望として、キーに対してある時間アクティビティが見られなくなったら、そのキーの状態をガベージコレクションすることが挙げられます。これは、状態をガベージコレクションするタイマーを更新することで実現できます。例えば
PCollection<KV<String, ValueT>> perUser = readPerUser();
perUser.apply(ParDo.of(new DoFn<KV<String, ValueT>, OutputT>() {
// The state for the key.
@StateId("state") private final StateSpec<ValueState<ValueT>> state = StateSpecs.value();
// The maximum element timestamp seen so far.
@StateId("maxTimestampSeen") private final StateSpec<CombiningState<Long, long[], Long>>
maxTimestamp = StateSpecs.combining(Max.ofLongs());
@TimerId("gcTimer") private final TimerSpec gcTimer = TimerSpecs.timer(TimeDomain.EVENT_TIME);
@ProcessElement public void process(
@Element KV<String, ValueT> element,
@Timestamp Instant ts,
@StateId("state") ValueState<ValueT> state,
@StateId("maxTimestampSeen") CombiningState<Long, long[], Long> maxTimestamp,
@TimerId("gcTimer") gcTimer) {
updateState(state, element);
maxTimestamp.add(ts.getMillis());
// Set the timer to be one hour after the maximum timestamp seen. This will keep overwriting the same timer, so
// as long as there is activity on this key the state will stay active. Once the key goes inactive for one hour's
// worth of event time (as measured by the watermark), then the gc timer will fire.
Instant expirationTime = new Instant(maxTimestamp.read()).plus(Duration.standardHours(1));
timer.set(expirationTime);
}
@OnTimer("gcTimer") public void onTimer(
@StateId("state") ValueState<ValueT> state,
@StateId("maxTimestampSeen") CombiningState<Long, long[], Long> maxTimestamp) {
// Clear all state for the key.
state.clear();
maxTimestamp.clear();
}
}class UserDoFn(DoFn):
ALL_ELEMENTS = BagStateSpec('state', coders.VarIntCoder())
MAX_TIMESTAMP = CombiningValueStateSpec('max_timestamp_seen', max)
TIMER = TimerSpec('gc-timer', TimeDomain.WATERMARK)
def process(self,
element,
t = DoFn.TimestampParam,
state = DoFn.StateParam(ALL_ELEMENTS),
max_timestamp = DoFn.StateParam(MAX_TIMESTAMP),
timer = DoFn.TimerParam(TIMER)):
update_state(state, element)
max_timestamp.add(t.micros)
# Set the timer to be one hour after the maximum timestamp seen. This will keep overwriting the same timer, so
# as long as there is activity on this key the state will stay active. Once the key goes inactive for one hour's
# worth of event time (as measured by the watermark), then the gc timer will fire.
expiration_time = Timestamp(micros=max_timestamp.read()) + Duration(seconds=60*60)
timer.set(expiration_time)
@on_timer(TIMER)
def expiry_callback(self,
state = DoFn.StateParam(ALL_ELEMENTS),
max_timestamp = DoFn.StateParam(MAX_TIMESTAMP)):
state.clear()
max_timestamp.clear()
_ = (p | 'Read per user' >> ReadPerUser()
| 'User DoFn' >> beam.ParDo(UserDoFn()))type timerGarbageCollectionFn[V any] struct {
State state.Value[V] // The state for the key.
MaxTimestampInBag state.Combining[int64, int64, int64] // The maximum element timestamp seen so far.
GcTimer timers.EventTime // The timestamp of the timer.
}
func (fn *timerGarbageCollectionFn[V]) ProcessElement(et beam.EventTime, sp state.Provider, tp timers.Provider, key string, value V, emit func(beam.EventTime, string)) {
updateState(sp, fn.State, key, value)
fn.MaxTimestampInBag.Add(sp, et.Milliseconds())
// Set the timer to be one hour after the maximum timestamp seen. This will keep overwriting the same timer, so
// as long as there is activity on this key the state will stay active. Once the key goes inactive for one hour's
// worth of event time (as measured by the watermark), then the gc timer will fire.
maxTs, _, _ := fn.MaxTimestampInBag.Read(sp)
expirationTime := time.UnixMilli(maxTs).Add(1 * time.Hour)
fn.GcTimer.Set(tp, expirationTime)
}
func (fn *timerGarbageCollectionFn[V]) OnTimer(sp state.Provider, tp timers.Provider, w beam.Window, key string, timer timers.Context, emit func(beam.EventTime, string)) {
switch timer.Family {
case fn.GcTimer.Family:
// Clear all the state for the key
fn.State.Clear(sp)
fn.MaxTimestampInBag.Clear(sp)
}
}
func AddTimerGarbageCollection[V any](s beam.Scope, in beam.PCollection) beam.PCollection {
return beam.ParDo(s, &timerGarbageCollectionFn[V]{
State: state.MakeValueState[V]("timerTimestamp"),
MaxTimestampInBag: state.MakeCombiningState[int64, int64, int64]("maxTimestampInBag", func(a, b int64) int64 {
if a > b {
return a
}
return b
}),
GcTimer: timers.InEventTime("gcTimer"),
}, in)
}11.5. 状態とタイマーの例
状態とタイマーの使用例を以下に示します。
11.5.1. クリックとビューの結合
この例では、パイプラインはeコマースサイトのホームページからのデータを処理しています。入力ストリームは2つあります。1つは、ホームページでユーザーに表示される推奨製品リンクを表すビューのストリーム、もう1つは、これらのリンクに対する実際のユーザークリックを表すクリックのストリームです。パイプラインの目的は、クリックイベントとビューイベントを結合し、両方のイベントの情報を含む新しい結合イベントを出力することです。各リンクには、ビューイベントと結合イベントの両方に存在する一意の識別子が付いています。
多くのビューイベントは、クリックでフォローアップされることはありません。このパイプラインはクリックを1時間待ち、その後この結合を諦めます。すべてのクリックイベントにはビューイベントがあるはずですが、少数のビューイベントが失われてBeamパイプラインに到達しない可能性があります。パイプラインは同様に、クリックイベントを検出してから1時間待ち、ビューイベントがその時間内に到着しない場合は諦めます。入力イベントは順序付けられていません - クリックイベントをビューイベントの前に見る可能性があります。1時間の結合タイムアウトは、処理時間ではなくイベント時間に基づいている必要があります。
// Read the event stream and key it by the link id.
PCollection<KV<String, Event>> eventsPerLinkId =
readEvents()
.apply(WithKeys.of(Event::getLinkId).withKeyType(TypeDescriptors.strings()));
eventsPerLinkId.apply(ParDo.of(new DoFn<KV<String, Event>, JoinedEvent>() {
// Store the view event.
@StateId("view") private final StateSpec<ValueState<Event>> viewState = StateSpecs.value();
// Store the click event.
@StateId("click") private final StateSpec<ValueState<Event>> clickState = StateSpecs.value();
// The maximum element timestamp seen so far.
@StateId("maxTimestampSeen") private final StateSpec<CombiningState<Long, long[], Long>>
maxTimestamp = StateSpecs.combining(Max.ofLongs());
// Timer that fires when an hour goes by with an incomplete join.
@TimerId("gcTimer") private final TimerSpec gcTimer = TimerSpecs.timer(TimeDomain.EVENT_TIME);
@ProcessElement public void process(
@Element KV<String, Event> element,
@Timestamp Instant ts,
@AlwaysFetched @StateId("view") ValueState<Event> viewState,
@AlwaysFetched @StateId("click") ValueState<Event> clickState,
@AlwaysFetched @StateId("maxTimestampSeen") CombiningState<Long, long[], Long> maxTimestampState,
@TimerId("gcTimer") gcTimer,
OutputReceiver<JoinedEvent> output) {
// Store the event into the correct state variable.
Event event = element.getValue();
ValueState<Event> valueState = event.getType().equals(VIEW) ? viewState : clickState;
valueState.write(event);
Event view = viewState.read();
Event click = clickState.read();
(if view != null && click != null) {
// We've seen both a view and a click. Output a joined event and clear state.
output.output(JoinedEvent.of(view, click));
clearState(viewState, clickState, maxTimestampState);
} else {
// We've only seen on half of the join.
// Set the timer to be one hour after the maximum timestamp seen. This will keep overwriting the same timer, so
// as long as there is activity on this key the state will stay active. Once the key goes inactive for one hour's
// worth of event time (as measured by the watermark), then the gc timer will fire.
maxTimestampState.add(ts.getMillis());
Instant expirationTime = new Instant(maxTimestampState.read()).plus(Duration.standardHours(1));
gcTimer.set(expirationTime);
}
}
@OnTimer("gcTimer") public void onTimer(
@StateId("view") ValueState<Event> viewState,
@StateId("click") ValueState<Event> clickState,
@StateId("maxTimestampSeen") CombiningState<Long, long[], Long> maxTimestampState) {
// An hour has gone by with an incomplete join. Give up and clear the state.
clearState(viewState, clickState, maxTimestampState);
}
private void clearState(
@StateId("view") ValueState<Event> viewState,
@StateId("click") ValueState<Event> clickState,
@StateId("maxTimestampSeen") CombiningState<Long, long[], Long> maxTimestampState) {
viewState.clear();
clickState.clear();
maxTimestampState.clear();
}
}));class JoinDoFn(DoFn):
# stores the view event.
VIEW_STATE_SPEC = ReadModifyWriteStateSpec('view', EventCoder())
# stores the click event.
CLICK_STATE_SPEC = ReadModifyWriteStateSpec('click', EventCoder())
# The maximum element timestamp value seen so far.
MAX_TIMESTAMP = CombiningValueStateSpec('max_timestamp_seen', max)
# Timer that fires when an hour goes by with an incomplete join.
GC_TIMER = TimerSpec('gc', TimeDomain.WATERMARK)
def process(self,
element,
view=DoFn.StateParam(VIEW_STATE_SPEC),
click=DoFn.StateParam(CLICK_STATE_SPEC),
max_timestamp_seen=DoFn.StateParam(MAX_TIMESTAMP),
ts=DoFn.TimestampParam,
gc=DoFn.TimerParam(GC_TIMER)):
event = element
if event.type == 'view':
view.write(event)
else:
click.write(event)
previous_view = view.read()
previous_click = click.read()
# We've seen both a view and a click. Output a joined event and clear state.
if previous_view and previous_click:
yield (previous_view, previous_click)
view.clear()
click.clear()
max_timestamp_seen.clear()
else:
max_timestamp_seen.add(ts)
gc.set(max_timestamp_seen.read() + Duration(seconds=3600))
@on_timer(GC_TIMER)
def gc_callback(self,
view=DoFn.StateParam(VIEW_STATE_SPEC),
click=DoFn.StateParam(CLICK_STATE_SPEC),
max_timestamp_seen=DoFn.StateParam(MAX_TIMESTAMP)):
view.clear()
click.clear()
max_timestamp_seen.clear()
_ = (p | 'EventsPerLinkId' >> ReadPerLinkEvents()
| 'Join DoFn' >> beam.ParDo(JoinDoFn()))type JoinedEvent struct {
View, Click *Event
}
type joinDoFn struct {
View state.Value[*Event] // Store the view event.
Click state.Value[*Event] // Store the click event.
MaxTimestampSeen state.Combining[int64, int64, int64] // The maximum element timestamp seen so far.
GcTimer timers.EventTime // The timestamp of the timer.
}
func (fn *joinDoFn) ProcessElement(et beam.EventTime, sp state.Provider, tp timers.Provider, key string, event *Event, emit func(JoinedEvent)) {
valueState := fn.View
if event.isClick() {
valueState = fn.Click
}
valueState.Write(sp, event)
view, _, _ := fn.View.Read(sp)
click, _, _ := fn.Click.Read(sp)
if view != nil && click != nil {
emit(JoinedEvent{View: view, Click: click})
fn.clearState(sp)
return
}
fn.MaxTimestampSeen.Add(sp, et.Milliseconds())
expTs, _, _ := fn.MaxTimestampSeen.Read(sp)
fn.GcTimer.Set(tp, time.UnixMilli(expTs).Add(1*time.Hour))
}
func (fn *joinDoFn) OnTimer(sp state.Provider, tp timers.Provider, w beam.Window, key string, timer timers.Context, emit func(beam.EventTime, string)) {
switch timer.Family {
case fn.GcTimer.Family:
fn.clearState(sp)
}
}
func (fn *joinDoFn) clearState(sp state.Provider) {
fn.View.Clear(sp)
fn.Click.Clear(sp)
fn.MaxTimestampSeen.Clear(sp)
}
func AddJoinDoFn(s beam.Scope, in beam.PCollection) beam.PCollection {
return beam.ParDo(s, &joinDoFn{
View: state.MakeValueState[*Event]("view"),
Click: state.MakeValueState[*Event]("click"),
MaxTimestampSeen: state.MakeCombiningState[int64, int64, int64]("maxTimestampSeen", func(a, b int64) int64 {
if a > b {
return a
}
return b
}),
GcTimer: timers.InEventTime("gcTimer"),
}, in)
}11.5.2. RPCのバッチ処理
この例では、入力要素が外部RPCサービスに転送されています。RPCはバッチリクエストを受け入れます - 同じユーザーに対する複数のイベントは、単一のRPC呼び出しでバッチ処理できます。このRPCサービスはレート制限も課すため、呼び出し回数を減らすために、10秒分のイベントをバッチ処理したいと考えています。
PCollection<KV<String, ValueT>> perUser = readPerUser();
perUser.apply(ParDo.of(new DoFn<KV<String, ValueT>, OutputT>() {
// Store the elements buffered so far.
@StateId("state") private final StateSpec<BagState<ValueT>> elements = StateSpecs.bag();
// Keep track of whether a timer is currently set or not.
@StateId("isTimerSet") private final StateSpec<ValueState<Boolean>> isTimerSet = StateSpecs.value();
// The processing-time timer user to publish the RPC.
@TimerId("outputState") private final TimerSpec timer = TimerSpecs.timer(TimeDomain.PROCESSING_TIME);
@ProcessElement public void process(
@Element KV<String, ValueT> element,
@StateId("state") BagState<ValueT> elementsState,
@StateId("isTimerSet") ValueState<Boolean> isTimerSetState,
@TimerId("outputState") Timer timer) {
// Add the current element to the bag for this key.
state.add(element.getValue());
if (!MoreObjects.firstNonNull(isTimerSetState.read(), false)) {
// If there is no timer currently set, then set one to go off in 10 seconds.
timer.offset(Duration.standardSeconds(10)).setRelative();
isTimerSetState.write(true);
}
}
@OnTimer("outputState") public void onTimer(
@StateId("state") BagState<ValueT> elementsState,
@StateId("isTimerSet") ValueState<Boolean> isTimerSetState) {
// Send an RPC containing the batched elements and clear state.
sendRPC(elementsState.read());
elementsState.clear();
isTimerSetState.clear();
}
}));class BufferDoFn(DoFn):
BUFFER = BagStateSpec('buffer', EventCoder())
IS_TIMER_SET = ReadModifyWriteStateSpec('is_timer_set', BooleanCoder())
OUTPUT = TimerSpec('output', TimeDomain.REAL_TIME)
def process(self,
buffer=DoFn.StateParam(BUFFER),
is_timer_set=DoFn.StateParam(IS_TIMER_SET),
timer=DoFn.TimerParam(OUTPUT)):
buffer.add(element)
if not is_timer_set.read():
timer.set(Timestamp.now() + Duration(seconds=10))
is_timer_set.write(True)
@on_timer(OUTPUT)
def output_callback(self,
buffer=DoFn.StateParam(BUFFER),
is_timer_set=DoFn.StateParam(IS_TIMER_SET)):
send_rpc(list(buffer.read()))
buffer.clear()
is_timer_set.clear()type bufferDoFn[V any] struct {
Elements state.Bag[V] // Store the elements buffered so far.
IsTimerSet state.Value[bool] // Keep track of whether a timer is currently set or not.
OutputElements timers.ProcessingTime // The processing-time timer user to publish the RPC.
}
func (fn *bufferDoFn[V]) ProcessElement(et beam.EventTime, sp state.Provider, tp timers.Provider, key string, value V) {
fn.Elements.Add(sp, value)
isSet, _, _ := fn.IsTimerSet.Read(sp)
if !isSet {
fn.OutputElements.Set(tp, time.Now().Add(10*time.Second))
fn.IsTimerSet.Write(sp, true)
}
}
func (fn *bufferDoFn[V]) OnTimer(sp state.Provider, tp timers.Provider, w beam.Window, key string, timer timers.Context) {
switch timer.Family {
case fn.OutputElements.Family:
elements, _, _ := fn.Elements.Read(sp)
sendRpc(elements)
fn.Elements.Clear(sp)
fn.IsTimerSet.Clear(sp)
}
}
func AddBufferDoFn[V any](s beam.Scope, in beam.PCollection) beam.PCollection {
return beam.ParDo(s, &bufferDoFn[V]{
Elements: state.MakeBagState[V]("elements"),
IsTimerSet: state.MakeValueState[bool]("isTimerSet"),
OutputElements: timers.InProcessingTime("outputElements"),
}, in)
}12. 分割可能なDoFns
分割可能なDoFn(SDF)を使用すると、ユーザーはI/Oを含むモジュール式コンポーネント(およびいくつかの高度な非I/Oユースケース)を作成できます。相互に接続できるモジュール式I/Oコンポーネントを使用すると、ユーザーが求める一般的なパターンが簡素化されます。たとえば、一般的なユースケースとして、メッセージキューからファイル名を読み取り、その後それらのファイルを解析することがあります。従来、ユーザーは、メッセージキューとファイルリーダーのロジックを含む単一のI/Oコネクタを作成する(複雑さが増す)か、メッセージキューI/Oを再利用し、ファイルを読み取る通常のDoFnを選択する(パフォーマンスが低下する)必要がありました。SDFを使用すると、Apache BeamのI/O APIの機能をDoFnにもたらし、モジュール性を維持しながら、従来のI/Oコネクタのパフォーマンスを維持できます。
12.1. SDFの基本
高いレベルでは、SDFは要素と制限のペアを処理する役割を担います。制限は、要素を処理する際に実行する必要があった作業のサブセットを表します。
SDFの実行は、次の手順に従います。
- 各要素は制限とペアになります(例:ファイル名は、ファイル全体を表すオフセット範囲とペアになります)。
- 各要素と制限のペアは分割されます(例:オフセット範囲はより小さなピースに分割されます)。
- ランナーは要素と制限のペアを複数のワーカーに再配布します。
- 要素と制限のペアは並列で処理されます(例:ファイルが読み取られます)。この最後のステップでは、要素と制限のペアは独自の処理を一時停止したり、さらに要素と制限のペアに分割したりできます。

12.1.1. 基本的なSDF
基本的なSDFは、制限、制限プロバイダー、および制限トラッカーの3つの部分で構成されます。ウォーターマークを制御する場合、特にストリーミングパイプラインでは、ウォーターマーク推定器プロバイダーとウォーターマーク推定器という2つのコンポーネントがさらに必要です。
制限は、特定の要素に対する作業のサブセットを表すために使用されるユーザー定義のオブジェクトです。たとえば、JavaとPythonでは、オフセット位置を表す制限としてOffsetRangeを定義しました。
制限プロバイダーを使用すると、SDF作成者はデフォルトの実装(分割とサイジングを含む)をオーバーライドできます。JavaとGoでは、これはDoFnです。Pythonには専用のRestrictionProvider型があります。
制限トラッカーは、処理中に制限のどのサブセットが完了したかを追跡する役割を担います。APIの詳細については、JavaとPythonのリファレンスドキュメントを参照してください。
Javaにはいくつかの組み込みRestrictionTracker実装が定義されています。
SDFにはPythonにも組み込みのRestrictionTracker実装があります。
Goにも組み込みのRestrictionTracker型があります。
ウォーターマーク状態は、WatermarkEstimatorProviderからWatermarkEstimatorを作成するために使用されるユーザー定義のオブジェクトです。最も単純なウォーターマーク状態はtimestampです。
ウォーターマーク推定器プロバイダーを使用すると、SDF作成者はウォーターマーク状態を初期化し、ウォーターマーク推定器を作成する方法を定義できます。JavaとGoでは、これはDoFnです。Pythonには専用のWatermarkEstimatorProvider型があります。
ウォーターマーク推定器は、要素と制限のペアが進行中の場合にウォーターマークを追跡します。APIの詳細については、Java、Python、およびGoのリファレンスドキュメントを参照してください。
Javaにはいくつかの組み込みWatermarkEstimator実装があります。
デフォルトのWatermarkEstimatorProviderと共に、Pythonにも同じ組み込みWatermarkEstimator実装があります。
Goには以下のWatermarkEstimator型が実装されています。
SDFを定義するには、SDFがバウンドされているか(デフォルト)、アンバウンドされているかを選択し、要素の初期制限を初期化する方法を定義する必要があります。この区別は、作業量がどのように表されるかに基づいています。
- バウンドされたDoFnとは、要素によって表される作業が事前に十分に知られており、終了があるものです。バウンドされた要素の例としては、ファイルまたはファイルのグループなどがあります。
- アンバウンドされたDoFnとは、作業量に特定の終わりがないか、作業量が事前にわからないものです。アンバウンドされた要素の例としては、KafkaトピックやPubSubトピックなどがあります。
Javaでは、@UnboundedPerElementまたは@BoundedPerElementを使用してDoFnに注釈を付けることができます。Pythonでは、@unbounded_per_elementを使用してDoFnに注釈を付けることができます。
@BoundedPerElement
private static class FileToWordsFn extends DoFn<String, Integer> {
@GetInitialRestriction
public OffsetRange getInitialRestriction(@Element String fileName) throws IOException {
return new OffsetRange(0, new File(fileName).length());
}
@ProcessElement
public void processElement(
@Element String fileName,
RestrictionTracker<OffsetRange, Long> tracker,
OutputReceiver<Integer> outputReceiver)
throws IOException {
RandomAccessFile file = new RandomAccessFile(fileName, "r");
seekToNextRecordBoundaryInFile(file, tracker.currentRestriction().getFrom());
while (tracker.tryClaim(file.getFilePointer())) {
outputReceiver.output(readNextRecord(file));
}
}
// Providing the coder is only necessary if it can not be inferred at runtime.
@GetRestrictionCoder
public Coder<OffsetRange> getRestrictionCoder() {
return OffsetRange.Coder.of();
}
}class FileToWordsRestrictionProvider(beam.transforms.core.RestrictionProvider
):
def initial_restriction(self, file_name):
return OffsetRange(0, os.stat(file_name).st_size)
def create_tracker(self, restriction):
return beam.io.restriction_trackers.OffsetRestrictionTracker()
class FileToWordsFn(beam.DoFn):
def process(
self,
file_name,
# Alternatively, we can let FileToWordsFn itself inherit from
# RestrictionProvider, implement the required methods and let
# tracker=beam.DoFn.RestrictionParam() which will use self as
# the provider.
tracker=beam.DoFn.RestrictionParam(FileToWordsRestrictionProvider())):
with open(file_name) as file_handle:
file_handle.seek(tracker.current_restriction.start())
while tracker.try_claim(file_handle.tell()):
yield read_next_record(file_handle)
# Providing the coder is only necessary if it can not be inferred at
# runtime.
def restriction_coder(self):
return ...func (fn *splittableDoFn) CreateInitialRestriction(filename string) offsetrange.Restriction {
return offsetrange.Restriction{
Start: 0,
End: getFileLength(filename),
}
}
func (fn *splittableDoFn) CreateTracker(rest offsetrange.Restriction) *sdf.LockRTracker {
return sdf.NewLockRTracker(offsetrange.NewTracker(rest))
}
func (fn *splittableDoFn) ProcessElement(rt *sdf.LockRTracker, filename string, emit func(int)) error {
file, err := os.Open(filename)
if err != nil {
return err
}
offset, err := seekToNextRecordBoundaryInFile(file, rt.GetRestriction().(offsetrange.Restriction).Start)
if err != nil {
return err
}
for rt.TryClaim(offset) {
record, newOffset := readNextRecord(file)
emit(record)
offset = newOffset
}
return nil
}現時点では、ランナーが開始した分割をサポートするSDFがあり、動的な作業の再バランスが可能になります。作業の初期並列化の速度を高めるため、またはランナーが開始した分割をサポートしないランナーの場合、初期分割のセットを提供することをお勧めします。
void splitRestriction(
@Restriction OffsetRange restriction, OutputReceiver<OffsetRange> splitReceiver) {
long splitSize = 64 * (1 << 20);
long i = restriction.getFrom();
while (i < restriction.getTo() - splitSize) {
// Compute and output 64 MiB size ranges to process in parallel
long end = i + splitSize;
splitReceiver.output(new OffsetRange(i, end));
i = end;
}
// Output the last range
splitReceiver.output(new OffsetRange(i, restriction.getTo()));
}class FileToWordsRestrictionProvider(beam.transforms.core.RestrictionProvider
):
def split(self, file_name, restriction):
# Compute and output 64 MiB size ranges to process in parallel
split_size = 64 * (1 << 20)
i = restriction.start
while i < restriction.end - split_size:
yield OffsetRange(i, i + split_size)
i += split_size
yield OffsetRange(i, restriction.end)func (fn *splittableDoFn) SplitRestriction(filename string, rest offsetrange.Restriction) (splits []offsetrange.Restriction) {
size := 64 * (1 << 20)
i := rest.Start
for i < rest.End - size {
// Compute and output 64 MiB size ranges to process in parallel
end := i + size
splits = append(splits, offsetrange.Restriction{i, end})
i = end
}
// Output the last range
splits = append(splits, offsetrange.Restriction{i, rest.End})
return splits
}12.2. サイズと進捗状況
サイジングと進捗状況は、SDFの実行中にランナーに情報を提供するために使用され、ランナーはどの制限を分割するか、作業をどのように並列化するかについてインテリジェントな決定を行うことができます。
要素と制限を処理する前に、初期サイズはランナーによって使用され、作業の初期バランスと並列化を改善しようとする制限の処理方法と処理者を決定します。要素と制限の処理中に、サイジングと進捗状況を使用して、どの制限を分割するか、誰が処理するかを選択します。
デフォルトでは、残りの作業量の推定値として制限トラッカーの推定値を使用し、すべての制限のコストが等しいと仮定することにフォールバックします。デフォルトをオーバーライドするには、SDF作成者は制限プロバイダー内に適切なメソッドを提供できます。SDF作成者は、ランナーが開始した分割と進捗状況の推定のために、サイジングメソッドがバンドル処理中に同時に呼び出されることに注意する必要があります。
@GetSize
double getSize(@Element String fileName, @Restriction OffsetRange restriction) {
return (fileName.contains("expensiveRecords") ? 2 : 1) * restriction.getTo()
- restriction.getFrom();
}# The RestrictionProvider is responsible for calculating the size of given
# restriction.
class MyRestrictionProvider(beam.transforms.core.RestrictionProvider):
def restriction_size(self, file_name, restriction):
weight = 2 if "expensiveRecords" in file_name else 1
return restriction.size() * weightfunc (fn *splittableDoFn) RestrictionSize(filename string, rest offsetrange.Restriction) float64 {
weight := float64(1)
if strings.Contains(filename, “expensiveRecords”) {
weight = 2
}
return weight * (rest.End - rest.Start)
}12.3. ユーザー主導のチェックポイント
一部のI/Oは、単一のバンドルの存続期間内に制限を完了するために必要なすべてのデータを生成できません。これは通常、アンバウンドされた制限で発生しますが、バウンドされた制限でも発生する可能性があります。たとえば、取り込む必要があるデータがさらにありますが、まだ利用できない場合があります。このシナリオの別の原因は、ソースシステムがデータのスロットリングを行っていることです。
SDFは、現在の制限の処理が完了していないことをユーザーに通知できます。このシグナルは、再開する時間を示唆する可能性があります。ランナーは再開時間を尊重しようとしますが、これは保証されていません。これにより、利用可能な作業がある制限で実行を継続し、リソースの利用率を向上させることができます。
@ProcessElement
public ProcessContinuation processElement(
RestrictionTracker<OffsetRange, Long> tracker,
OutputReceiver<RecordPosition> outputReceiver) {
long currentPosition = tracker.currentRestriction().getFrom();
Service service = initializeService();
try {
while (true) {
List<RecordPosition> records = service.readNextRecords(currentPosition);
if (records.isEmpty()) {
// Return a short delay if there is no data to process at the moment.
return ProcessContinuation.resume().withResumeDelay(Duration.standardSeconds(10));
}
for (RecordPosition record : records) {
if (!tracker.tryClaim(record.getPosition())) {
return ProcessContinuation.stop();
}
currentPosition = record.getPosition() + 1;
outputReceiver.output(record);
}
}
} catch (ThrottlingException exception) {
// Return a longer delay in case we are being throttled.
return ProcessContinuation.resume().withResumeDelay(Duration.standardSeconds(60));
}
}class MySplittableDoFn(beam.DoFn):
def process(
self,
element,
restriction_tracker=beam.DoFn.RestrictionParam(
MyRestrictionProvider())):
current_position = restriction_tracker.current_restriction.start()
while True:
# Pull records from an external service.
try:
records = external_service.fetch(current_position)
if records.empty():
# Set a shorter delay in case we are being throttled.
restriction_tracker.defer_remainder(timestamp.Duration(second=10))
return
for record in records:
if restriction_tracker.try_claim(record.position):
current_position = record.position
yield record
else:
return
except TimeoutError:
# Set a longer delay in case we are being throttled.
restriction_tracker.defer_remainder(timestamp.Duration(seconds=60))
returnfunc (fn *checkpointingSplittableDoFn) ProcessElement(rt *sdf.LockRTracker, emit func(Record)) (sdf.ProcessContinuation, error) {
position := rt.GetRestriction().(offsetrange.Restriction).Start
for {
records, err := fn.ExternalService.readNextRecords(position)
if err != nil {
if err == fn.ExternalService.ThrottlingErr {
// Resume at a later time to avoid throttling.
return sdf.ResumeProcessingIn(60 * time.Second), nil
}
return sdf.StopProcessing(), err
}
if len(records) == 0 {
// Wait for data to be available.
return sdf.ResumeProcessingIn(10 * time.Second), nil
}
for _, record := range records {
if !rt.TryClaim(position) {
// Records have been claimed, finish processing.
return sdf.StopProcessing(), nil
}
position += 1
emit(record)
}
}
}12.4. ランナー主導の分割
ランナーは、いつでも処理中に制限を分割しようとすることがあります。これにより、ランナーは制限の処理を一時停止して他の作業を実行したり(出力量を制限したり、待機時間を短縮したりするために、アンバウンドされた制限で一般的です)、制限を2つのピースに分割して、システム内の利用可能な並列処理を増やすことができます。異なるランナー(例:Dataflow、Flink、Spark)は、バッチとストリーミングの実行下で分割を発行するための異なる戦略を持っています。
制限の終わりが変わる可能性があるため、これを念頭に置いてSDFを作成します。処理ループを作成する際には、最後まで処理できると仮定するのではなく、制限の一部を要求しようとした結果を使用します。
間違った例を1つ示します。
@ProcessElement
public void badTryClaimLoop(
@Element String fileName,
RestrictionTracker<OffsetRange, Long> tracker,
OutputReceiver<Integer> outputReceiver)
throws IOException {
RandomAccessFile file = new RandomAccessFile(fileName, "r");
seekToNextRecordBoundaryInFile(file, tracker.currentRestriction().getFrom());
// The restriction tracker can be modified by another thread in parallel
// so storing state locally is ill advised.
long end = tracker.currentRestriction().getTo();
while (file.getFilePointer() < end) {
// Only after successfully claiming should we produce any output and/or
// perform side effects.
tracker.tryClaim(file.getFilePointer());
outputReceiver.output(readNextRecord(file));
}
}class BadTryClaimLoop(beam.DoFn):
def process(
self,
file_name,
tracker=beam.DoFn.RestrictionParam(FileToWordsRestrictionProvider())):
with open(file_name) as file_handle:
file_handle.seek(tracker.current_restriction.start())
# The restriction tracker can be modified by another thread in parallel
# so storing state locally is ill advised.
end = tracker.current_restriction.end()
while file_handle.tell() < end:
# Only after successfully claiming should we produce any output and/or
# perform side effects.
tracker.try_claim(file_handle.tell())
yield read_next_record(file_handle)func (fn *badTryClaimLoop) ProcessElement(rt *sdf.LockRTracker, filename string, emit func(int)) error {
file, err := os.Open(filename)
if err != nil {
return err
}
offset, err := seekToNextRecordBoundaryInFile(file, rt.GetRestriction().(offsetrange.Restriction).Start)
if err != nil {
return err
}
// The restriction tracker can be modified by another thread in parallel
// so storing state locally is ill advised.
end = rt.GetRestriction().(offsetrange.Restriction).End
for offset < end {
// Only after successfully claiming should we produce any output and/or
// perform side effects.
rt.TryClaim(offset)
record, newOffset := readNextRecord(file)
emit(record)
offset = newOffset
}
return nil
}12.5. ウォーターマークの推定
デフォルトのウォーターマーク推定器は、ウォーターマークの推定値を生成しません。そのため、出力ウォーターマークは、上流のウォーターマークの最小値によってのみ計算されます。
SDFは、この要素と制限ペアが生成する将来のすべての出力の下限を指定することで、出力ウォーターマークを進めることができます。ランナーは、すべての上流のウォーターマークと、各要素と制限ペアによって報告された最小値を比較して、最小出力ウォーターマークを計算します。報告されたウォーターマークは、バンドル境界間で各要素と制限ペアについて単調増加する必要があります。要素と制限ペアが処理を停止すると、そのウォーターマークは上記の計算に含まれなくなります。
ヒント
- タイムスタンプ付きのレコードを出力するSDFを作成する場合は、ユーザーがこのSDFで使用できるウォーターマーク推定器を設定する方法を提供する必要があります。
- ウォーターマーク前に生成されたデータは、遅延データと見なされる場合があります。詳細については、ウォーターマークと遅延データを参照してください。
12.5.1. ウォーターマークの制御
ウォーターマーク推定器には、タイムスタンプ観測型と外部クロック観測型の2つの一般的なタイプがあります。タイムスタンプ観測型ウォーターマーク推定器は、各レコードの出力タイムスタンプを使用してウォーターマーク推定値を計算しますが、外部クロック観測型ウォーターマーク推定器は、個々の出力に関連付けられていないクロック(マシンのローカルクロックや外部サービスを介して公開されるクロックなど)を使用してウォーターマークを制御します。
ウォーターマーク推定器プロバイダーを使用すると、デフォルトのウォーターマーク推定ロジックをオーバーライドし、既存のウォーターマーク推定器実装を使用できます。独自のウォーターマーク推定器実装を提供することもできます。
// (Optional) Define a custom watermark state type to save information between bundle
// processing rounds.
public static class MyCustomWatermarkState {
public MyCustomWatermarkState(String element, OffsetRange restriction) {
// Store data necessary for future watermark computations
}
}
// (Optional) Choose which coder to use to encode the watermark estimator state.
@GetWatermarkEstimatorStateCoder
public Coder<MyCustomWatermarkState> getWatermarkEstimatorStateCoder() {
return AvroCoder.of(MyCustomWatermarkState.class);
}
// Define a WatermarkEstimator
public static class MyCustomWatermarkEstimator
implements TimestampObservingWatermarkEstimator<MyCustomWatermarkState> {
public MyCustomWatermarkEstimator(MyCustomWatermarkState type) {
// Initialize watermark estimator state
}
@Override
public void observeTimestamp(Instant timestamp) {
// Will be invoked on each output from the SDF
}
@Override
public Instant currentWatermark() {
// Return a monotonically increasing value
return currentWatermark;
}
@Override
public MyCustomWatermarkState getState() {
// Return state to resume future watermark estimation after a checkpoint/split
return null;
}
}
// Then, update the DoFn to generate the initial watermark estimator state for all new element
// and restriction pairs and to create a new instance given watermark estimator state.
@GetInitialWatermarkEstimatorState
public MyCustomWatermarkState getInitialWatermarkEstimatorState(
@Element String element, @Restriction OffsetRange restriction) {
// Compute and return the initial watermark estimator state for each element and
// restriction. All subsequent processing of an element and restriction will be restored
// from the existing state.
return new MyCustomWatermarkState(element, restriction);
}
@NewWatermarkEstimator
public WatermarkEstimator<MyCustomWatermarkState> newWatermarkEstimator(
@WatermarkEstimatorState MyCustomWatermarkState oldState) {
return new MyCustomWatermarkEstimator(oldState);
}
}# (Optional) Define a custom watermark state type to save information between
# bundle processing rounds.
class MyCustomerWatermarkEstimatorState(object):
def __init__(self, element, restriction):
# Store data necessary for future watermark computations
pass
# Define a WatermarkEstimator
class MyCustomWatermarkEstimator(WatermarkEstimator):
def __init__(self, estimator_state):
self.state = estimator_state
def observe_timestamp(self, timestamp):
# Will be invoked on each output from the SDF
pass
def current_watermark(self):
# Return a monotonically increasing value
return current_watermark
def get_estimator_state(self):
# Return state to resume future watermark estimation after a
# checkpoint/split
return self.state
# Then, a WatermarkEstimatorProvider needs to be created for this
# WatermarkEstimator
class MyWatermarkEstimatorProvider(WatermarkEstimatorProvider):
def initial_estimator_state(self, element, restriction):
return MyCustomerWatermarkEstimatorState(element, restriction)
def create_watermark_estimator(self, estimator_state):
return MyCustomWatermarkEstimator(estimator_state)
# Finally, define the SDF using your estimator.
class MySplittableDoFn(beam.DoFn):
def process(
self,
element,
restriction_tracker=beam.DoFn.RestrictionParam(MyRestrictionProvider()),
watermark_estimator=beam.DoFn.WatermarkEstimatorParam(
MyWatermarkEstimatorProvider())):
# The current watermark can be inspected.
watermark_estimator.current_watermark()// WatermarkState is a custom type.`
//
// It is optional to write your own state type when making a custom estimator.
type WatermarkState struct {
Watermark time.Time
}
// CustomWatermarkEstimator is a custom watermark estimator.
// You may use any type here, including some of Beam's built in watermark estimator types,
// e.g. sdf.WallTimeWatermarkEstimator, sdf.TimestampObservingWatermarkEstimator, and sdf.ManualWatermarkEstimator
type CustomWatermarkEstimator struct {
state WatermarkState
}
// CurrentWatermark returns the current watermark and is invoked on DoFn splits and self-checkpoints.
// Watermark estimators must implement CurrentWatermark() time.Time
func (e *CustomWatermarkEstimator) CurrentWatermark() time.Time {
return e.state.Watermark
}
// ObserveTimestamp is called on the output timestamps of all
// emitted elements to update the watermark. It is optional
func (e *CustomWatermarkEstimator) ObserveTimestamp(ts time.Time) {
e.state.Watermark = ts
}
// InitialWatermarkEstimatorState defines an initial state used to initialize the watermark
// estimator. It is optional. If this is not defined, WatermarkEstimatorState may not be
// defined and CreateWatermarkEstimator must not take in parameters.
func (fn *weDoFn) InitialWatermarkEstimatorState(et beam.EventTime, rest offsetrange.Restriction, element string) WatermarkState {
// Return some watermark state
return WatermarkState{Watermark: time.Now()}
}
// CreateWatermarkEstimator creates the watermark estimator used by this Splittable DoFn.
// Must take in a state parameter if InitialWatermarkEstimatorState is defined, otherwise takes no parameters.
func (fn *weDoFn) CreateWatermarkEstimator(initialState WatermarkState) *CustomWatermarkEstimator {
return &CustomWatermarkEstimator{state: initialState}
}
// WatermarkEstimatorState returns the state used to resume future watermark estimation
// after a checkpoint/split. It is required if InitialWatermarkEstimatorState is defined,
// otherwise it must not be defined.
func (fn *weDoFn) WatermarkEstimatorState(e *CustomWatermarkEstimator) WatermarkState {
return e.state
}
// ProcessElement is the method to execute for each element.
// It can optionally take in a watermark estimator.
func (fn *weDoFn) ProcessElement(e *CustomWatermarkEstimator, element string) {
// ...
e.state.Watermark = time.Now()
}12.6. ドレイン中の切り詰め
パイプラインのドレインをサポートするランナーは、SDFをドレインする機能が必要です。そうでなければ、パイプラインは停止しない可能性があります。デフォルトでは、バウンドされた制限は制限の残りを処理しますが、バウンドされていない制限は、次のSDFが開始したチェックポイントまたはランナーが開始した分割で処理を終了します。制限プロバイダーで適切なメソッドを定義することで、このデフォルトの動作をオーバーライドできます。
注:パイプラインのドレインが開始し、切り捨て制限変換がトリガーされると、sdf.ProcessContinuationは再スケジュールされません。
@TruncateRestriction
@Nullable
TruncateResult<OffsetRange> truncateRestriction(
@Element String fileName, @Restriction OffsetRange restriction) {
if (fileName.contains("optional")) {
// Skip optional files
return null;
}
return TruncateResult.of(restriction);
}class MyRestrictionProvider(beam.transforms.core.RestrictionProvider):
def truncate(self, file_name, restriction):
if "optional" in file_name:
# Skip optional files
return None
return restriction// TruncateRestriction is a transform that is triggered when pipeline starts to drain. It helps to finish a
// pipeline quicker by truncating the restriction.
func (fn *splittableDoFn) TruncateRestriction(rt *sdf.LockRTracker, element string) offsetrange.Restriction {
start := rt.GetRestriction().(offsetrange.Restriction).Start
prevEnd := rt.GetRestriction().(offsetrange.Restriction).End
// truncate the restriction by half.
newEnd := prevEnd / 2
return offsetrange.Restriction{
Start: start,
End: newEnd,
}
}12.7. バンドルの最終処理
バンドルの最終化により、DoFnはコールバックを登録することで副作用を実行できます。ランナーが出力を永続的に保存したことを確認すると、コールバックが呼び出されます。たとえば、メッセージキューは、パイプラインに取り込んだメッセージを確認する必要がある場合があります。バンドルの最終化はSDFに限定されませんが、これが主要なユースケースであるため、ここで説明されています。
@ProcessElement
public void processElement(ProcessContext c, BundleFinalizer bundleFinalizer) {
// ... produce output ...
bundleFinalizer.afterBundleCommit(
Instant.now().plus(Duration.standardMinutes(5)),
() -> {
// ... perform a side effect ...
});
}class MySplittableDoFn(beam.DoFn):
def process(self, element, bundle_finalizer=beam.DoFn.BundleFinalizerParam):
# ... produce output ...
# Register callback function for this bundle that performs the side
# effect.
bundle_finalizer.register(my_callback_func)func (fn *splittableDoFn) ProcessElement(bf beam.BundleFinalization, rt *sdf.LockRTracker, element string) {
// ... produce output ...
bf.RegisterCallback(5*time.Minute, func() error {
// ... perform a side effect ...
return nil
})
}13. 多言語パイプライン
このセクションでは、多言語パイプラインの包括的なドキュメントを提供します。多言語パイプラインの作成を開始するには、以下を参照してください。
Beamを使用すると、サポートされている任意のSDK言語(現在、JavaとPython)で記述された変換を組み合わせ、それらを1つの多言語パイプラインで使用できます。この機能により、単一のクロス言語変換を通じて、さまざまなApache Beam SDKで同時に新しい機能を提供することが容易になります。たとえば、Apache KafkaコネクタとSQL変換(Java SDKからのもの)は、Pythonパイプラインで使用できます。
複数のSDK言語からの変換を使用するパイプラインは、多言語パイプラインと呼ばれます。
Beam YAMLは、完全にクロス言語変換の上に構築されています。組み込みの変換に加えて、独自の変換(Beam APIの完全な表現力を使用して)を作成し、プロバイダーと呼ばれる概念を介して公開できます。
13.1. 複数言語間の変換の作成
ある言語で記述された変換を別の言語で記述されたパイプラインで使用できるようにするために、Beamは拡張サービスを使用します。このサービスは、適切な言語固有のパイプラインフラグメントを作成し、パイプラインに挿入します。
次の例では、Beam PythonパイプラインがローカルJava拡張サービスを起動して、Java Kafkaクロス言語変換を実行するための適切なJavaパイプラインフラグメントを作成し、Pythonパイプラインに挿入します。その後、SDKはこれらの変換を実行するために必要なJava依存関係をダウンロードしてステージングします。

実行時に、BeamランナーはPythonとJavaの両方の変換を実行してパイプラインを実行します。
このセクションでは、KafkaIO.Readを使用して、Javaのクロス言語変換を作成する方法と、Pythonのテスト例を作成する方法を示します。
13.1.1. 複数言語対応Java変換の作成
Java変換を他のSDKで使用可能にするには、2つの方法があります。
- オプション1:場合によっては、追加のJavaコードを記述せずに、他のSDKから既存のJava変換を使用できます。
- オプション2:いくつかのJavaクラスを追加することで、他のSDKから任意のJava変換を使用できます。
13.1.1.1 追加のJavaコードを記述せずに既存のJava変換を使用する
Beam 2.34.0以降、Python SDKユーザーは、追加のJavaコードを記述せずに、いくつかのJava変換を使用できます。これは多くの場合に役立ちます。たとえば
- Javaに慣れていない開発者は、Pythonパイプラインから既存のJava変換を使用する必要がある場合があります。
- 開発者は、追加のJavaコードの記述/リリースを行うことなく、既存のJava変換をPythonパイプラインで使用可能にする必要がある場合があります。
注:この機能は、現在、PythonパイプラインからJava変換を使用する場合にのみ使用できます。
直接使用するには、Java変換のAPIが次の要件を満たしている必要があります。
- Java変換は、利用可能なパブリックコンストラクターまたは同じJavaクラスのパブリック静的メソッド(コンストラクターメソッド)を使用して構築できます。
- Java変換は、1つ以上のビルダーメソッドを使用して構成できます。各ビルダーメソッドはパブリックである必要があり、Java変換のインスタンスを返す必要があります。
Python APIから直接使用できるJavaクラスの例を次に示します。
public class JavaDataGenerator extends PTransform<PBegin, PCollection<String>> {
. . .
// The following method satisfies requirement 1.
// Note that you could use a class constructor instead of a static method.
public static JavaDataGenerator create(Integer size) {
return new JavaDataGenerator(size);
}
static class JavaDataGeneratorConfig implements Serializable {
public String prefix;
public long length;
public String suffix;
. . .
}
// The following method conforms to requirement 2.
public JavaDataGenerator withJavaDataGeneratorConfig(JavaDataGeneratorConfig dataConfig) {
return new JavaDataGenerator(this.size, javaDataGeneratorConfig);
}
. . .
}
完全な例については、JavaDataGeneratorを参照してください。
上記の要件に適合するJavaクラスをPython SDKパイプラインから使用するには、次の手順に従います。
- Pythonから直接アクセスされるJava変換クラスとメソッドを記述するyaml許可リストを作成します。
javaClassLookupAllowlistFileオプションを使用して許可リストへのパスを渡すことで、拡張サービスを起動します。- PythonのJavaExternalTransform APIを使用して、許可リストに定義されているJava変換にPython側から直接アクセスします。
Beam 2.36.0以降、下記のセクションで説明されているように、手順1と2を省略できます。
手順1
Pythonから有効なJava変換を使用するには、yaml許可リストを定義します。この許可リストには、Python側から直接使用できるクラス名、コンストラクターメソッド、およびビルダーメソッドがリストされています。
Beam 2.35.0以降、実際の許可リストを定義する代わりに、*をjavaClassLookupAllowlistFileオプションに渡すことができます。*は、拡張サービスのクラスパスにあるサポートされているすべての変換がAPIを介してアクセスできることを指定します。任意のJavaクラスへのクライアントからのアクセスを許可するとセキュリティリスクになる可能性があるため、本番環境では実際の許可リストを使用することをお勧めします。
version: v1
allowedClasses:
- className: my.beam.transforms.JavaDataGenerator
allowedConstructorMethods:
- create
allowedBuilderMethods:
- withJavaDataGeneratorConfig手順2
Java拡張サービスを起動する際に、許可リストを引数として提供します。たとえば、次のコマンドを使用して、拡張サービスをローカルJavaプロセスとして起動できます。
java -jar <jar file> <port> --javaClassLookupAllowlistFile=<path to the allowlist file>Beam 2.36.0以降、拡張サービスアドレスが提供されていない場合、JavaExternalTransform APIは指定されたjarファイル依存関係を使用して拡張サービスを自動的に起動します。
手順3
JavaExternalTransform APIから作成されたスタブ変換を使用して、PythonパイプラインからJavaクラスを直接使用できます。このAPIを使用すると、Javaクラス名を使用して変換を構築し、ビルダーメソッドを呼び出してクラスを構成できます。
コンストラクターとメソッドのパラメータータイプは、Beamスキーマを使用してPythonとJavaの間でマッピングされます。スキーマは、Python側で提供されたオブジェクトタイプを使用して自動生成されます。Javaクラスのコンストラクターメソッドまたはビルダーメソッドが複雑なオブジェクトタイプを受け入れる場合は、これらのオブジェクトのBeamスキーマが登録され、Java拡張サービスで使用可能であることを確認してください。スキーマが登録されていない場合、Java拡張サービスはJavaFieldSchemaを使用してスキーマの登録を試みます。Pythonでは、任意のオブジェクトをNamedTupleを使用して表現できます。これは、スキーマ内のBeam行として表現されます。上記のJava変換を表すPythonスタブ変換を次に示します。
JavaDataGeneratorConfig = typing.NamedTuple(
'JavaDataGeneratorConfig', [('prefix', str), ('length', int), ('suffix', str)])
data_config = JavaDataGeneratorConfig(prefix='start', length=20, suffix='end')
java_transform = JavaExternalTransform(
'my.beam.transforms.JavaDataGenerator', expansion_service='localhost:<port>').create(numpy.int32(100)).withJavaDataGeneratorConfig(data_config)
この変換は、他のPython変換と共にPythonパイプラインで使用できます。完全な例については、javadatagenerator.pyを参照してください。
13.1.1.2 APIを使用して既存のJava変換を他のSDKで使用可能にする
Beam Java SDK変換をSDK言語間で移植可能にするには、ExternalTransformBuilderインターフェースとExternalTransformRegistrarインターフェースを実装する必要があります。ExternalTransformBuilderインターフェースは、パイプラインから渡された構成値を使用してクロス言語変換を構築し、ExternalTransformRegistrarインターフェースは、拡張サービスで使用するためのクロス言語変換を登録します。
インターフェースの実装
ExternalTransformBuilderインターフェースを実装し、変換オブジェクトの構築に使用されるbuildExternalメソッドをオーバーライドする変換のビルダークラスを定義します。変換の初期構成値は、buildExternalメソッドで定義する必要があります。ほとんどの場合、Java変換ビルダークラスにExternalTransformBuilderを実装するのが便利です。注:
ExternalTransformBuilderでは、外部SDKから送信されたパラメーターのセットをキャプチャする構成オブジェクト(単純なPOJO)を定義する必要があります。通常、これらのパラメーターはJava変換のコンストラクターパラメーターに直接マッピングされます。@AutoValue.Builder abstract static class Builder<K, V> implements ExternalTransformBuilder<External.Configuration, PBegin, PCollection<KV<K, V>>> { abstract Builder<K, V> setConsumerConfig(Map<String, Object> config); abstract Builder<K, V> setTopics(List<String> topics); /** Remaining property declarations omitted for clarity. */ abstract Read<K, V> build(); @Override public PTransform<PBegin, PCollection<KV<K, V>>> buildExternal( External.Configuration config) { setTopics(ImmutableList.copyOf(config.topics)); /** Remaining property defaults omitted for clarity. */ } }完全な例については、JavaCountBuilderとJavaPrefixBuilderを参照してください。
buildExternalメソッドは、変換で外部SDKから受信したプロパティを設定する前に、追加の操作を実行できます。たとえば、buildExternalは、変換で設定する前に、構成オブジェクトで使用可能なプロパティを検証できます。ExternalTransformRegistrarを実装するクラスを定義することで、変換を外部クロス言語変換として登録します。変換が拡張サービスによって正しく登録およびインスタンス化されるようにするには、クラスにAutoServiceアノテーションを付ける必要があります。レジストラクラス内で、トランスフォームのUniform Resource Name(URN)を定義します。URNは、拡張サービスでトランスフォームを一意に識別する文字列である必要があります。
レジストラクラス内から、外部SDKによるトランスフォームの初期化時に使用されるパラメータのコンフィグレーションクラスを定義します。
KafkaIOトランスフォームの以下の例は、手順2から4の実装方法を示しています。
@AutoService(ExternalTransformRegistrar.class) public static class External implements ExternalTransformRegistrar { public static final String URN = "beam:external:java:kafka:read:v1"; @Override public Map<String, Class<? extends ExternalTransformBuilder<?, ?, ?>>> knownBuilders() { return ImmutableMap.of( URN, (Class<? extends ExternalTransformBuilder<?, ?, ?>>) (Class<?>) AutoValue_KafkaIO_Read.Builder.class); } /** Parameters class to expose the Read transform to an external SDK. */ public static class Configuration { private Map<String, String> consumerConfig; private List<String> topics; public void setConsumerConfig(Map<String, String> consumerConfig) { this.consumerConfig = consumerConfig; } public void setTopics(List<String> topics) { this.topics = topics; } /** Remaining properties omitted for clarity. */ } }追加の例については、JavaCountRegistrar と JavaPrefixRegistrar を参照してください。
ExternalTransformBuilderインターフェースとExternalTransformRegistrarインターフェースを実装したら、トランスフォームはデフォルトのJava拡張サービスによって正常に登録および作成できます。
拡張サービスの起動
同じパイプラインで複数のトランスフォームを持つ拡張サービスを使用できます。Beam Java SDKはJavaトランスフォーム用のデフォルトの拡張サービスを提供します。独自の拡張サービスを作成することもできますが、一般的には必要ないため、このセクションでは説明しません。
Java拡張サービスを直接起動するには、次の手順を実行します。
# Build a JAR with both your transform and the expansion service
# Start the expansion service at the specified port.
$ jar -jar /path/to/expansion_service.jar <PORT_NUMBER>拡張サービスは、指定されたポートでトランスフォームを提供できるようになりました。
トランスフォーム用のSDK固有のラッパーを作成する際には、SDK提供のユーティリティを使用して拡張サービスを起動できる場合があります。たとえば、Python SDKは、JARファイルを使用してJava拡張サービスを起動するためのユーティリティ JavaJarExpansionService と BeamJarExpansionService を提供しています。
依存関係の追加
トランスフォームが外部ライブラリを必要とする場合、拡張サービスのクラスパスに追加することでそれらを含めることができます。クラスパスに追加されると、トランスフォームが拡張サービスによって拡張される際にステージングされます。
SDK固有のラッパーの作成
クロス言語Javaトランスフォームは、(次のセクションで説明するように)多言語パイプラインで低レベルのExternalTransformクラスを介して呼び出すことができます。ただし、可能であれば、代わりにパイプラインの言語(Pythonなど)でSDK固有のラッパーを作成してトランスフォームにアクセスする必要があります。このより高レベルの抽象化により、パイプライン作成者はトランスフォームをより簡単に使用できます。
Pythonパイプラインで使用するためのSDKラッパーを作成するには、次の手順を実行します。
クロス言語トランスフォーム用のPythonモジュールを作成します。
モジュール内で、
PayloadBuilderクラスのいずれかを使用して、最初のクロス言語トランスフォーム拡張リクエストのペイロードを作成します。ペイロードのパラメータ名と型は、Javaの
ExternalTransformBuilderに提供されるコンフィグレーションPOJOのパラメータ名と型にマップする必要があります。パラメータ型は、Beamスキーマを使用してSDK間でマップされます。パラメータ名は、Pythonのアンダースコア区切りの変数名をキャメルケース(Java標準)に変換するだけでマップされます。次の例では、kafka.py が
NamedTupleBasedPayloadBuilderを使用してペイロードを作成しています。パラメータは、前のセクションで定義されたJavaのKafkaIO.External.Configurationコンフィグオブジェクトにマップされます。class ReadFromKafkaSchema(typing.NamedTuple): consumer_config: typing.Mapping[str, str] topics: typing.List[str] # Other properties omitted for clarity. payload = NamedTupleBasedPayloadBuilder(ReadFromKafkaSchema(...))パイプライン作成者によって指定されていない限り、拡張サービスを開始します。Beam Python SDKは、JARファイルを使用して拡張サービスを起動するためのユーティリティ
JavaJarExpansionServiceとBeamJarExpansionServiceを提供しています。JavaJarExpansionServiceは、指定されたJARファイルへのパス(ローカルパスまたはURL)を使用して拡張サービスを起動するために使用できます。BeamJarExpansionServiceは、BeamでリリースされたJARから拡張サービスを起動するために使用できます。Beamでリリースされたトランスフォームの場合、次の手順を実行します。
ターゲットJavaトランスフォームのシェーディングされた拡張サービスJARをビルドするために使用できるGradleターゲットをBeamに追加します。このターゲットは、Javaトランスフォームの拡張に必要なすべての依存関係を含むBeam JARを生成する必要があり、JARはBeamでリリースする必要があります。拡張サービスJAR(たとえば、すべてのGCP IO用)の集約バージョンを提供する既存のGradleターゲットを使用できる場合があります。
Pythonモジュールで、Gradleターゲットを使用して
BeamJarExpansionServiceをインスタンス化します。expansion_service = BeamJarExpansionService('sdks:java:io:expansion-service:shadowJar')
ExternalTransformを拡張するPythonラッパー変換クラスを追加します。上記で定義されたペイロードと拡張サービスを、ExternalTransform親クラスのコンストラクタのパラメータとして渡します。
13.1.2. 複数言語対応Python変換の作成
拡張サービスのスコープ内で定義されたPythonトランスフォームは、完全修飾名を使用してアクセスできます。たとえば、PythonのReadFromTextトランスフォームを、完全修飾名apache_beam.io.ReadFromTextを使用してJavaパイプラインで使用できます。
p.apply("Read",
PythonExternalTransform.<PBegin, PCollection<String>>from("apache_beam.io.ReadFromText")
.withKwarg("file_pattern", options.getInputFile())
.withKwarg("validate", false))
PythonExternalTransformには、PyPIパッケージ依存関係のステージングのためのwithExtraPackagesや、出力コーダーの設定のためのwithOutputCoderなど、他の便利なメソッドもあります。トランスフォームが外部パッケージに存在する場合は、たとえばwithExtraPackagesを使用してそのパッケージを指定してください。
p.apply("Read",
PythonExternalTransform.<PBegin, PCollection<String>>from("my_python_package.BeamReadPTransform")
.withExtraPackages(ImmutableList.of("my_python_package")))
あるいは、既存のPythonトランスフォームをクロス言語トランスフォームとして登録し、Python拡張サービスで使用できるようにし、その既存のトランスフォームを呼び出して意図した操作を実行するPythonモジュールを作成することもできます。登録されたURNは、後で拡張リクエストで使用して拡張ターゲットを示すことができます。
Pythonモジュールの定義
トランスフォームのUniform Resource Name(URN)を定義します。URNは、拡張サービスでトランスフォームを一意に識別する文字列である必要があります。
TEST_COMPK_URN = "beam:transforms:xlang:test:compk"既存のPythonトランスフォームの場合、Python拡張サービスにURNを登録する新しいクラスを作成します。
@ptransform.PTransform.register_urn(TEST_COMPK_URN, None) class CombinePerKeyTransform(ptransform.PTransform):クラス内から、入力PCollectionを受け取り、Pythonトランスフォームを実行し、出力PCollectionを返すexpandメソッドを定義します。
def expand(self, pcoll): return pcoll \ | beam.CombinePerKey(sum).with_output_types( typing.Tuple[unicode, int])他のPythonトランスフォームと同様に、URNを返す
to_runner_api_parameterメソッドを定義します。def to_runner_api_parameter(self, unused_context): return TEST_COMPK_URN, Noneクロス言語Pythonトランスフォームのインスタンスを返す静的
from_runner_api_parameterメソッドを定義します。@staticmethod def from_runner_api_parameter( unused_ptransform, unused_parameter, unused_context): return CombinePerKeyTransform()
拡張サービスの起動
拡張サービスは、同じパイプラインで複数のトランスフォームで使用できます。Beam Python SDKは、Pythonトランスフォームで使用できるデフォルトの拡張サービスを提供します。独自の拡張サービスを作成することもできますが、一般的には必要ないため、このセクションでは説明しません。
デフォルトのPython拡張サービスを直接起動するには、次の手順を実行します。
仮想環境を作成し、Apache Beam SDKをインストールします。
指定されたポートでPython SDKの拡張サービスを開始します。

$ export PORT_FOR_EXPANSION_SERVICE=12345拡張サービスを使用して利用可能にするトランスフォームを含むモジュールをインポートします。
$ python -m apache_beam.runners.portability.expansion_service_test -p $PORT_FOR_EXPANSION_SERVICE --pickle_library=cloudpickleこの拡張サービスは、`localhost:$PORT_FOR_EXPANSION_SERVICE` アドレスでトランスフォームを提供できるようになりました。
13.1.3. 複数言語対応Go変換の作成
Goは現在、クロス言語トランスフォームの作成はサポートしておらず、他の言語からのクロス言語トランスフォームの使用のみをサポートしています。詳しくはIssue 21767を参照してください。
13.1.4. URNの定義
クロス言語トランスフォームの開発には、拡張サービスにトランスフォームを登録するためのURNの定義が含まれます。このセクションでは、このようなURNを定義するための規則を示します。この規則に従うことはオプションですが、他の開発者が開発したトランスフォームと共に拡張サービスに登録する際に、トランスフォームが競合に遭遇しないようにします。
13.1.4.1. スキーマ
URNは次のコンポーネントで構成する必要があります。
- ns-id: 名前空間識別子。推奨デフォルトは
beam:transformです。 - org-identifier: トランスフォームが定義された組織を識別します。Apache Beamで定義されたトランスフォームは、これに対して
org.apache.beamを使用します。 - functionality-identifier: クロス言語トランスフォームの機能を識別します。
- version: トランスフォームのバージョン番号。
拡張バッカス・ナウア記法で、URN規則からのスキーマを示します。大文字のキーワードはURN仕様からのものです。
transform-urn = ns-id “:” org-identifier “:” functionality-identifier “:” version
ns-id = (“beam” / NID) “:” “transform”
id-char = ALPHA / DIGIT / "-" / "." / "_" / "~" ; A subset of characters allowed in a URN
org-identifier = 1*id-char
functionality-identifier = 1*id-char
version = “v” 1*(DIGIT / “.”) ; For example, ‘v1.2’13.1.4.2. 例
以下に、いくつかのトランスフォームクラスの例と、使用する対応するURNを示します。
- Parquetファイルを書き込むApache Beamで提供されるトランスフォーム。
beam:transform:org.apache.beam:parquet_write:v1
- メタデータ付きでKafkaから読み取るApache Beamで提供されるトランスフォーム。
beam:transform:org.apache.beam:kafka_read_with_metadata:v1
- 組織abc.orgによって開発された、データストアMyDatastoreから読み取るトランスフォーム。
beam:transform:org.abc:mydatastore_read:v1
13.2. 複数言語間の変換の使用
パイプラインのSDK言語に応じて、高レベルのSDKラッパーを使用するか、低レベルのトランスフォームクラスを使用してクロス言語トランスフォームにアクセスできます。
13.2.1. Javaパイプラインでの複数言語変換の使用
ユーザーは、Javaパイプラインでクロス言語トランスフォームを使用するために3つのオプションがあります。最も高い抽象化レベルでは、いくつかの一般的なPythonトランスフォームは専用のJavaラッパーを通してアクセスできます。たとえば、Java SDKには、Python SDKのDataframeTransformを使用するDataframeTransformクラスと、Python SDKのRunInferenceを使用するRunInferenceクラスなどがあります。ターゲットPythonトランスフォームでSDK固有のラッパーが利用できない場合、代わりにPythonトランスフォームの完全修飾名とコンストラクタ引数を指定することで、より低レベルのPythonExternalTransformクラスを使用できます。Python以外のSDK(Java SDK自体を含む)からの外部トランスフォームを試したい場合は、最も低レベルのExternalクラスを使用することもできます。
SDKラッパーの使用
SDKラッパーを使用してクロス言語トランスフォームを使用するには、SDKラッパーのモジュールをインポートし、例に示すようにパイプラインから呼び出します。
import org.apache.beam.sdk.extensions.python.transforms.DataframeTransform;
input.apply(DataframeTransform.of("lambda df: df.groupby('a').sum()").withIndexes())
PythonExternalTransformクラスの使用
SDK固有のラッパーが利用できない場合、ターゲットPythonトランスフォームの完全修飾名とコンストラクタ引数を指定することで、PythonExternalTransformクラスを使用してPythonクロス言語トランスフォームにアクセスできます。
input.apply(
PythonExternalTransform.<PCollection<Row>, PCollection<Row>>from(
"apache_beam.dataframe.transforms.DataframeTransform")
.withKwarg("func", PythonCallableSource.of("lambda df: df.groupby('a').sum()"))
.withKwarg("include_indexes", true))
Externalクラスの使用
ランタイム環境の依存関係(JREなど)がローカルマシンにインストールされていることを確認してください(ローカルマシンに直接インストールするか、コンテナを介して利用可能にする)。詳細については、拡張サービスのセクションを参照してください。
**注:** JavaパイプラインからPythonトランスフォームを含める場合、すべてのPython依存関係をSDKハーネスコンテナに含める必要があります。
使用しようとしているトランスフォームの言語のSDKの拡張サービスを起動します(利用できない場合)。
使用しようとしているトランスフォームが利用可能であり、拡張サービスで使用できることを確認します。
パイプラインのインスタンス化時に、External.of(…) を含めてください。URN、ペイロード、および拡張サービスを参照してください。例については、多言語変換テストスイートを参照してください。
ジョブがBeamランナーに送信された後、拡張サービスのプロセスを終了することで拡張サービスをシャットダウンしてください。
13.2.2. Pythonパイプラインでの複数言語変換の使用
多言語変換用のPython固有のラッパーが利用可能な場合は、それを使用してください。そうでない場合は、下位レベルのExternalTransformクラスを使用して変換にアクセスする必要があります。
SDKラッパーの使用
SDKラッパーを使用してクロス言語トランスフォームを使用するには、SDKラッパーのモジュールをインポートし、例に示すようにパイプラインから呼び出します。
from apache_beam.io.kafka import ReadFromKafka
kafka_records = (
pipeline
| 'ReadFromKafka' >> ReadFromKafka(
consumer_config={
'bootstrap.servers': self.bootstrap_servers,
'auto.offset.reset': 'earliest'
},
topics=[self.topic],
max_num_records=max_num_records,
expansion_service=<Address of expansion service>))
ExternalTransformクラスの使用
SDK固有のラッパーが利用できない場合、ExternalTransformクラスを介して多言語変換にアクセスする必要があります。
ローカルマシンにランタイム環境の依存関係(JREなど)がインストールされていることを確認してください。詳細については、拡張サービスのセクションを参照してください。
使用しようとしている変換の言語のSDKに対して、拡張サービスが利用できない場合は、拡張サービスを起動してください。Pythonは、JavaJarExpansionServiceやBeamJarExpansionServiceなど、拡張サービスとして直接渡すことができる、拡張Javaサービスを自動的に開始するためのいくつかのクラスを提供しています。使用しようとしている変換が利用可能であり、拡張サービスで使用できることを確認してください。
Javaの場合、変換のビルダーとレジストラーが拡張サービスのクラスパスにあることを確認してください。
パイプラインのインスタンス化時に
ExternalTransformを含めてください。URN、ペイロード、および拡張サービスを参照してください。利用可能なPayloadBuilderクラスのいずれかを使用して、ExternalTransformのペイロードを構築できます。with pipeline as p: res = ( p | beam.Create(['a', 'b']).with_output_types(unicode) | beam.ExternalTransform( TEST_PREFIX_URN, ImplicitSchemaPayloadBuilder({'data': '0'}), <expansion service>)) assert_that(res, equal_to(['0a', '0b']))追加の例については、addprefix.pyとjavacount.pyを参照してください。
ジョブがBeamランナーに送信された後、手動で開始した拡張サービスをすべて、拡張サービスのプロセスを終了することでシャットダウンしてください。
JavaExternalTransformクラスの使用
Pythonは、プロキシオブジェクトを介して、Javaで定義された変換をPython変換であるかのように呼び出すことができます。これらは次のように呼び出されます。
```py
MyJavaTransform = beam.JavaExternalTransform('fully.qualified.ClassName', classpath=[jars])
with pipeline as p:
res = (
p
| beam.Create(['a', 'b']).with_output_types(unicode)
| MyJavaTransform(javaConstructorArg, ...).builderMethod(...)
assert_that(res, equal_to(['0a', '0b']))
```
Javaのメソッド名がPythonの予約語(例:from)の場合、Pythonのgetattrメソッドを使用できます。
他の外部変換と同様に、事前に開始された拡張サービスを提供するか、変換、その依存関係、およびBeamの拡張サービスを含むjarファイルを提供できます。その場合、拡張サービスが自動的に開始されます。
13.2.3. Goパイプラインでの複数言語変換の使用
多言語変換用のGo固有のラッパーが利用可能な場合は、それを使用してください。そうでない場合は、下位レベルのCrossLanguage関数を使用して変換にアクセスする必要があります。
拡張サービス
Go SDKは、拡張アドレスが提供されていない場合、Java拡張サービスの自動起動をサポートしていますが、これは永続的な拡張サービスを提供するよりも遅くなります。多くのラップされたJava変換はこれを自動的に管理します。手動で行う場合は、xlangxパッケージのUseAutomatedJavaExpansionService()関数を使用します。Pythonの多言語変換を使用するには、ローカルマシンで必要な拡張サービスを手動で開始し、パイプライン構築中にコードからアクセスできるようにする必要があります。
SDKラッパーの使用
SDKラッパーを介して多言語変換を使用するには、SDKラッパーのパッケージをインポートし、例に示されているようにパイプラインから呼び出します。
import (
"github.com/apache/beam/sdks/v2/go/pkg/beam/io/xlang/kafkaio"
)
// Kafka Read using previously defined values.
kafkaRecords := kafkaio.Read(
s,
expansionAddr, // Address of expansion service.
bootstrapAddr,
[]string{topicName},
kafkaio.MaxNumRecords(numRecords),
kafkaio.ConsumerConfigs(map[string]string{"auto.offset.reset": "earliest"}))
CrossLanguage関数の使用
SDK固有のラッパーが利用できない場合、beam.CrossLanguage関数を使用して多言語変換にアクセスする必要があります。
適切な拡張サービスが実行されていることを確認してください。詳細については、拡張サービスのセクションを参照してください。
使用しようとしている変換が利用可能であり、拡張サービスで使用できることを確認してください。詳細については、多言語変換の作成を参照してください。
パイプラインで適切に
beam.CrossLanguage関数を使用してください。URN、拡張サービスアドレスを参照し、入力と出力を定義します。ペイロードのエンコードにはbeam.CrossLanguagePayload関数を使用できます。beam.UnnamedInputとbeam.UnnamedOutput関数は、名前のない単一入力/出力のショートカットとして使用するか、名前付き入力/出力のマップを定義できます。type prefixPayload struct { Data string `beam:"data"` } urn := "beam:transforms:xlang:test:prefix" payload := beam.CrossLanguagePayload(prefixPayload{Data: prefix}) expansionAddr := "localhost:8097" outT := beam.UnnamedOutput(typex.New(reflectx.String)) res := beam.CrossLanguage(s, urn, payload, expansionAddr, beam.UnnamedInput(inputPCol), outT)ジョブがBeamランナーに送信された後、拡張サービスのプロセスを終了することで拡張サービスをシャットダウンしてください。
13.2.4. Typescriptパイプラインでの複数言語変換の使用
多言語パイプラインのTypeScriptラッパーの使用は、依存関係(最新のPythonインタープリターやJava JREなど)が利用可能であれば、他の変換の使用と同様です。たとえば、ほとんどのTypeScript IOは、他の言語からのBeam変換を単にラップしたものです。
ラッパーがまだ利用できない場合は、apache_beam.transforms.external.rawExternalTransform を使用して明示的に使用できます。これは、`urn`(変換を識別する文字列)、`payload`(変換をパラメーター化するバイナリまたはJSONオブジェクト)、および`expansionService`(事前に開始されたサービスのアドレス、または自動的に開始された拡張サービスオブジェクトを返す呼び出し可能なオブジェクトのいずれか)を取ります。
たとえば、次のように記述できます。
pcoll.applyAsync(
rawExternalTransform(
"beam:registered:urn",
{arg: value},
"localhost:expansion_service_port"
)
);
pcollには、SchemaCoderなどの多言語対応のコーダーが必要です。これは、withCoderInternalまたはwithRowCoder変換を使用して確認できます。
const result = pcoll.apply(
beam.withRowCoder({ intFieldName: 0, stringFieldName: "" })
);
推論できない場合は、出力にもコーダーを指定できます。
さらに、pythonTransformなどのユーティリティにより、特定の言語からの変換を簡単に呼び出すことができます。
const result: PCollection<number> = await pcoll
.apply(
beam.withName("UpdateCoder1", beam.withRowCoder({ a: 0, b: 0 }))
)
.applyAsync(
pythonTransform(
// Fully qualified name
"apache_beam.transforms.Map",
// Positional arguments
[pythonCallable("lambda x: x.a + x.b")],
// Keyword arguments
{},
// Output type if it cannot be inferred
{ requestedOutputCoders: { output: new VarIntCoder() } }
)
);
多言語変換はインラインで定義することもできます。これは、呼び出し元のSDKでは利用できない機能やライブラリにアクセスする場合に役立ちます。
const result: PCollection<string> = await pcoll
.apply(withCoderInternal(new StrUtf8Coder()))
.applyAsync(
pythonTransform(
// Define an arbitrary transform from a callable.
"__callable__",
[
pythonCallable(`
def apply(pcoll, prefix, postfix):
return pcoll | beam.Map(lambda s: prefix + s + postfix)
`),
],
// Keyword arguments to pass above, if any.
{ prefix: "x", postfix: "y" },
// Output type if it cannot be inferred
{ requestedOutputCoders: { output: new StrUtf8Coder() } }
)
);
13.3. ランナーのサポート
現在、Flink、Spark、Directランナーなどのポータブルランナーは、多言語パイプラインで使用できます。
Dataflowは、Dataflowランナーv2バックエンドアーキテクチャを介して多言語パイプラインをサポートしています。
13.4. ヒントとトラブルシューティング
追加のヒントとトラブルシューティング情報については、こちらを参照してください。
14. バッチ処理DoFns
バッチDoFnは現在、Pythonのみの機能です。
バッチDoFnを使用すると、複数の論理要素のバッチを処理する、モジュール式で構成可能なコンポーネントを作成できます。これらのDoFnは、効率のためにデータのバッチを処理するNumPy、SciPy、Pandasなどのベクトル化されたPythonライブラリを活用できます。
14.1. 基本
バッチDoFnは現在、Pythonのみの機能です。
単純なバッチDoFnは次のようになります。
class MultiplyByTwo(beam.DoFn):
# Type
def process_batch(self, batch: np.ndarray) -> Iterator[np.ndarray]:
yield batch * 2
# Declare what the element-wise output type is
def infer_output_type(self, input_element_type):
return input_element_typeこのDoFnは、個々の要素を処理するBeamパイプラインで使用できます。Beamは、暗黙的に要素をバッファリングし、入力側でNumPy配列を作成し、出力側ではNumPy配列を個々の要素に分割します。
(p | beam.Create([1, 2, 3, 4]).with_output_types(np.int64)
| beam.ParDo(MultiplyByTwo()) # Implicit buffering and batch creation
| beam.Map(lambda x: x/3)) # Implicit batch explosionbeam.Createの出力の要素ごとの型ヒントを設定するために、PTransform.with_output_typesを使用していることに注意してください。その後、MultiplyByTwoがこのPCollectionに適用されると、Beamはnp.ndarrayがnp.int64要素と組み合わせて使用できる許容されるバッチ型であることを認識します。このガイドではこのようなNumPyの型ヒントを頻繁に使用しますが、Beamは他のライブラリの型ヒントもサポートしています。サポートされているバッチ型を参照してください。
前の例では、Beamは入力と出力の境界でバッチを暗黙的に作成および分割します。ただし、同等の型のバッチDoFnが連鎖されている場合、このバッチの作成と分割は省略されます。バッチはそのまま渡されます!これにより、バッチを処理する変換を効率的に構成することがはるかに簡単になります。
(p | beam.Create([1, 2, 3, 4]).with_output_types(np.int64)
| beam.ParDo(MultiplyByTwo()) # Implicit buffering and batch creation
| beam.ParDo(MultiplyByTwo()) # Batches passed through
| beam.ParDo(MultiplyByTwo()))14.2. 要素ごとのフォールバック
バッチDoFnは現在、Pythonのみの機能です。
DoFnによっては、目的のロジックのバッチ実装と要素ごとの実装の両方を提供できる場合があります。これは、processとprocess_batchの両方を定義するだけで実行できます。
class MultiplyByTwo(beam.DoFn):
def process(self, element: np.int64) -> Iterator[np.int64]:
# Multiply an individual int64 by 2
yield element * 2
def process_batch(self, batch: np.ndarray) -> Iterator[np.ndarray]:
# Multiply a _batch_ of int64s by 2
yield batch * 2このDoFnを実行すると、Beamはコンテキストに応じて使用する最適な実装を選択します。一般的に、DoFnへの入力が既にバッチ化されている場合、Beamはバッチ実装を使用します。そうでない場合は、processメソッドで定義された要素ごとの実装を使用します。
この場合、infer_output_typeを定義する必要がないことに注意してください。これは、Beamがprocessの型ヒントから出力型を取得できるためです。
14.3. バッチ生成とバッチ消費
バッチDoFnは現在、Pythonのみの機能です。
慣例により、Beamは、バッチ化された入力を消費するprocess_batchメソッドもバッチ化された出力を生成すると想定しています。同様に、Beamはprocessメソッドが個々の要素を生成すると想定しています。これは、@beam.DoFn.yields_elementsおよび@beam.DoFn.yields_batchesデコレータを使用してオーバーライドできます。例:
# Consumes elements, produces batches
class ReadFromFile(beam.DoFn):
@beam.DoFn.yields_batches
def process(self, path: str) -> Iterator[np.ndarray]:
...
yield array
# Declare what the element-wise output type is
def infer_output_type(self):
return np.int64
# Consumes batches, produces elements
class WriteToFile(beam.DoFn):
@beam.DoFn.yields_elements
def process_batch(self, batch: np.ndarray) -> Iterator[str]:
...
yield output_path14.4. サポートされるバッチの種類
バッチDoFnは現在、Pythonのみの機能です。
このガイドでは、バッチDoFnの実装でNumPy型(要素型ヒントとしてnp.int64、対応するバッチ型ヒントとしてnp.ndarray)を使用しましたが、Beamは他のライブラリの型ヒントもサポートしています。
NumPy
| 要素型ヒント | バッチ型ヒント |
|---|---|
数値型(int、np.int32、boolなど) | np.ndarray(またはNumpyArray) |
Pandas
| 要素型ヒント | バッチ型ヒント |
|---|---|
数値型(int、np.int32、boolなど) | pd.Series |
bytes | |
任意 | |
| Beamスキーマ型 | pd.DataFrame |
PyArrow
| 要素型ヒント | バッチ型ヒント |
|---|---|
数値型(int、np.int32、boolなど) | pd.Series |
任意 | |
List | |
マッピング | |
| Beamスキーマ型 | pa.Table |
その他の型?
バッチDoFnで使用したい他のバッチ型がある場合は、問題を報告してください。
14.5. 動的バッチ入出力型
バッチDoFnは現在、Pythonのみの機能です。
一部のバッチDoFnでは、processおよび/またはprocess_batchの型ヒントを使用してバッチ型を静的に宣言するだけでは不十分な場合があります。これらの型を動的に宣言する必要がある場合があります。これは、DoFnでget_input_batch_typeメソッドとget_output_batch_typeメソッドをオーバーライドすることで実行できます。
# Utilize Beam's parameterized NumpyArray typehint
from apache_beam.typehints.batch import NumpyArray
class MultipyByTwo(beam.DoFn):
# No typehints needed
def process_batch(self, batch):
yield batch * 2
def get_input_batch_type(self, input_element_type):
return NumpyArray[input_element_type]
def get_output_batch_type(self, input_element_type):
return NumpyArray[input_element_type]
def infer_output_type(self, input_element_type):
return input_element_type14.6. バッチとイベント時間セマンティクス
バッチDoFnは現在、Pythonのみの機能です。
現在、バッチには、バッチ内のすべての論理要素に適用される単一のタイミング情報(イベント時間、ウィンドウなど)が必要です。複数のタイムスタンプにまたがるバッチを作成するメカニズムは現在ありません。ただし、バッチDoFnの実装でこのタイミング情報を取得することは可能です。この情報は、従来のDoFn.*Param属性を使用してアクセスできます。
class RetrieveTimingDoFn(beam.DoFn):
def process_batch(
self,
batch: np.ndarray,
timestamp=beam.DoFn.TimestampParam,
pane_info=beam.DoFn.PaneInfoParam,
) -> Iterator[np.ndarray]:
...
def infer_output_type(self, input_type):
return input_type15. 変換サービス
Apache Beam SDKバージョン2.49.0以降には、Docker Composeサービスである「変換サービス」が含まれています。
次の図は、変換サービスの基本アーキテクチャを示しています。(図は原文に含まれていないため、翻訳できません)
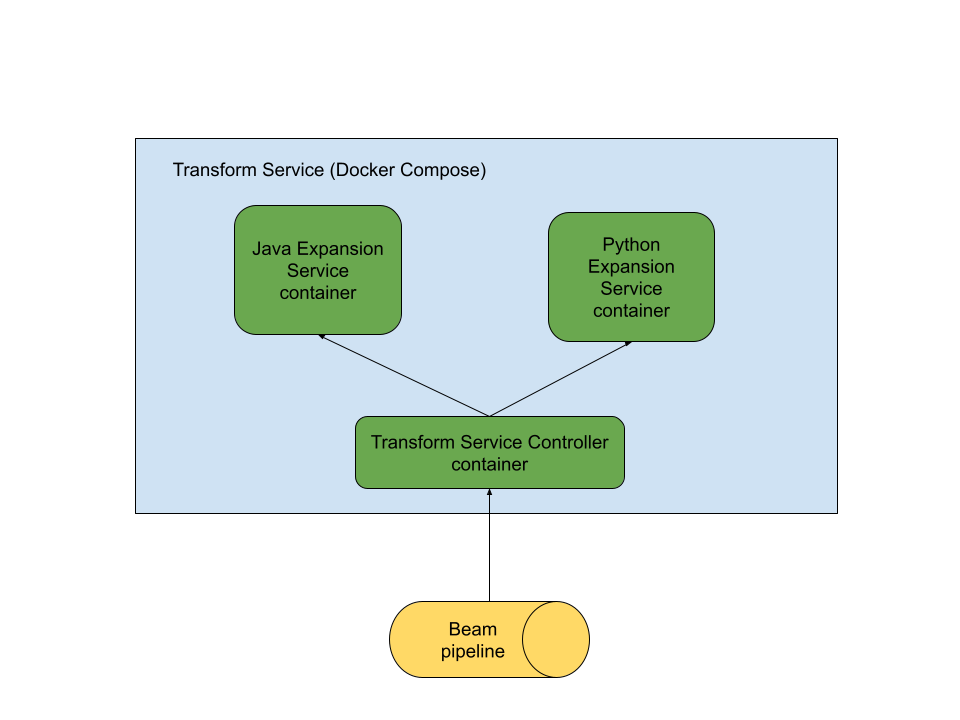
変換サービスを使用するには、サービスを開始するマシンでDockerが利用可能である必要があります。
変換サービスには、いくつかの主要なユースケースがあります。
15.1. 変換サービスを使用した変換のアップグレード
変換サービスは、パイプラインのBeamバージョンを変更せずに、Beamパイプラインで使用されるサポートされている個々の変換のBeam SDKバージョンをアップグレード(またはダウングレード)するために使用できます。この機能は、現在Beam Java SDK 2.53.0以降でのみ利用可能です。現在、アップグレード可能な変換は次のとおりです。
- BigQuery読み取り変換(URN:beam:transform:org.apache.beam:bigquery_read:v1)
- BigQuery書き込み変換(URN:beam:transform:org.apache.beam:bigquery_write:v1)
- Kafka読み取り変換(URN:beam:transform:org.apache.beam:kafka_read_with_metadata:v2)
- Kafka書き込み変換(URN:beam:transform:org.apache.beam:kafka_write:v2)
この機能を使用するには、アップグレードする変換のURNと、変換をアップグレードするBeamバージョンを指定する追加のパイプラインオプションを含むJavaパイプラインを実行するだけです。一致するURNを持つパイプライン内のすべての変換がアップグレードされます。
たとえば、Beam 2.53.0を使用するパイプライン実行のBigQuery読み取り変換を将来のBeamバージョン2.xy.zにアップグレードするには、次の追加パイプラインオプションを指定できます。
--transformsToOverride=beam:transform:org.apache.beam:bigquery_read:v1 --transformServiceBeamVersion=2.xy.zThis feature is currently not available for Python SDK.This feature is currently not available for Go SDK.フレームワークは、関連するDockerコンテナを自動的にダウンロードし、変換サービスを自動的に起動することに注意してください。
この機能を使用してBigQueryの読み書きトランスフォームをアップグレードする完全な例については、こちらをご覧ください。
15.2. 多言語パイプラインのための変換サービスの使用
Transformサービスは、Beam拡張APIを実装しています。これにより、Beamマルチ言語パイプラインは、Transformサービス内で利用可能なトランスフォームを展開する際に、Transformサービスを使用できます。ここでの主な利点は、マルチ言語パイプラインが追加の言語ランタイムのサポートをインストールせずに動作できることです。たとえば、`KafkaIO`などのJavaトランスフォームを使用するBeam Pythonパイプラインは、システムでDockerが利用可能な限り、ジョブ提出時にローカルにJavaをインストールせずに動作できます。
場合によっては、Apache Beam SDKがTransformサービスを自動的に起動することがあります。
Javaの`PythonExternalTransform` APIは、Pythonランタイムがローカルで利用できないがDockerが利用可能な場合、Transformサービスを自動的に起動します。
Javaトランスフォームを使用しており、Javaランタイムがローカルで利用できないが、Dockerがローカルで利用可能な場合、Apache Beam Pythonマルチ言語ラッパーはTransformサービスを自動的に起動することがあります。
Beamユーザーは、手動でTransformサービスを起動し、それをマルチ言語パイプラインで使用される拡張サービスとして使用することもできます。
15.3. 変換サービスの手動起動
Beam Transformサービスインスタンスは、Apache Beam SDKに付属のユーティリティを使用して手動で起動できます。
java -jar beam-sdks-java-transform-service-app-<Beam version for the jar>.jar --port <port> --beam_version <Beam version for the transform service> --project_name <a unique ID for the transform service> --command uppython -m apache_beam.utils.transform_service_launcher --port <port> --beam_version <Beam version for the transform service> --project_name <a unique ID for the transform service> --command upThis feature is currently in development.Transformサービスを停止するには、次のコマンドを使用します。
java -jar beam-sdks-java-transform-service-app-<Beam version for the jar>.jar --port <port> --beam_version <Beam version for the transform service> --project_name <a unique ID for the transform service> --command downpython -m apache_beam.utils.transform_service_launcher --port <port> --beam_version <Beam version for the transform service> --project_name <a unique ID for the transform service> --command downThis feature is currently in development.15.4. 変換サービスに含まれるポータブル変換
Beam Transformサービスには、Apache Beam JavaおよびPython SDKに実装された多くのトランスフォームが含まれています。
現在、Transformサービスには次のトランスフォームが含まれています。
Javaトランスフォーム:Google Cloud I/Oコネクタ、Kafka I/Oコネクタ、JDBC I/Oコネクタ
Pythonトランスフォーム:Apache Beam Python SDKに実装されているすべてのポータブルトランスフォーム(RunInferenceやDataFrameトランスフォームなど)。
利用可能なトランスフォームのより包括的なリストについては、Transformサービス開発者ガイドを参照してください。
最終更新日:2024年10月31日
お探しの情報はすべて見つかりましたか?
すべて役立ち、分かりやすかったですか?変更して欲しい点があれば教えてください!