


ワークフローオーケストレーション
このページでは、KFPとTFXのオーケストレーションの例を示します。最初にKFPの例を示し、次にTFXがKFPを使用する場合に手動で定義される機能をどのように管理するかを示します。
Beam DAGの理解
Apache Beamは、バッチとストリーミングの両方のデータ並列処理パイプラインを定義するためのオープンソースの統一モデルです。Apache Beamプログラミングモデルの中心的な概念は、Directed Acyclic Graph(DAG)です。各Apache Beamパイプラインは、選択したプログラミング言語(サポートされているApache Beam SDKのセットから)でBeam SDKを使用して構築できるDAGです。このDAGの各ノードは、データのコレクション(PCollection)を入力として受け取り、変換されたデータのコレクション(PCollection)を出力する処理ステップ(PTransform)を表します。エッジは、データがパイプラインを介して1つの処理ステップから別の処理ステップにどのように流れるかを定義します。次の図は、パイプラインワークフローの例を示しています。

パイプラインと対応するDAGを定義しても、データがパイプラインを流れ始めるわけではありません。パイプラインを実行するには、サポートされているBeamランナーの1つにデプロイする必要があります。これらの分散処理バックエンドには、Apache Flink、Apache Spark、Google Cloud Dataflowなどがあります。開発およびデバッグ目的でローカルマシンでパイプラインを実行するには、Direct Runnerも提供されています。ランナー機能マトリックスを参照して、選択したランナーがパイプラインで定義されているデータ処理ステップをサポートしていることを確認してください(特にDirect Runnerを使用する場合)。
オーケストレーションフレームワーク
機械学習プロジェクトの成功した提供には、モデルのトレーニング以上のものが必要です。完全なMLワークフローには、多くの場合、データの取り込み、データの検証、データの前処理、モデルの評価、モデルのデプロイ、データドリフトの検出など、その他の一連のステップが含まれます。さらに、重要な質問(例:
- このモデルはどのようなデータとトレーニングパラメーターでトレーニングされましたか?
- このモデルはいつデプロイされ、テストデータセットでの精度はどのくらいでしたか?この知識がなければ、ソリューションの規模が大きくなるにつれて、トラブルシューティング、監視、およびMLソリューションの改善がますます困難になります。
ソリューション:MLOps。MLOpsは、機械学習システムの開発と保守をシームレスかつ効率的に行うためのベストプラクティスとガイドラインを記述するために使用される包括的な用語です。MLOpsは、多くの場合、モデルとデータのライフサイクル全体で機械学習ワークフローを自動化することを意味します。これらのワークフローDAGを作成するための一般的なフレームワークは、Kubeflow Pipelines、Apache Airflow、およびTFXです。
Apache Beamパイプラインをスタンドアロンのデータ処理ジョブとして使用することも、ワークフロー内のより大きなステップシーケンスの一部にすることもできます。後者の場合、Apache Beam DAGは、ワークフローオーケストレータによって構成される上位のDAGの1つのノードになります。したがって、このワークフローには、次の図に示すように、DAG内にDAGが含まれています。

Apache Beam DAGとオーケストレーションDAGの主な違いは、Apache Beam DAGはデータを処理し、そのデータをDAGのノード間で渡すのに対し、オーケストレーションDAGはワークフローのステップをスケジュールおよび監視し、実行パラメーター、メタデータ、およびアーティファクトをDAGのノード間で渡すことです。
- Apache Beamは、並列化とバッチジョブとストリーミングジョブの両方を有効にすることに重点を置いています。
- オーケストレーションDAGアーティファクトの例としては、トレーニング済みのモデルとデータセットがあります。このようなアーティファクトは、多くの場合、値ではなく参照URIによって渡されます。
注:TFXはワークフローDAGを作成しますが、実行するには独自のオーケストレータが必要です。TFXでネイティブにサポートされているオーケストレータは、Airflow、Kubeflow Pipelines、およびApache Beam自体です。TFXドキュメントで説明されているように
「いくつかのTFXコンポーネントは、分散データ処理にBeamに依存しています。さらに、TFXはApache Beamを使用してパイプラインDAGをオーケストレーションおよび実行できます。Beamオーケストレータは、コンポーネントのデータ処理に使用されるものとは異なるBeamRunnerを使用します。」
注意点:Beamオーケストレータは、本番環境で使用されるTFXオーケストレータを意図したものではありません。これは単に、AirflowやKubeflowに必要な追加の設定を行うことなく、BeamのDirect RunnerでローカルにTFXパイプラインをデバッグできるようにするものです。
前処理の例
このセクションでは、Kubeflow Pipelines(KFP)とTensorflow Extended(TFX)の2つのオーケストレーションされたMLワークフローについて説明します。これら2つのフレームワークはどちらもワークフローを作成しますが、それぞれに独自の利点と欠点があります。
- KFPでは、ワークフローコンポーネントをゼロから作成する必要があり、ユーザーがコンポーネント間で、どのような方法でアーティファクトを渡す必要があるかを明示的に示す必要があります。
- TFXは、多くの事前構築済みコンポーネントを提供し、アーティファクトの受け渡しをより暗黙的に処理します。2つのフレームワークの選択にあたっては、柔軟性とプログラミングのオーバーヘッドのトレードオフを考慮する必要があります。
簡略化のため、ワークフローにはデータ取り込み、データ前処理、モデルトレーニングの3つのコンポーネントのみが含まれています。シナリオに応じて、モデル評価やモデルデプロイなど、さまざまな追加コンポーネントを追加できます。この例では、MLデータの効率的で並列的な処理のためにApache BeamをMLワークフローでどのように使用するかを示すため、前処理コンポーネントに焦点を当てています。
データセットは、画像とその内容を記述するテキストキャプションのペアで構成されています。MSCOCO 2014データセットのキャプションサブセットから取得されたペアです。このマルチモーダルデータ(画像とテキスト)により、両方のモダリティの前処理操作を試行する機会が得られます。
Kubeflow pipelines (KFP)
KFPでMLワークフローを実行するには、3つの手順を実行する必要があります。
- コンポーネントのインターフェースを指定し、コンポーネントロジックの実装を記述してコンテナ化することにより、KFPコンポーネントを作成します。
- 作成したコンポーネントを接続し、コンポーネント間で入出力データがどのように渡されるかを指定し、パイプライン定義を完全なパイプライン定義にコンパイルすることにより、KFPパイプラインを作成します。
- KFPクライアントエンドポイントに送信することにより、KFPパイプラインを実行します。
完全なサンプルコードは、GitHubリポジトリにあります。
KFPコンポーネントの作成
次の図は、ターゲットファイル構造を示しています。
    kfp
    ├── pipeline.py
    ├── components
    │   ├── ingestion
    │   │   ├── Dockerfile
    │   │   ├── component.yaml
    │   │   ├── requirements.txt
    │   │   └── src
    │   │       └── ingest.py
    │   ├── preprocessing
    │   │   ├── Dockerfile
    │   │   ├── component.yaml
    │   │   ├── requirements.txt
    │   │   └── src
    │   │       └── preprocess.py
    │   └── train
    │       ├── Dockerfile
    │       ├── component.yaml
    │       ├── requirements.txt
    │       └── src
    │           └── train.py
    └── requirements.txt
完全な前処理コンポーネントの仕様は、次の図に示されています。入力は、取り込みコンポーネントによって取り込まれたデータセットが保存されたパスと、コンポーネントがアーティファクトを保存できるディレクトリのパスです。さらに、いくつかの入力は、Apache Beamパイプラインがどのように、どこに実行されるかを指定します。取り込みコンポーネントとトレーニングコンポーネントの仕様は同様であり、ingestion component.yamlファイルとtrain component.yamlファイルにあります。
注:v2はまだベータ版であるため、KFP v1 SDKを使用しています。v2 SDKでは、入出力アーティファクトに対するよりネイティブなサポートにより、コンポーネントインターフェースを指定するための新しいオプションがいくつか導入されています。v1からv2へのコンポーネントの移行方法については、KFPドキュメントを参照してください。
name: preprocessing
description: Component that mimicks scraping data from the web and outputs it to a jsonlines format file
inputs:
  - name: ingested_dataset_path
    description: source uri of the data to scrape
    type: String
  - name: base_artifact_path
    description: base path to store data
    type: String
  - name: gcp_project_id
    description: ID for the google cloud project to deploy the pipeline to.
    type: String
  - name: region
    description: Region in which to deploy the Dataflow pipeline.
    type: String
  - name: dataflow_staging_root
    description: Path to staging directory for the dataflow runner.
    type: String
  - name: beam_runner
    description: Beam runner, DataflowRunner or DirectRunner.
    type: String
outputs:
  - name: preprocessed_dataset_path
    description: target uri for the ingested dataset
    type: String
implementation:
  container:
    image: <your-docker-registry/preprocessing-image-name:latest>
    command: [
      python3,
      preprocess.py,
      --ingested-dataset-path,
      {inputValue: ingested_dataset_path},
      --base-artifact-path,
      {inputValue: base_artifact_path},
      --preprocessed-dataset-path,
      {outputPath: preprocessed_dataset_path},
      --gcp-project-id,
      {inputValue: gcp_project_id},
      --region,
      {inputValue: region},
      --dataflow-staging-root,
      {inputValue: dataflow_staging_root},
      --beam-runner,
      {inputValue: beam_runner},
    ]
この場合、各コンポーネントは同一のDockerfileを共有しますが、必要に応じてコンポーネント固有の依存関係を追加できます。
FROM python:3.9-slim

# (Optional) install extra dependencies

# install pypi dependencies
COPY requirements.txt /
RUN python3 -m pip install --no-cache-dir -r requirements.txt

# copy src files and set working directory
COPY src /src
WORKDIR /src
コンポーネントの仕様とコンテナ化が完了したら、前処理コンポーネントを実装します。
KFPは入出力引数をコマンドライン引数として提供するため、argumentparserが必要です。
def parse_args():
  """Parse preprocessing arguments."""
  parser = argparse.ArgumentParser()
  parser.add_argument(
      "--ingested-dataset-path",
      type=str,
      help="Path to the ingested dataset",
      required=True)
  parser.add_argument(
      "--preprocessed-dataset-path",
      type=str,
      help="The target directory for the ingested dataset.",
      required=True)
  parser.add_argument(
      "--base-artifact-path",
      type=str,
      help="Base path to store pipeline artifacts.",
      required=True)
  parser.add_argument(
      "--gcp-project-id",
      type=str,
      help="ID for the google cloud project to deploy the pipeline to.",
      required=True)
  parser.add_argument(
      "--region",
      type=str,
      help="Region in which to deploy the pipeline.",
      required=True)
  parser.add_argument(
      "--dataflow-staging-root",
      type=str,
      help="Path to staging directory for dataflow.",
      required=True)
  parser.add_argument(
      "--beam-runner",
      type=str,
      help="Beam runner: DataflowRunner or DirectRunner.",
      default="DirectRunner")

return parser.parse_args()preprocess_dataset関数の実装には、Apache Beamパイプラインコードと、ランナーを選択するBeamパイプラインオプションが含まれています。実行される前処理には、URLから画像バイトをダウンロードし、Torchテンソルに変換し、目的のサイズにリサイズすることが含まれます。キャプションは、モデルに均一な画像説明が提供されるように、一連の文字列操作が行われます。トークン化はここでは行いませんが、語彙がわかっていればここで含めることができます。最後に、各要素はシリアル化され、Avroファイルに書き込まれます。TFRecordsなどの代替ファイル形式を使用できます。
# We use the save_main_session option because one or more DoFn's in this
# workflow rely on global context (e.g., a module imported at module level).
pipeline_options = PipelineOptions(
    runner=beam_runner,
    project=gcp_project_id,
    job_name=f'preprocessing-{int(time.time())}',
    temp_location=dataflow_staging_root,
    region=region,
    requirements_file="/requirements.txt",
    save_main_session=True,
)

with beam.Pipeline(options=pipeline_options) as pipeline:
  (
      pipeline
      | "Read input jsonlines file" >>
      beam.io.ReadFromText(ingested_dataset_path)
      | "Load json" >> beam.Map(json.loads)
      | "Filter licenses" >> beam.Filter(valid_license)
      | "Download image from URL" >> beam.FlatMap(download_image_from_url)
      | "Resize image" >> beam.Map(resize_image, size=IMAGE_SIZE)
      | "Clean Text" >> beam.Map(clean_text)
      | "Serialize Example" >> beam.Map(serialize_example)
      | "Write to Avro files" >> beam.io.WriteToAvro(
          file_path_prefix=target_path,
          schema={
              "namespace": "preprocessing.example",
              "type": "record",
              "name": "Sample",
              "fields": [{
                  "name": "id", "type": "int"
              }, {
                  "name": "caption", "type": "string"
              }, {
                  "name": "image", "type": "bytes"
              }]
          },
file_name_suffix=".avro"))また、コンポーネントのI/Oを実行するために必要なコードも含まれています。まず、コンポーネント入力パラメータbase_artifact_pathとタイムスタンプに基づいて、前処理済みデータセットを保存するためのターゲットパスが構築されます。コンポーネントからの出力値はファイルとしてのみ返されるため、構築されたターゲットパスの値を、KFPによってコンポーネントに提供された出力ファイルに書き込みます。
timestamp = time.time()
target_path = f"{base_artifact_path}/preprocessing/preprocessed_dataset_{timestamp}"

# the directory where the output file is created may or may not exists
# so we have to create it.
Path(preprocessed_dataset_path).parent.mkdir(parents=True, exist_ok=True)
with open(preprocessed_dataset_path, 'w') as f:
  f.write(target_path)
Beamパイプラインをより大きなMLワークフローに統合する方法を示すために、主に前処理コンポーネントに関心があるため、このセクションでは、取り込みコンポーネントとトレーニングコンポーネントの実装を詳しく説明しません。それらの動作を模倣するダミーコンポーネントの実装は、完全なサンプルコードに提供されています。
パイプライン定義の作成
pipeline.pyはまず、作成されたコンポーネントをそれらの仕様.yamlファイルから読み込みます。
# load the kfp components from their yaml files
DataIngestOp = comp.load_component('components/ingestion/component.yaml')
DataPreprocessingOp = comp.load_component(
    'components/preprocessing/component.yaml')
TrainModelOp = comp.load_component('components/train/component.yaml')
その後、パイプラインが作成され、必要なコンポーネントの入出力は手動で指定されます。
@dsl.pipeline(
    pipeline_root=PIPELINE_ROOT,
    name="beam-preprocessing-kfp-example",
    description="Pipeline to show an apache beam preprocessing example in KFP")
def pipeline(
    gcp_project_id: str,
    region: str,
    component_artifact_root: str,
    dataflow_staging_root: str,
    beam_runner: str):
  """KFP pipeline definition.

  Args:
      gcp_project_id (str): ID for the google cloud project to deploy the pipeline to.
      region (str): Region in which to deploy the pipeline.
      component_artifact_root (str): Path to artifact repository where Kubeflow Pipelines
        components can store artifacts.
      dataflow_staging_root (str): Path to staging directory for the dataflow runner.
      beam_runner (str): Beam runner: DataflowRunner or DirectRunner.
  """

  ingest_data_task = DataIngestOp(base_artifact_path=component_artifact_root)

  data_preprocessing_task = DataPreprocessingOp(
      ingested_dataset_path=ingest_data_task.outputs["ingested_dataset_path"],
      base_artifact_path=component_artifact_root,
      gcp_project_id=gcp_project_id,
      region=region,
      dataflow_staging_root=dataflow_staging_root,
      beam_runner=beam_runner)

  train_model_task = TrainModelOp(
      preprocessed_dataset_path=data_preprocessing_task.
      outputs["preprocessed_dataset_path"],
base_artifact_path=component_artifact_root)最後に、定義されたパイプラインがコンパイルされ、pipeline.json仕様ファイルが生成されます。
Compiler().compile(pipeline_func=pipeline, package_path="pipeline.json")KFPパイプラインの実行
必要な要件をインストールして、次の仕様ファイルとスニペットを使用すると、パイプラインを実行できます。run_pipelineドキュメントを参照してください。パイプラインを実行する前に、各コンポーネントのコンテナをビルドし、パイプラインがアクセスできるコンテナレジストリにプッシュする必要があります。また、コンポーネント仕様.yamlファイルは、正しいコンテナイメージを指している必要があります。
client = kfp.Client()
experiment = client.create_experiment("KFP orchestration example")
run_result = client.run_pipeline(
    experiment_id=experiment.id,
    job_name="KFP orchestration job",
    pipeline_package_path="pipeline.json",
    params=run_arguments)
Tensorflow Extended (TFX)
TFXを使用する方法は、前述のKFPの方法と似ています。個々のワークフローコンポーネントを定義し、パイプラインオブジェクトに接続し、ターゲット環境でパイプラインを実行します。TFXを異なるものにするのは、ワークフローコンポーネントを作成するためのライブラリである一連のPythonパッケージを既に構築していることです。KFPの例とは異なり、コードを記述してコンテナ化することから始める必要はありません。
TFXを使用する場合は、ワークフローに関連するTFXコンポーネントを選択し、ライブラリを使用してその機能をユースケースに適応させる必要があります。次の図は、使用可能なコンポーネントとその対応するライブラリを示しています。
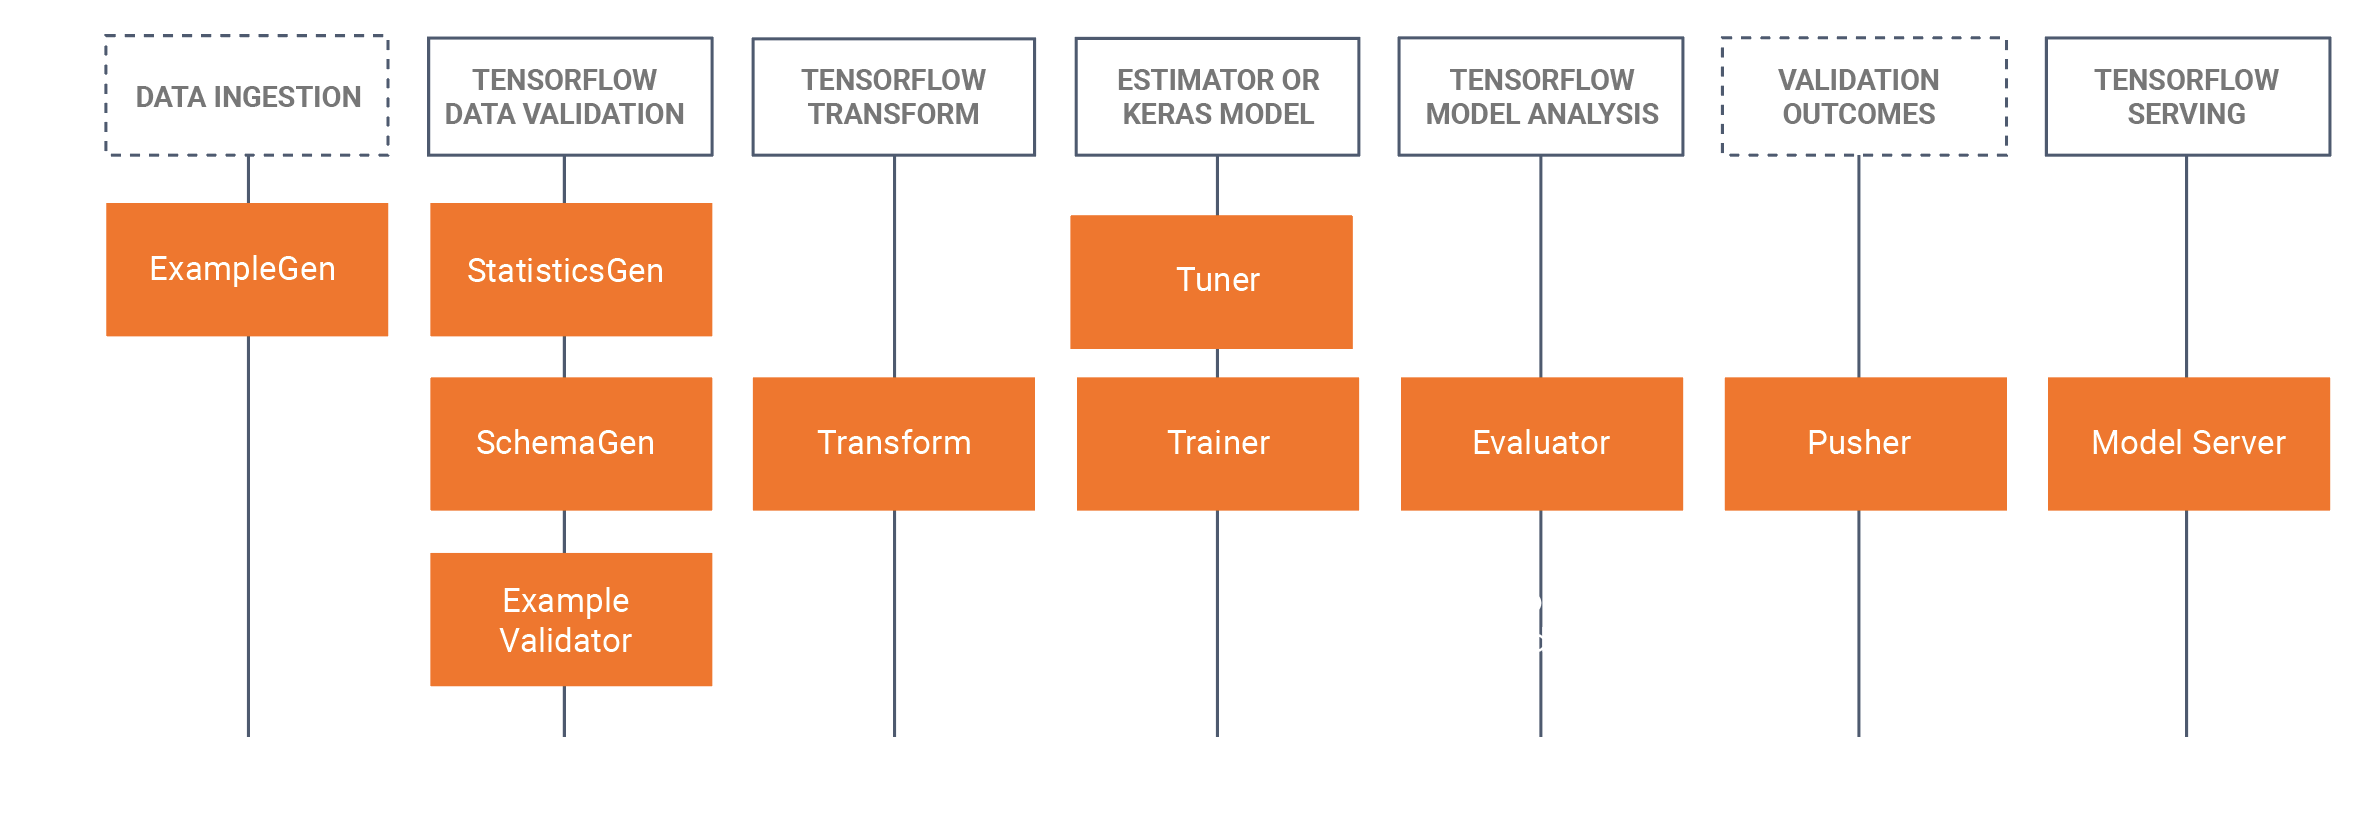
TFXは、これらのライブラリでデータ並列パイプラインを実装するためにApache Beamに大きく依存しています。これらのライブラリを使用して作成されたコンポーネントは、サポートされているApache Beamランナーのいずれかで実行する必要があります。完全なTFXサンプルコードは、GitHubリポジトリにあります。
KFPの例では、取り込み、前処理、トレーナーのコンポーネントを使用しました。このTFXの例では、ExampleGen、Transform、Trainerライブラリを使用します。
まず、パイプライン定義を確認します。この定義は、前の例と似ていることに注意してください。
def create_pipeline(
    gcp_project_id,
    region,
    pipeline_name,
    pipeline_root,
    csv_file,
    module_file,
    beam_runner,
    metadata_file):
  """Create the TFX pipeline.

  Args:
      gcp_project_id (str): ID for the google cloud project to deploy the pipeline to.
      region (str): Region in which to deploy the pipeline.
      pipeline_name (str): Name for the Beam pipeline
      pipeline_root (str): Path to artifact repository where TFX
        stores a pipeline’s artifacts.
      csv_file (str): Path to the csv input file.
      module_file (str): Path to module file containing the preprocessing_fn and run_fn.
      beam_runner (str): Beam runner: DataflowRunner or DirectRunner.
      metadata_file (str): Path to store a metadata file as a mock metadata database.
  """
  example_gen = tfx.components.CsvExampleGen(input_base=csv_file)

  # Computes statistics over data for visualization and example validation.
  statistics_gen = tfx.components.StatisticsGen(
      examples=example_gen.outputs['examples'])

  schema_gen = tfx.components.SchemaGen(
      statistics=statistics_gen.outputs['statistics'], infer_feature_shape=True)

  transform = tfx.components.Transform(
      examples=example_gen.outputs['examples'],
      schema=schema_gen.outputs['schema'],
      module_file=module_file)

  trainer = tfx.components.Trainer(
      module_file=module_file,
      examples=transform.outputs['transformed_examples'],
      transform_graph=transform.outputs['transform_graph'])

  components = [example_gen, statistics_gen, schema_gen, transform, trainer]

  beam_pipeline_args_by_runner = {
      'DirectRunner': [],
      'DataflowRunner': [
          '--runner=DataflowRunner',
          '--project=' + gcp_project_id,
          '--temp_location=' + os.path.join(pipeline_root, 'tmp'),
          '--region=' + region,
      ]
  }

  return tfx.dsl.Pipeline(
      pipeline_name=pipeline_name,
      pipeline_root=pipeline_root,
      components=components,
      enable_cache=True,
      metadata_connection_config=tfx.orchestration.metadata.
      sqlite_metadata_connection_config(metadata_file),
beam_pipeline_args=beam_pipeline_args_by_runner[beam_runner])同じデータ入力、つまりMSCOCO 2014データセットから抽出された画像とキャプションのペアを使用します。ただし、今回はExampleGenコンポーネントはデフォルトでjsonlinesをサポートしていないため、CSV形式のデータを使用します。すぐに使える形式は、TensorFlowドキュメントのデータソースと形式ページにリストされています。または、カスタムExampleGenを作成できます。
次のスニペットを入力データCSVファイルにコピーします。
image_id,id,caption,image_url,image_name,image_license
318556,255,"An angled view of a beautifully decorated bathroom.","http://farm4.staticflickr.com/3133/3378902101_3c9fa16b84_z.jpg","COCO_train2014_000000318556.jpg","Attribution-NonCommercial-ShareAlike License"
476220,14,"An empty kitchen with white and black appliances.","http://farm7.staticflickr.com/6173/6207941582_b69380c020_z.jpg","COCO_train2014_000000476220.jpg","Attribution-NonCommercial License"これまでのところ、標準のTFXコンポーネントをインポートし、それらをパイプラインにチェーン接続しただけです。TransformコンポーネントとTrainerコンポーネントの両方には、module_file引数が定義されています。そこで、これらの標準コンポーネントから必要な動作を定義します。
前処理
Transformコンポーネントは、module_fileでpreprocessing_fn関数の定義を検索します。この関数は、tf.transformライブラリの主要な概念です。TFXドキュメントでこの関数が説明されています。
前処理関数は、tf.Transformの最も重要な概念です。前処理関数は、データセットの変換の論理的な説明です。前処理関数は、テンソルの辞書を受け取り、返します。ここで、テンソルはTensorまたはSparseTensorを意味します。前処理関数を定義するために使用される関数は2種類あります。
- テンソルを受け取り、返す関数。これらは、生データを変換済みのデータに変換するTensorFlow演算をグラフに追加します。
- tf.Transformによって提供されるアナライザー。アナライザーもテンソルを受け取り、返しますが、TensorFlow関数とは異なり、グラフに演算を追加しません。代わりに、アナライザーは、tf.TransformにTensorFlowの外でフルパス演算を実行させます。それらは、出力として返される定数テンソルを生成するために、データセット全体で入力テンソルの値を使用します。たとえば、tft.minはデータセット全体でテンソルの最小値を計算します。tf.Transformは固定されたアナライザーセットを提供しますが、これは将来のバージョンで拡張されます。
したがって、preprocesing_fnには、テンソルを受け取り、返すすべてのtf演算と、特定のtf.transform演算を含めることができます。次の例では、前者を使い、入力されるすべてのキャプションを小文字のみに変換します。一方、後者では、後続の前処理ステップで使用されるキャプションの平均長を計算するために、データセット内のすべてのデータでフルパスを実行します。
def preprocessing_fn(inputs):
  """Transform raw data."""
  # convert the captions to lowercase
  # split the captions into separate words
  lower = tf.strings.lower(inputs['caption'])

  # compute the vocabulary of the captions during a full pass
  # over the dataset and use this to tokenize.
  mean_length = tft.mean(tf.strings.length(lower))
  # <do some preprocessing with the mean length>

  return {
      'caption_lower': lower,
  }
この関数は、前処理中に実行する必要がある論理的な手順のみを定義します。関数は実行可能になる前に、具体的な実装が必要です。このような実装の1つは、Apache Beamを使用するtf.Transformによって提供され、データ処理のためにPTransform tft_beam.AnalyzeAndTransformDatasetを提供します。このPTransformを明示的に使用して、TFX Transformコンポーネントの外でこのprocessing_fnをテストできます。tf.TransformをTFX Transformコンポーネントと組み合わせて使用する場合、このようにprocessing_fnを呼び出す必要はありません。
if __name__ == "__main__":
  # Test processing_fn directly without the tfx pipeline
  raw_data = [
      {
          "caption": "A bicycle replica with a clock as the front wheel."
      }, {
          "caption": "A black Honda motorcycle parked in front of a garage."
      }, {
          "caption": "A room with blue walls and a white sink and door."
      }
  ]

  # define the feature_spec (in a tfx pipeline this would be generated by a SchemaGen component)
  feature_spec = dict(caption=tf.io.FixedLenFeature([], tf.string))
  raw_data_metadata = tft.DatasetMetadata.from_feature_spec(feature_spec)

  # test out the beam implementation of the
  # processing_fn with AnalyzeAndTransformDataset
  with tft_beam.Context(temp_dir=tempfile.mkdtemp()):
    transformed_dataset, transform_fn = (
      (raw_data, raw_data_metadata)
      | tft_beam.AnalyzeAndTransformDataset(preprocessing_fn))
  transformed_data, transformed_metadata = transformed_dataset
トレーニング
TrainerコンポーネントはTransformコンポーネントのように動作しますが、preprocessing_fnを探す代わりに、指定されたmodule_fileでrun_fn関数を必要とします。単純な実装では、tf.Kerasを使用してスタブモデルを作成し、結果のモデルをディレクトリに保存します。
def run_fn(fn_args: tfx.components.FnArgs) -> None:
  """Build the TF model, train it and export it."""
  # create a model
  model = tf.keras.Sequential()
  model.add(tf.keras.layers.Dense(1, input_dim=10))
  model.compile()

  # train the model on the preprocessed data
  # model.fit(...)

  # Save model to fn_args.serving_model_dir.
  model.save(fn_args.serving_model_dir)
パイプラインの実行
パイプラインを起動するには、2つの構成を提供します。TFXパイプラインのオーケストレーターと、Apache Beamパイプラインを実行するためのパイプラインオプションです。追加のセットアップ依存関係なしにローカルでパイプラインを実行するために、この例ではオーケストレーションにLocalDagRunnerを使用しています。作成されたパイプラインは、beam_pipeline_args引数を使用してApache Beamのパイプラインオプションを指定できます。
args = parse_args()
tfx.orchestration.LocalDagRunner().run(create_pipeline(**vars(args)))
最終更新日:2024年10月31日
必要な情報は見つかりましたか?
すべて役に立ち、分かりやすかったですか?変更したい点があれば教えてください!